How to – Switch ViciDial from meetme to confbridge

Confbridge Update

How to – Switch ViciDial from meetme to confbridge

Ok, so as most of you probably know already, Asterisk is not going to be using meetMe anymore and they have set it to “End of life” so it will no longer get any updates. So what does this mean for Vicidial which uses MeetMe channels for all its sounds and communications? Well, there is another module called confbridge which can also handle these jobs and actually can do so better and has room for some more advanced features over time I’m sure. Ok so let’s start with the main issue a lot of people are going to have, really because they are scared more than anything, is confbridge needs at least Asterisk 16 to work so our first step is going to be to update Asterisk from 13 to 16. Make sure you are at the latest SVN which at the time of this article is 3636 by following this article.

Step 1 – Upgrade to Asterisk 16

ok so lets go ahead and install Asterisk 16 by following the steps below:

First you will need to follow this article on how to download, patch and compile Asterisk 16 or you can use the compile commands below:

./configure --libdir=/usr/lib64 --with-pjproject-bundled --with-jansson-bundled
rm -rf menuselect.makeopts
make menuselect*
**** Go down one to applications and hit enter, go down until you find the "meetme" app and press space bar, then hit "X" ****
make && make install
make uninstall
make install

We had to fix the Asterisk 16 install over Asterisk 13 by running “make uninstall” and then reinstalling as shown here:

Fixing Asterisk 16 install

Now we need to stop the current Asterisk 13 from running and start back up the new Asterisk 16.

asterisk -r
core restart now
/usr/share/astguiclient/start_asterisk_boot.pl
asterisk -r (make sure the version you see is 16)

Step 2 – Add new confbridge extensions

We need to edit extensions.conf and add some new conferences for confbridge to use so lets start by going into the asterisk directory:

cd /etc/asterisk
nano extensions.conf
paste the following at the bottom:

; --------------------------
; ConfBridge Extensions
; --------------------------

; use to send a agent channel into the conference
exten => _9600XXX,1,Answer()
exten => _9600XXX,n,Playback(sip-silence)
exten => _9600XXX,n,ConfBridge(${EXTEN},vici_agent_bridge,vici_customer_user)
exten => _9600XXX,n,Hangup()

;; used to send an customer channel into the conference
exten => _29600XXX,1,Answer()
exten => _29600XXX,n,Playback(sip-silence)
exten => _29600XXX,n,ConfBridge(${EXTEN:1},vici_agent_bridge,vici_agent_user)
exten => _29600XXX,n,Hangup()

;; used by an admin to enter the confernece
exten => _39600XXX,1,Answer()
exten => _39600XXX,n,Playback(sip-silence)
exten => _39600XXX,n,ConfBridge(${EXTEN:1},vici_agent_bridge,vici_admin_user)
exten => _39600XXX,n,Hangup()

;; used to monitor a conference
exten => _49600XXX,1,Answer()
exten => _49600XXX,n,Playback(sip-silence)
exten => _49600XXX,n,ConfBridge(${EXTEN:1},vici_agent_bridge,vici_monitor_user)
exten => _49600XXX,n,Hangup()

;; used to record into a conference
exten => _59600XXX,1,Answer()
exten => _59600XXX,n,Playback(sip-silence)
exten => _59600XXX,n,ConfBridge(${EXTEN:1},vici_agent_bridge,vici_recording_user)
exten => _59600XXX,n,Hangup()

;; used to barge a conference
exten => _69600XXX,1,Answer()
exten => _69600XXX,n,Playback(sip-silence)
exten => _69600XXX,n,ConfBridge(${EXTEN:1},vici_agent_bridge,vici_barge_user)
exten => _69600XXX,n,Hangup()

;; used to trigger DTMF tones in a conference
exten => _79600XXX,1,Answer()
exten => _79600XXX,n,Playback(sip-silence)
exten => _79600XXX,n,ConfBridge(${EXTEN:1},vici_agent_bridge,vici_dtmf_user)
exten => _79600XXX,n,Hangup()

;; used to play an audio file to a conference
exten => _89600XXX,1,Answer()
exten => _89600XXX,n,Playback(sip-silence)
exten => _89600XXX,n,ConfBridge(${EXTEN:1},vici_agent_bridge,vici_audio_user)
exten => _89600XXX,n,Hangup()

;; used to kick all channels from a conference
exten => _99600XXX,1,ConfKick(${EXTEN:1},all)
exten => _99600XXX,2,Hangup()
exten => _55559600XXX,1,ConfKick(${EXTEN:4},all)
exten => _55559600XXX,2,Hangup()

Save and exit

Step 3 – Add additional code for confbridge to work correctly

We have to edit a couple files so first lets do:

nano /etc/asterisk/confbridge.conf and paste this at the bottom:
#include confbridge-vicidial.conf

Now create a new file called confbridge-vicidial.conf and add the following lines:

; Bridge Profile for agent conferences
[vici_agent_bridge]
type=bridge
max_members=10
record_conference=no
internal_sample_rate=8000
mixing_interval=40
video_mode=none
sound_join=enter
sound_leave=leave
sound_has_joined=sip-silence
sound_has_left=sip-silence
sound_kicked=sip-silence
sound_muted=sip-silence
sound_unmuted=sip-silence
sound_only_person=confbridge-only-participant
sound_only_one=sip-silence
sound_there_are=sip-silence
sound_other_in_party=sip-silence
sound_begin=sip-silence
sound_wait_for_leader=sip-silence
sound_leader_has_left=sip-silence
sound_get_pin=sip-silence
sound_invalid_pin=sip-silence
sound_locked=sip-silence
sound_locked_now=sip-silence
sound_unlocked_now=sip-silence
sound_error_menu=sip-silence
sound_participants_muted=sip-silence


; User Profile for agent channels
[vici_agent_user]
type=user
admin=no
quiet=no
startmuted=no
marked=yes
dtmf_passthrough=yes
hear_own_join_sound=yes
dsp_drop_silence=yes

; User Profile for admin channels
[vici_admin_user]
type=user
admin=yes
quiet=no
startmuted=no
marked=yes
dtmf_passthrough=yes
dsp_drop_silence=yes

; User Profile for monitoring
[vici_monitor_user]
type=user
admin=no
quiet=no
startmuted=yes
marked=no
dtmf_passthrough=no
dsp_drop_silence=yes

; User Profile for barging
[vici_barge_user]
type=user
admin=no
quiet=no
startmuted=no
marked=no
dtmf_passthrough=yes
dsp_drop_silence=yes

; User Profile for customers channels
[vici_customer_user]
type=user
admin=no
quiet=no
startmuted=no
marked=yes
dtmf_passthrough=yes
hear_own_join_sound=no
dsp_drop_silence=yes

; User Profile for call recording channels
[vici_recording_user]
type=user
admin=no
quiet=yes
startmuted=yes
marked=no
dtmf_passthrough=no
dsp_drop_silence=yes

; User Profile for audio playback channels
[vici_audio_user]
type=user
admin=no
quiet=yes
startmuted=yes
marked=no
dtmf_passthrough=no
dsp_drop_silence=yes

; User Profile for triggering DTMF
[vici_dtmf_user]
type=user
admin=no
quiet=yes
startmuted=yes
marked=no
dtmf_passthrough=yes
dsp_drop_silence=yes

Step 4 – Add ConfBridge Conferences to Database

Go into mysql and add the conferences to the vicidial_confbridges table by pasting the following commands:

mysql -A asterisk
INSERT INTO `vicidial_confbridges` VALUES 
(9600000,'10.10.10.17','','0',NULL),
(9600001,'10.10.10.17','','0',NULL),
(9600002,'10.10.10.17','','0',NULL),
(9600003,'10.10.10.17','','0',NULL),
(9600004,'10.10.10.17','','0',NULL),
(9600005,'10.10.10.17','','0',NULL),
(9600006,'10.10.10.17','','0',NULL),
(9600007,'10.10.10.17','','0',NULL),
(9600008,'10.10.10.17','','0',NULL),
(9600009,'10.10.10.17','','0',NULL),
(9600010,'10.10.10.17','','0',NULL),
(9600011,'10.10.10.17','','0',NULL),
(9600012,'10.10.10.17','','0',NULL),
(9600013,'10.10.10.17','','0',NULL),
(9600014,'10.10.10.17','','0',NULL),
(9600015,'10.10.10.17','','0',NULL),
(9600016,'10.10.10.17','','0',NULL),
(9600017,'10.10.10.17','','0',NULL),
(9600018,'10.10.10.17','','0',NULL),
(9600019,'10.10.10.17','','0',NULL),
(9600020,'10.10.10.17','','0',NULL),
(9600021,'10.10.10.17','','0',NULL),
(9600022,'10.10.10.17','','0',NULL),
(9600023,'10.10.10.17','','0',NULL),
(9600024,'10.10.10.17','','0',NULL),
(9600025,'10.10.10.17','','0',NULL),
(9600026,'10.10.10.17','','0',NULL),
(9600027,'10.10.10.17','','0',NULL),
(9600028,'10.10.10.17','','0',NULL),
(9600029,'10.10.10.17','','0',NULL),
(9600030,'10.10.10.17','','0',NULL),
(9600031,'10.10.10.17','','0',NULL),
(9600032,'10.10.10.17','','0',NULL),
(9600033,'10.10.10.17','','0',NULL),
(9600034,'10.10.10.17','','0',NULL),
(9600035,'10.10.10.17','','0',NULL),
(9600036,'10.10.10.17','','0',NULL),
(9600037,'10.10.10.17','','0',NULL),
(9600038,'10.10.10.17','','0',NULL),
(9600039,'10.10.10.17','','0',NULL),
(9600040,'10.10.10.17','','0',NULL),
(9600041,'10.10.10.17','','0',NULL),
(9600042,'10.10.10.17','','0',NULL),
(9600043,'10.10.10.17','','0',NULL),
(9600044,'10.10.10.17','','0',NULL),
(9600045,'10.10.10.17','','0',NULL),
(9600046,'10.10.10.17','','0',NULL),
(9600047,'10.10.10.17','','0',NULL),
(9600048,'10.10.10.17','','0',NULL),
(9600049,'10.10.10.17','','0',NULL),
(9600050,'10.10.10.17','','0',NULL),
(9600051,'10.10.10.17','','0',NULL),
(9600052,'10.10.10.17','','0',NULL),
(9600053,'10.10.10.17','','0',NULL),
(9600054,'10.10.10.17','','0',NULL),
(9600055,'10.10.10.17','','0',NULL),
(9600056,'10.10.10.17','','0',NULL),
(9600057,'10.10.10.17','','0',NULL),
(9600058,'10.10.10.17','','0',NULL),
(9600059,'10.10.10.17','','0',NULL),
(9600060,'10.10.10.17','','0',NULL),
(9600061,'10.10.10.17','','0',NULL),
(9600062,'10.10.10.17','','0',NULL),
(9600063,'10.10.10.17','','0',NULL),
(9600064,'10.10.10.17','','0',NULL),
(9600065,'10.10.10.17','','0',NULL),
(9600066,'10.10.10.17','','0',NULL),
(9600067,'10.10.10.17','','0',NULL),
(9600068,'10.10.10.17','','0',NULL),
(9600069,'10.10.10.17','','0',NULL),
(9600070,'10.10.10.17','','0',NULL),
(9600071,'10.10.10.17','','0',NULL),
(9600072,'10.10.10.17','','0',NULL),
(9600073,'10.10.10.17','','0',NULL),
(9600074,'10.10.10.17','','0',NULL),
(9600075,'10.10.10.17','','0',NULL),
(9600076,'10.10.10.17','','0',NULL),
(9600077,'10.10.10.17','','0',NULL),
(9600078,'10.10.10.17','','0',NULL),
(9600079,'10.10.10.17','','0',NULL),
(9600080,'10.10.10.17','','0',NULL),
(9600081,'10.10.10.17','','0',NULL),
(9600082,'10.10.10.17','','0',NULL),
(9600083,'10.10.10.17','','0',NULL),
(9600084,'10.10.10.17','','0',NULL),
(9600085,'10.10.10.17','','0',NULL),
(9600086,'10.10.10.17','','0',NULL),
(9600087,'10.10.10.17','','0',NULL),
(9600088,'10.10.10.17','','0',NULL),
(9600089,'10.10.10.17','','0',NULL),
(9600090,'10.10.10.17','','0',NULL),
(9600091,'10.10.10.17','','0',NULL),
(9600092,'10.10.10.17','','0',NULL),
(9600093,'10.10.10.17','','0',NULL),
(9600094,'10.10.10.17','','0',NULL),
(9600095,'10.10.10.17','','0',NULL),
(9600096,'10.10.10.17','','0',NULL),
(9600097,'10.10.10.17','','0',NULL),
(9600098,'10.10.10.17','','0',NULL),
(9600099,'10.10.10.17','','0',NULL),
(9600100,'10.10.10.17','','0',NULL),
(9600101,'10.10.10.17','','0',NULL),
(9600102,'10.10.10.17','','0',NULL),
(9600103,'10.10.10.17','','0',NULL),
(9600104,'10.10.10.17','','0',NULL),
(9600105,'10.10.10.17','','0',NULL),
(9600106,'10.10.10.17','','0',NULL),
(9600107,'10.10.10.17','','0',NULL),
(9600108,'10.10.10.17','','0',NULL),
(9600109,'10.10.10.17','','0',NULL),
(9600110,'10.10.10.17','','0',NULL),
(9600111,'10.10.10.17','','0',NULL),
(9600112,'10.10.10.17','','0',NULL),
(9600113,'10.10.10.17','','0',NULL),
(9600114,'10.10.10.17','','0',NULL),
(9600115,'10.10.10.17','','0',NULL),
(9600116,'10.10.10.17','','0',NULL),
(9600117,'10.10.10.17','','0',NULL),
(9600118,'10.10.10.17','','0',NULL),
(9600119,'10.10.10.17','','0',NULL),
(9600120,'10.10.10.17','','0',NULL),
(9600121,'10.10.10.17','','0',NULL),
(9600122,'10.10.10.17','','0',NULL),
(9600123,'10.10.10.17','','0',NULL),
(9600124,'10.10.10.17','','0',NULL),
(9600125,'10.10.10.17','','0',NULL),
(9600126,'10.10.10.17','','0',NULL),
(9600127,'10.10.10.17','','0',NULL),
(9600128,'10.10.10.17','','0',NULL),
(9600129,'10.10.10.17','','0',NULL),
(9600130,'10.10.10.17','','0',NULL),
(9600131,'10.10.10.17','','0',NULL),
(9600132,'10.10.10.17','','0',NULL),
(9600133,'10.10.10.17','','0',NULL),
(9600134,'10.10.10.17','','0',NULL),
(9600135,'10.10.10.17','','0',NULL),
(9600136,'10.10.10.17','','0',NULL),
(9600137,'10.10.10.17','','0',NULL),
(9600138,'10.10.10.17','','0',NULL),
(9600139,'10.10.10.17','','0',NULL),
(9600140,'10.10.10.17','','0',NULL),
(9600141,'10.10.10.17','','0',NULL),
(9600142,'10.10.10.17','','0',NULL),
(9600143,'10.10.10.17','','0',NULL),
(9600144,'10.10.10.17','','0',NULL),
(9600145,'10.10.10.17','','0',NULL),
(9600146,'10.10.10.17','','0',NULL),
(9600147,'10.10.10.17','','0',NULL),
(9600148,'10.10.10.17','','0',NULL),
(9600149,'10.10.10.17','','0',NULL),
(9600150,'10.10.10.17','','0',NULL),
(9600151,'10.10.10.17','','0',NULL),
(9600152,'10.10.10.17','','0',NULL),
(9600153,'10.10.10.17','','0',NULL),
(9600154,'10.10.10.17','','0',NULL),
(9600155,'10.10.10.17','','0',NULL),
(9600156,'10.10.10.17','','0',NULL),
(9600157,'10.10.10.17','','0',NULL),
(9600158,'10.10.10.17','','0',NULL),
(9600159,'10.10.10.17','','0',NULL),
(9600160,'10.10.10.17','','0',NULL),
(9600161,'10.10.10.17','','0',NULL),
(9600162,'10.10.10.17','','0',NULL),
(9600163,'10.10.10.17','','0',NULL),
(9600164,'10.10.10.17','','0',NULL),
(9600165,'10.10.10.17','','0',NULL),
(9600166,'10.10.10.17','','0',NULL),
(9600167,'10.10.10.17','','0',NULL),
(9600168,'10.10.10.17','','0',NULL),
(9600169,'10.10.10.17','','0',NULL),
(9600170,'10.10.10.17','','0',NULL),
(9600171,'10.10.10.17','','0',NULL),
(9600172,'10.10.10.17','','0',NULL),
(9600173,'10.10.10.17','','0',NULL),
(9600174,'10.10.10.17','','0',NULL),
(9600175,'10.10.10.17','','0',NULL),
(9600176,'10.10.10.17','','0',NULL),
(9600177,'10.10.10.17','','0',NULL),
(9600178,'10.10.10.17','','0',NULL),
(9600179,'10.10.10.17','','0',NULL),
(9600180,'10.10.10.17','','0',NULL),
(9600181,'10.10.10.17','','0',NULL),
(9600182,'10.10.10.17','','0',NULL),
(9600183,'10.10.10.17','','0',NULL),
(9600184,'10.10.10.17','','0',NULL),
(9600185,'10.10.10.17','','0',NULL),
(9600186,'10.10.10.17','','0',NULL),
(9600187,'10.10.10.17','','0',NULL),
(9600188,'10.10.10.17','','0',NULL),
(9600189,'10.10.10.17','','0',NULL),
(9600190,'10.10.10.17','','0',NULL),
(9600191,'10.10.10.17','','0',NULL),
(9600192,'10.10.10.17','','0',NULL),
(9600193,'10.10.10.17','','0',NULL),
(9600194,'10.10.10.17','','0',NULL),
(9600195,'10.10.10.17','','0',NULL),
(9600196,'10.10.10.17','','0',NULL),
(9600197,'10.10.10.17','','0',NULL),
(9600198,'10.10.10.17','','0',NULL),
(9600199,'10.10.10.17','','0',NULL),
(9600200,'10.10.10.17','','0',NULL),
(9600201,'10.10.10.17','','0',NULL),
(9600202,'10.10.10.17','','0',NULL),
(9600203,'10.10.10.17','','0',NULL),
(9600204,'10.10.10.17','','0',NULL),
(9600205,'10.10.10.17','','0',NULL),
(9600206,'10.10.10.17','','0',NULL),
(9600207,'10.10.10.17','','0',NULL),
(9600208,'10.10.10.17','','0',NULL),
(9600209,'10.10.10.17','','0',NULL),
(9600210,'10.10.10.17','','0',NULL),
(9600211,'10.10.10.17','','0',NULL),
(9600212,'10.10.10.17','','0',NULL),
(9600213,'10.10.10.17','','0',NULL),
(9600214,'10.10.10.17','','0',NULL),
(9600215,'10.10.10.17','','0',NULL),
(9600216,'10.10.10.17','','0',NULL),
(9600217,'10.10.10.17','','0',NULL),
(9600218,'10.10.10.17','','0',NULL),
(9600219,'10.10.10.17','','0',NULL),
(9600220,'10.10.10.17','','0',NULL),
(9600221,'10.10.10.17','','0',NULL),
(9600222,'10.10.10.17','','0',NULL),
(9600223,'10.10.10.17','','0',NULL),
(9600224,'10.10.10.17','','0',NULL),
(9600225,'10.10.10.17','','0',NULL),
(9600226,'10.10.10.17','','0',NULL),
(9600227,'10.10.10.17','','0',NULL),
(9600228,'10.10.10.17','','0',NULL),
(9600229,'10.10.10.17','','0',NULL),
(9600230,'10.10.10.17','','0',NULL),
(9600231,'10.10.10.17','','0',NULL),
(9600232,'10.10.10.17','','0',NULL),
(9600233,'10.10.10.17','','0',NULL),
(9600234,'10.10.10.17','','0',NULL),
(9600235,'10.10.10.17','','0',NULL),
(9600236,'10.10.10.17','','0',NULL),
(9600237,'10.10.10.17','','0',NULL),
(9600238,'10.10.10.17','','0',NULL),
(9600239,'10.10.10.17','','0',NULL),
(9600240,'10.10.10.17','','0',NULL),
(9600241,'10.10.10.17','','0',NULL),
(9600242,'10.10.10.17','','0',NULL),
(9600243,'10.10.10.17','','0',NULL),
(9600244,'10.10.10.17','','0',NULL),
(9600245,'10.10.10.17','','0',NULL),
(9600246,'10.10.10.17','','0',NULL),
(9600247,'10.10.10.17','','0',NULL),
(9600248,'10.10.10.17','','0',NULL),
(9600249,'10.10.10.17','','0',NULL),
(9600250,'10.10.10.17','','0',NULL),
(9600251,'10.10.10.17','','0',NULL),
(9600252,'10.10.10.17','','0',NULL),
(9600253,'10.10.10.17','','0',NULL),
(9600254,'10.10.10.17','','0',NULL),
(9600255,'10.10.10.17','','0',NULL),
(9600256,'10.10.10.17','','0',NULL),
(9600257,'10.10.10.17','','0',NULL),
(9600258,'10.10.10.17','','0',NULL),
(9600259,'10.10.10.17','','0',NULL),
(9600260,'10.10.10.17','','0',NULL),
(9600261,'10.10.10.17','','0',NULL),
(9600262,'10.10.10.17','','0',NULL),
(9600263,'10.10.10.17','','0',NULL),
(9600264,'10.10.10.17','','0',NULL),
(9600265,'10.10.10.17','','0',NULL),
(9600266,'10.10.10.17','','0',NULL),
(9600267,'10.10.10.17','','0',NULL),
(9600268,'10.10.10.17','','0',NULL),
(9600269,'10.10.10.17','','0',NULL),
(9600270,'10.10.10.17','','0',NULL),
(9600271,'10.10.10.17','','0',NULL),
(9600272,'10.10.10.17','','0',NULL),
(9600273,'10.10.10.17','','0',NULL),
(9600274,'10.10.10.17','','0',NULL),
(9600275,'10.10.10.17','','0',NULL),
(9600276,'10.10.10.17','','0',NULL),
(9600277,'10.10.10.17','','0',NULL),
(9600278,'10.10.10.17','','0',NULL),
(9600279,'10.10.10.17','','0',NULL),
(9600280,'10.10.10.17','','0',NULL),
(9600281,'10.10.10.17','','0',NULL),
(9600282,'10.10.10.17','','0',NULL),
(9600283,'10.10.10.17','','0',NULL),
(9600284,'10.10.10.17','','0',NULL),
(9600285,'10.10.10.17','','0',NULL),
(9600286,'10.10.10.17','','0',NULL),
(9600287,'10.10.10.17','','0',NULL),
(9600288,'10.10.10.17','','0',NULL),
(9600289,'10.10.10.17','','0',NULL),
(9600290,'10.10.10.17','','0',NULL),
(9600291,'10.10.10.17','','0',NULL),
(9600292,'10.10.10.17','','0',NULL),
(9600293,'10.10.10.17','','0',NULL),
(9600294,'10.10.10.17','','0',NULL),
(9600295,'10.10.10.17','','0',NULL),
(9600296,'10.10.10.17','','0',NULL),
(9600297,'10.10.10.17','','0',NULL),
(9600298,'10.10.10.17','','0',NULL),
(9600299,'10.10.10.17','','0',NULL);
exit

Update the IP to your server IP by running the following command:

/usr/share/astguiclient/ADMIN_update_server_ip.pl –old-server_ip=10.10.10.17 (Click Enter for Y)
Next enter your server IP and press enter twice to chaneg it in the DB as show below:

updating server IP
Update Server IP

Step 5 – Code changes to ViciDial files

There are some files now that have to be patched in order to include the changes needed for confbrides to work. They are in the “extras/ConfBridge/” directory of the svn/trunk codebase. Lets copy the files over to where they are needed, this will depend on if you are using a single server or a cluster to where the files go. Here is a list of where they go:

Dialers:
/usr/share/astguiclient/ - 
- ADMIN_keepalive_ALL.pl.diff
- ADMIN_update_server_ip.pl.diff
- AST_DB_optimize.pl.diff
- AST_reset_mysql_vars.pl.diff
- AST_VDremote_agents.pl.diff
- AST_conf_update_screen.pl

Webservers:
/srv/www/htdocs/agc/ - 
- vicidial.php.diff
- vdc_db_query.php.diff
- manager_send.php.diff
/srv/www/htdocs/vicidial/ - 
- non_agent_api.php.diff

You can copy and paste the entire code below to get it all done
cd /usr/src/astguiclient/trunk/extras/ConfBridge/
cp * /usr/share/astguiclient/
cd /usr/share/astguiclient/
mv manager_send.php.diff vdc_db_query.php.diff vicidial.php.diff /var/www/html/agc/
patch -p0 < ADMIN_keepalive_ALL.pl.diff
patch -p0 < ADMIN_update_server_ip.pl.diff
patch -p0 < AST_DB_optimize.pl.diff
chmod +x AST_conf_update_screen.pl
patch -p0 < AST_reset_mysql_vars.pl.diff
cd /var/www/html/agc/
patch -p0 < manager_send.php.diff
patch -p0 < vdc_db_query.php.diff
patch -p0 < vicidial.php.diff

Step 6 – Add the confbridge keepalive and turn off the conf_update keepalive in crontab

A new screen session has been added called 'AST_conf_update_screen.pl'. This screen session replaces both the AST_conf_update.pl and AST_conf_update_3way.pl scripts. It checks both MeetMe and ConfBridge conferences for unnecessary channels and removes them. For instance if an agent does a Leave 3way and a few minutes later one of the remaining channels hangs up. This script will remove the remaining channel and free the conference for use by Vicidial. This screen session is optional for use with MeetMe but is required to be used with ConfBridge.
Add C to VARactive_keepalives
To enable this screen session you need to add a 'C' to the 'VARactive_keepalives' variable in the '/etc/astguiclient.conf' on your dialers, and comment out the following line from your crontab:

                ### updater for conference validator
                #* * * * * /usr/share/astguiclient/AST_conf_update.pl

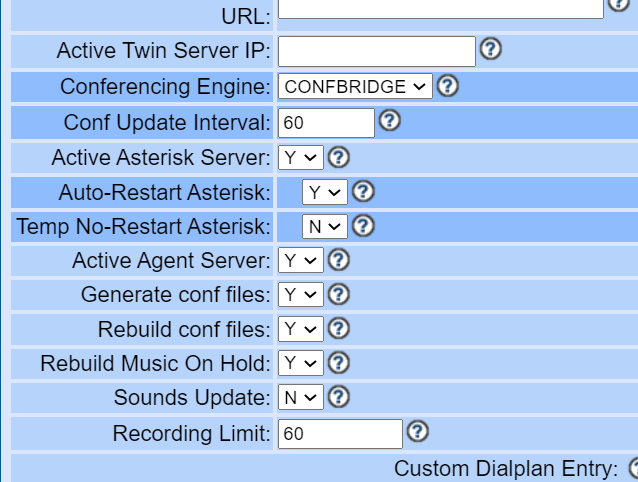
You can configure the refresh interval for how often the screen session checks for unnecessary channels by changing "Conf Update Interval" in Admin -> Servers.

Step 7- Make the needed changes in ViciDial GUI

Login to the ViciDial Admin GUI and go to Admin > Servers and click on the server(s) that are dialers and change the conferencing engine to “CONFBRIDGE” as shown below:

Change conferencing Engine to CONFBRIDGE

Thats a lot to get through but now that its done your customers will no longer hear the “Water drop” or “bloop” sound that they do now and you’re ready for the future of Asterisk now that meetme has been deprecated. Thats it for now, you’re all done. Hopefully this helps those of you who are a little intimidated to try the change and like always, if you have any problems, feel free to visit our Skype live support with almost 200 Vicidial experts from around the world.

-Chris aka carpenox

How to – Use Firewalld via command line

Robots trying to hack in

How to – use Firewalld via command line

This short post is just going to briefly go over the more common commands you need in order to manage firewalld and make sure you keep your servers safe. This firewall works in conjunction with the dynamic portal for ViciDial as well as the built in whitelist initially named ViciWhite in the IP list area in Admin.

Dynamic portal
Dynamic portal

Systemctl and Firewalld

Enable firewalld

This makes sure that firewalld will be started automatically with the server.

systemctl enable firewalld

Start firewalld

After the firewalld service is enabled, you’ll need to start it manually the first time. This is how you would manually start firewalld if it were not already running.

systemctl start firewalld

Stop firewalld

When troubleshooting rules and connection issues, you may need to stop the fireawlld service momentarily. You can stop the service with the following command.

systemctl stop firewalld

Restart firewalld

If for some reason, you need to restart the service, you can do that with the systemctl restart command.

systemctl restart firewalld

Firewalld status

Checking the status of the service gives us the most meaningful and informative output. Here you can see whether the service is enabled, running, failed, or anything else.

systemctl status firewalld

In this example output, you can see that the service is enabled, active, and running on the server. If it were not running or in a failed state, this would be displayed.

[root@alma ~]# systemctl status firewalld
● firewalld.service - firewalld - dynamic firewall daemon
Loaded: loaded (/usr/lib/systemd/system/firewalld.service; enabled; vendor preset: enabled)
Active: active (running) since Tue 2019-01-22 22:50:32 EST; 1h 0min ago
Main PID: 808 (firewalld)
CGroup: /system.slice/firewalld.service
└─808 /usr/bin/python -Es /usr/sbin/firewalld --nofork --nopid

Managing Firewalld and Configuring Rules

Now that we have firewalld running, we can get down to set the configuration. We can open ports, allow services, whitelist IPs for access, and more. In all of these examples, we include the –permanent flag. This is important to make sure a rule is saved even after you restart firewalld, or reboot the server. Once you’re done adding new rules, you need to reload the firewall to make the new rules active.

Add a Port for TCP or UDP

You do have to specify TCP or UDP and to open a port for both. You will need to add rules for each protocol.

firewall-cmd --permanent --add-port=22/TCP
firewall-cmd --permanent --add-port=53/UDP

Remove a Port for TCP or UDP

Using a slight variation on the above structure, you can remove a currently open port, effectively closing off that port.

firewall-cmd --permanent --remove-port=444/tcp

Add a Service

These services assume the default ports configured within the /etc/services configuration file; if you wish to use a service on a non-standard port, you will have to open the specific port, as in the example above.

firewall-cmd --permanent --add-service=ssh
firewall-cmd --permanent --add-service=http

Remove a Service

As above, you specify the remove-service option, and you can close off the port that is defined for that service.

firewall-cmd --permanent --remove-service=mysql

Whitelist an IP Address

To whitelist or allow access from an IP or range of IPs, you can tell the firewall to add a trusted source.

firewall-cmd --permanent --add-source=192.168.1.100

You can also allow a range of IPs using what is called CIDR notation. CIDR is outside the scope of this article but is a shorthand that can be used for noting ranges of IP addresses.

firewall-cmd --permanent --add-source=192.168.1.0/24

Remove a Whitelisted IP Address

To remove a whitelisted IP or IP range, you can use the –remove-source option.

firewall-cmd --permanent --remove-source=192.168.1.100

Block an IP Address

As the firewall-cmd tool is mostly used for opening or allowing access, rich rules are needed to block an IP. Rich rules are similar in form to the way iptables rules are written.

firewall-cmd --permanent --add-rich-rule="rule family='ipv4' source address='192.168.1.100' reject"

You can again use CIDR notation also block a range of IP addresses.

firewall-cmd --permanent --add-rich-rule="rule family='ipv4' source address='192.168.1.0/24' reject"

Whitelist an IP Address for a Specific Port (More Rich Rules)

We have to reach back to iptables and create another rich rule; however, we are using the accept statement at the end to allow the IP access, rather than reject its access.

firewall-cmd --permanent --add-rich-rule='rule family="ipv4" source address="192.168.1.100" port protocol="tcp" port="3306" accept'

Removing a Rich Rule

To remove a rich rule, use the option —remove-rich-rule, but you have to fully specify which rule is being removed, so it is best to copy and paste the full rule, rather than try to type it all out from memory.

firewall-cmd --permanent --remove-rich-rule='rule family="ipv4" source address="192.168.1.100" port protocol="tcp" port="3306" accept'

Saving Firewall Rules

After you have completed all the additions and subtraction of rules, you need to reload the firewall rules to make them active. To do this, you again use the firewall-cmd tool but using the option –reload.

firewall-cmd --reload

Viewing Firewall Rules

After reloading the rules, you can confirm if the new rules are in place correctly with the following.

firewall-cmd --list-all

Here is an example output from the –list-all option, you can see that this server has a number of ports, and services open in the firewall along with a rich rule (that forwards one port to another).

[root@alma ~]# firewall-cmd --list-all
public (default, active)
interfaces: enp1s0
sources: 192.168.1.0/24
services: dhcpv6-client dns http https mysql nfs samba smtp ssh
ports: 443/tcp 80/tcp 5900-5902/tcp 83/tcp 444/tcp 3260/tcp
masquerade: no
forward-ports:
icmp-blocks:
rich rules:
rule family="ipv4" source address="192.168.1.0/24" forward-port port="5423" protocol="tcp" to-port="80"


Hopefully this will help a lot of you that end up just not using a firewall at all because it intimidates you not knowing how to use it correctly. Well, I’ve just eliminated that excuse, so now I want to see more of you securing your servers and dialer systems. Here is a few articles to get you started in the right direction.

This will show you how secure OpenSUSE LEAP
https://dialer.one/how-to-scratch-install-the-dynportal-on-centos/?amp
Securing CentOS, Alma or Rocky Linux

Here are some more articles in relation to VICIdial security for your servers

How to – Use the built in Dynamic Portal for Vicibox
How to – Turn on IP whitelist in Vicidial
How to – Use one dynamic portal for whitelisting and have it sync across an entire cluster
How to – Fix the firewall on Vicibox10


That’s it for this article, hopefully you guys take this serious because hackers, especially ransomware thieves are targeting dialer servers in particular for their schemes, such as using the VoIP to call their victims to either trick them into downloading files or threatening them over the phone with blackmail or other means. BazarCall is one of the more well known tools thats being used by the ransomware group called Ryuk.

How to – Setup a ViciDial Cluster

ViciDial Cluster

How to – Setup a ViciDial Cluster

This article is going to go over the steps I suggest to take in order to setup a ViciDial Cluster. I do things a little different when it comes to this to prepare for worst case scenario that a server may have problems and have to be taken offline, I install all services to each server, such as apache, mysql and asterisk this way if need be, they each can take on additional roles to cover for a server having to be taken out of production. Obviously this is going to assume you have ViciDial already installed on each server with all roles ready to go. To do so you can follow any one of my articles for scratch installs or you can just use an ISO to install of which I suggest using Vicibox v9.0.3 over V10 because of the issues with the V10 firewall and dynamic portal not working correctly, even if you do apply my fix, I find V9 to be more stable.

ViciDial Cluster
ViciDial Cluster

Step 1 – Install Vicidial on each server

As I said above, I suggest installing all services on each server and just leaving the ones not needed for each box, disabled until needed. So if you are using an ISO install instead of one of my scratch instructions, for the purpose on this article, lets say ViciBox v9.0.3. The first thing you need to do after loading v9 is to upgrade the operating system from Leap 15.1 to Leap 15.2 using these instructions, because Leap 15.1 is end of life(no more updates). After that use the command, vicibox-install and choose Y(yes) for the options shown in the picture below:

ViciBox Installer
vicibox-install

Repeat this process on each server and then move on to step 2.

Step 2 – Turn off services not needed on each server role

Now we need to disable services not needed on each server to save on resources, but this way they are there if they are needed in the future.

  • DB Server: systemctl disable apache2;systemctl disable asterisk
  • Web Server: systemctl disable mysql;systemctl disable asterisk
  • Asterisk Servers: systemctl disable mysql

We want to leave apache running on the asterisk servers so we can install webrtc for webphones

Step 3 – Run the install.pl script on each server

Now we want to link them all together by running the install.pl script located in the source directory for vicidial, follow the following commands to get to and run it:

cd /usr/src/astguiclient/trunk
perl install.pl

Now follow the prompt and answer them accordingly. The pictures below will show the choices needed for each server role except make sure you set the IP for the DB server on all the rest instead of localhost.

DB Server and Web Server

DB Server

For the web server make sure you put the DB server IP instead of localhost

Asterisk Servers

Only use 5 and 7 on ONE asterisk server, not all, the rest put 123468

Make sure you only put 5 and 7 keepalives on one asterisk server, the rest you should only choose 123468.

Step 4 – Add them to the GUI for ViciDial

Now we need to add them into the GUI for Vicidial by going to Admin then servers

Go to Servers in the Admin area

Once you are here, click “Add a new server”

Once you are here, click "Add a new server"
Once you are here, click “Add a new server”

Fill out the fields accordingly and click submit

Add a new server

Now for the DB and web server turn the options to N(no) where you see highlighted below:

Active server, Active Asterisk server and Active agent server set to N

Now reboot all servers and then check your reports page to make sure all servers are set to green like shown below

ViciDial Cluster
ViciDial Cluster

That’s all there is to it, not as hard as you thought it would be, right? If you have any questions feel free to join our live support on Skype:

Skype Channel

I hope this helps!

Chris aka carpenox

Table of Contents – Knowledge Base

CyburDial

I am carpenox from the Vicidial forums and I enjoy helping our community, of which I do free of charge, however my one on one time helping people out I do have to charge for my time in order to keep this going. If my articles have helped you out and you’re making money now because of my help, please think about donating to the cause so I can keep this blog going. Here is a link to donate through PayPal.

Check out all of our social media platforms -:- https://linktr.ee/CyburDial

Join us on Discord: https://discord.gg/jt8sNvJM

Table of Contents

Information

HIPPA Compliance
HIPPA Compliance

Book time with carpenox now

ViciDial Scratch Install Instructions

Troubleshooting ViciDial

How To’s

Security

STAYING COMPLIANT

How to – Scratch install Vicidial on AlmaLinux

CyburDial Realtime Screen

How to – Scratch install Vicidial on AlmaLinux

This article will go over how to scratch install Vicidial on AlmaLinux 8.6 -:- Special thanks to https://zestvoip.com/ and https://zenithbsolutions.com/ for testing this out. You can also use the Video tutorial at the bottom created by HBtutorials

IMPORTANT UPDATE: Alma changed one of the dependency packages and the normal install doesn’t work anymore, see the fix at the bottom.

sed -i 's/SELINUX=enforcing/SELINUX=disabled/g' /etc/selinux/config

Set Default Editor to nano:
yum -y install nano

nano /etc/bashrc

Then add this line at the bottom:
export EDITOR="nano"

timedatectl set-timezone America/New_York


rc.local not work:

chmod +x /etc/rc.d/rc.local
systemctl enable rc-local
systemctl start rc-local
systemctl status rc-local

yum check-update
yum -y install epel-release
yum update -y
yum groupinstall "Development Tools" -y

yum -y install https://dl.fedoraproject.org/pub/epel/epel-release-latest-8.noarch.rpm
yum -y install http://rpms.remirepo.net/enterprise/remi-release-8.rpm
yum -y install yum-utils
dnf -y module enable php:remi-7.4

sudo dnf install -y mariadb-server

sudo dnf -y install dnf-plugins-core
sudo dnf config-manager --set-enabled powertools

yum install -y php php-mcrypt php-cli php-gd php-curl php-mysql php-ldap php-zip php-fileinfo php-opcache wget unzip make patch gcc gcc-c++ subversion php php-devel php-gd gd-devel readline-devel php-mbstring php-mcrypt php-imap php-ldap php-mysql php-odbc php-pear php-xml php-xmlrpc curl curl-devel perl-libwww-perl ImageMagick libxml2 libxml2-devel httpd libpcap libpcap-devel libnet ncurses ncurses-devel screen kernel* mutt glibc.i686 certbot python3-certbot-apache mod_ssl openssl-devel newt-devel libxml2-devel kernel-devel sqlite-devel libuuid-devel sox sendmail lame-devel htop iftop perl-File-Which php-opcache libss7 mariadb-devel libss7* libopen* 

systemctl enable mariadb

cp /etc/my.cnf /etc/my.cnf.original
echo "" > /etc/my.cnf

nano /etc/my.cnf ; copy the below config to this file.

####################################################################################################

[mysql.server]
user = mysql
#basedir = /var/lib

[client]
port = 3306
socket = /var/lib/mysql/mysql.sock

[mysqld]
datadir = /var/lib/mysql
#tmpdir = /home/mysql_tmp
socket = /var/lib/mysql/mysql.sock
user = mysql
old_passwords = 0
ft_min_word_len = 3
max_connections = 800
max_allowed_packet = 32M
skip-external-locking
sql_mode="NO_ENGINE_SUBSTITUTION"

log-error = /var/log/mysqld/mysqld.log

query-cache-type = 1
query-cache-size = 32M

long_query_time = 1
#slow_query_log = 1
#slow_query_log_file = /var/log/mysqld/slow-queries.log

tmp_table_size = 128M
table_cache = 1024

join_buffer_size = 1M
key_buffer = 512M
sort_buffer_size = 6M
read_buffer_size = 4M
read_rnd_buffer_size = 16M
myisam_sort_buffer_size = 64M

max_tmp_tables = 64

thread_cache_size = 8
thread_concurrency = 8

# If using replication, uncomment log-bin below
#log-bin = mysql-bin

[mysqldump]
quick
max_allowed_packet = 16M

[mysql]
no-auto-rehash

[isamchk]
key_buffer = 256M
sort_buffer_size = 256M
read_buffer = 2M
write_buffer = 2M

[myisamchk]
key_buffer = 256M
sort_buffer_size = 256M
read_buffer = 2M
write_buffer = 2M

[mysqlhotcopy]
interactive-timeout

[mysqld_safe]
#log-error = /var/log/mysqld/mysqld.log
#pid-file = /var/run/mysqld/mysqld.pid

  • mkdir /var/log/mysqld
  • touch /var/log/mysqld/slow-queries.log
  • chown -R mysql:mysql /var/log/mysqld
  • systemctl restart mariadb
Install the Perl Modules
yum install -y perl-CPAN perl-YAML perl-libwww-perl perl-DBI perl-DBD-MySQL perl-GD perl-Env perl-Term-ReadLine-Gnu perl-SelfLoader perl-open.noarch

cpan -i Tk String::CRC Tk::TableMatrix Net::Address::IP::Local Term::ReadLine::Gnu Spreadsheet::Read Net::Address::IPv4::Local RPM::Specfile Spreadsheet::XLSX Spreadsheet::ReadSXC MD5 Digest::MD5 Digest::SHA1 Bundle::CPAN Pod::Usage Getopt::Long DBI DBD::mysql Net::Telnet Time::HiRes Net::Server Mail::Sendmail Unicode::Map Jcode Spreadsheet::WriteExcel OLE::Storage_Lite Proc::ProcessTable IO::Scalar Scalar::Util Spreadsheet::ParseExcel Archive::Zip Compress::Raw::Zlib Spreadsheet::XLSX Test::Tester Spreadsheet::ReadSXC Text::CSV Test::NoWarnings Text::CSV_PP File::Temp Text::CSV_XS Spreadsheet::Read LWP::UserAgent HTML::Entities HTML::Strip HTML::FormatText HTML::TreeBuilder Switch Time::Local Mail::POP3Client Mail::IMAPClient Mail::Message IO::Socket::SSL readline

cd /usr/bin/
curl -LOk http://xrl.us/cpanm
chmod +x cpanm


cpanm -f File::HomeDir
cpanm -f File::Which
cpanm CPAN::Meta::Requirements
cpanm -f CPAN
cpanm YAML
cpanm MD5
cpanm Digest::MD5
cpanm Digest::SHA1
cpanm readline


cpanm Bundle::CPAN
cpanm DBI
cpanm -f DBD::mysql
cpanm Net::Telnet
cpanm Time::HiRes
cpanm Net::Server
cpanm Switch
cpanm Mail::Sendmail
cpanm Unicode::Map
cpanm Jcode
cpanm Spreadsheet::WriteExcel
cpanm OLE::Storage_Lite
cpanm Proc::ProcessTable
cpanm IO::Scalar
cpanm Spreadsheet::ParseExcel
cpanm Curses
cpanm Getopt::Long
cpanm Net::Domain
cpanm Term::ReadKey
cpanm Term::ANSIColor
cpanm Spreadsheet::XLSX
cpanm Spreadsheet::Read
cpanm LWP::UserAgent
cpanm HTML::Entities
cpanm HTML::Strip
cpanm HTML::FormatText
cpanm HTML::TreeBuilder
cpanm Time::Local
cpanm MIME::Decoder
cpanm Mail::POP3Client
cpanm Mail::IMAPClient
cpanm Mail::Message
cpanm IO::Socket::SSL
cpanm MIME::Base64
cpanm MIME::QuotedPrint
cpanm Crypt::Eksblowfish::Bcrypt
cpanm Crypt::RC4
cpanm Text::CSV
cpanm Text::CSV_XS

cd /usr/src
wget http://download.vicidial.com/required-apps/asterisk-perl-0.08.tar.gz
tar xzf asterisk-perl-0.08.tar.gz
cd asterisk-perl-0.08
perl Makefile.PL
make all
make install 

dnf --enablerepo=powertools install libsrtp-devel -y
yum install -y elfutils-libelf-devel libedit-devel

cd /usr/src
wget http://downloads.sourceforge.net/project/lame/lame/3.99/lame-3.99.5.tar.gz
tar -zxf lame-3.99.5.tar.gz
cd lame-3.99.5
./configure
make
make install

cd /usr/src/
wget https://digip.org/jansson/releases/jansson-2.13.tar.gz
tar xvzf jansson*
cd jansson-2.13
./configure
make clean
make
make install 
ldconfig

UPDATE: 6/22/21 - Ty @Ankit for catching the wrong directory below 

UPDATE: 8/2/23 - TY to Nik and Frank for fixing the install with the added lines I've put below for the dahdi install.

REBOOT!!

cd /usr/src/
wget https://downloads.asterisk.org/pub/telephony/dahdi-linux-complete/dahdi-linux-complete-current.tar.gz
tar xzf dahdi*
cd /usr/src/dahdi-linux-complete-3.2.0+3.2.0/
cd /usr/src
git clone -b next 
git://git.asterisk.org/dahdi/linux


yum -y install kernel-devel-$(uname -r)

sudo sed -i 's|, 64);|);|g' /usr/src/dahdi-linux-complete-3.2.0+3.2.0/linux/drivers/dahdi/wctc4xxp/base.c

make
make install
make install-config

yum -y install dahdi-tools-libs

cd tools
make clean
make
make install
make install-config

cd /etc/dahdi
mv system.conf.sample system.conf


cd /usr/src/
wget http://downloads.asterisk.org/pub/telephony/libpri/libpri-1.6.0.tar.gz
tar xzf libpri-1.6.1.tar.gz
cd /usr/src/libpri-1.6.0
make clean
make
make install

nano  /etc/php.ini
error_reporting  =  E_ALL & ~E_NOTICE
memory_limit = 128M
short_open_tag = On
max_execution_time = 330
max_input_time = 360
post_max_size = 100M
upload_max_filesize = 42M
default_socket_timeout = 360
date.timezone = America/New_York

cd /usr/src/
wget http://download.vicidial.com/required-apps/asterisk-13.29.2-vici.tar.gz
tar xzf asterisk-13.29.2-vici.tar.gz
cd /usr/src/asterisk-13.29.2/
./configure --libdir=/usr/lib64 --with-pjproject-bundled -with-jansson-bundled
make clean
make menuselect    ; ####### select chan_meetme 
make
make install
make samples
make config


mkdir /usr/src/astguiclient
cd /usr/src/astguiclient
svn checkout svn://svn.eflo.net:3690/agc_2-X/trunk


mysql
SET GLOBAL connect_timeout=60;
CREATE DATABASE `asterisk` DEFAULT CHARACTER SET utf8 COLLATE utf8_unicode_ci;
CREATE USER 'cron'@'localhost' IDENTIFIED BY '1234';
GRANT SELECT,INSERT,UPDATE,DELETE,LOCK TABLES on asterisk.* TO cron@'%' IDENTIFIED BY '1234';
CREATE USER 'custom'@'localhost' IDENTIFIED BY 'custom1234';
GRANT SELECT,INSERT,UPDATE,DELETE,LOCK TABLES on asterisk.* TO custom@'%' IDENTIFIED BY 'custom1234';
GRANT SELECT,INSERT,UPDATE,DELETE,LOCK TABLES on asterisk.* TO cron@localhost IDENTIFIED BY '1234';
GRANT SELECT,INSERT,UPDATE,DELETE,LOCK TABLES on asterisk.* TO custom@localhost IDENTIFIED BY 'custom1234';
GRANT RELOAD ON *.* TO cron@'%';
GRANT RELOAD ON *.* TO cron@localhost;
GRANT RELOAD ON *.* TO custom@'%';
GRANT RELOAD ON *.* TO custom@localhost;
flush privileges;
use asterisk;
\. /usr/src/astguiclient/trunk/extras/MySQL_AST_CREATE_tables.sql
\. /usr/src/astguiclient/trunk/extras/first_server_install.sql
ALTER TABLE phones ALTER template_id SET DEFAULT '';
quit

cd /usr/src/astguiclient/trunk

perl install.pl


*Within the install.pl script make sure you Copy Asterisk Settings=Yes + Server webroot path=/var/www/html

/usr/share/astguiclient/ADMIN_area_code_populate.pl
/usr/share/astguiclient/ADMIN_update_server_ip.pl --old-server_ip=10.10.10.15
nano /etc/rc.d/rc.local

### paste this below: 

#!/bin/sh
#
# This script will be executed *after* all the other init scripts.
# You can put your own initialization stuff in here if you don't
# want to do the full Sys V style init stuff.

touch /var/lock/subsys/local

# OPTIONAL enable ip_relay(for same-machine trunking and blind monitoring)
/usr/share/astguiclient/ip_relay/relay_control start 2>/dev/null 1>&2

# Disable console blanking and powersaving
/usr/bin/setterm -blank
/usr/bin/setterm -powersave off
/usr/bin/setterm -powerdown

### start up the MySQL server
systemctl restart mariadb.service

### start up the apache web server
systemctl restart apache2

### roll the Asterisk logs upon reboot
/usr/share/astguiclient/ADMIN_restart_roll_logs.pl

### clear the server-related records from the database
/usr/share/astguiclient/AST_reset_mysql_vars.pl

### load dahdi drivers
modprobe dahdi
/usr/sbin/dahdi_cfg -vvvvvvvvvvvvv

### sleep for 20 seconds before launching Asterisk
sleep 20

### start up asterisk
/usr/share/astguiclient/start_asterisk_boot.pl

type "crontab -e"

### paste below:

### recording mixing/compressing/ftping scripts
#0,3,6,9,12,15,18,21,24,27,30,33,36,39,42,45,48,51,54,57 * * * * /usr/share/astguiclient/AST_CRON_audio_1_move_mix.pl
0,3,6,9,12,15,18,21,24,27,30,33,36,39,42,45,48,51,54,57 * * * * /usr/share/astguiclient/AST_CRON_audio_1_move_mix.pl --MIX
0,3,6,9,12,15,18,21,24,27,30,33,36,39,42,45,48,51,54,57 * * * * /usr/share/astguiclient/AST_CRON_audio_1_move_VDonly.pl
1,4,7,10,13,16,19,22,25,28,31,34,37,40,43,46,49,52,55,58 * * * * /usr/share/astguiclient/AST_CRON_audio_2_compress.pl --GSM
#2,5,8,11,14,17,20,23,26,29,32,35,38,41,44,47,50,53,56,59 * * * * /usr/share/astguiclient/AST_CRON_audio_3_ftp.pl --GSM

### keepalive script for astguiclient processes
* * * * * /usr/share/astguiclient/ADMIN_keepalive_ALL.pl --cu3way

### kill Hangup script for Asterisk updaters
* * * * * /usr/share/astguiclient/AST_manager_kill_hung_congested.pl

### updater for voicemail
* * * * * /usr/share/astguiclient/AST_vm_update.pl

### updater for conference validator
* * * * * /usr/share/astguiclient/AST_conf_update.pl

### flush queue DB table every hour for entries older than 1 hour
11 * * * * /usr/share/astguiclient/AST_flush_DBqueue.pl -q

### fix the vicidial_agent_log once every hour and the full day run at night
33 * * * * /usr/share/astguiclient/AST_cleanup_agent_log.pl
50 0 * * * /usr/share/astguiclient/AST_cleanup_agent_log.pl --last-24hours
## uncomment below if using QueueMetrics
#*/5 * * * * /usr/share/astguiclient/AST_cleanup_agent_log.pl --only-qm-live-call-check

## uncomment below if using Vtiger
#1 1 * * * /usr/share/astguiclient/Vtiger_optimize_all_tables.pl --quiet

### updater for VICIDIAL hopper
* * * * * /usr/share/astguiclient/AST_VDhopper.pl -q

### adjust the GMT offset for the leads in the vicidial_list table
1 1,7 * * * /usr/share/astguiclient/ADMIN_adjust_GMTnow_on_leads.pl --debug

### reset several temporary-info tables in the database
2 1 * * * /usr/share/astguiclient/AST_reset_mysql_vars.pl

### optimize the database tables within the asterisk database
3 1 * * * /usr/share/astguiclient/AST_DB_optimize.pl

## adjust time on the server with ntp
30 * * * * /usr/sbin/ntpdate -u pool.ntp.org 2>/dev/null 1>&2

### VICIDIAL agent time log weekly and daily summary report generation
2 0 * * 0 /usr/share/astguiclient/AST_agent_week.pl
22 0 * * * /usr/share/astguiclient/AST_agent_day.pl

### VICIDIAL campaign export scripts (OPTIONAL)
#32 0 * * * /usr/share/astguiclient/AST_VDsales_export.pl
#42 0 * * * /usr/share/astguiclient/AST_sourceID_summary_export.pl

### remove old recordings more than 7 days old
#24 0 * * * /usr/bin/find /var/spool/asterisk/monitorDONE -maxdepth 2 -type f -mtime +7 -print | xargs rm -f

### roll logs monthly on high-volume dialing systems
#30 1 1 * * /usr/share/astguiclient/ADMIN_archive_log_tables.pl

### remove old vicidial logs and asterisk logs more than 2 days old
28 0 * * * /usr/bin/find /var/log/astguiclient -maxdepth 1 -type f -mtime +2 -print | xargs rm -f
29 0 * * * /usr/bin/find /var/log/asterisk -maxdepth 3 -type f -mtime +2 -print | xargs rm -f
30 0 * * * /usr/bin/find / -maxdepth 1 -name "screenlog.0*" -mtime +4 -print | xargs rm -f

### cleanup of the scheduled callback records
25 0 * * * /usr/share/astguiclient/AST_DB_dead_cb_purge.pl --purge-non-cb -q

### GMT adjust script - uncomment to enable
#45 0 * * * /usr/share/astguiclient/ADMIN_adjust_GMTnow_on_leads.pl --list-settings

### Dialer Inventory Report
1 7 * * * /usr/share/astguiclient/AST_dialer_inventory_snapshot.pl -q --override-24hours

### inbound email parser
* * * * * /usr/share/astguiclient/AST_inbound_email_parser.pl
systemctl enable httpd
##Install Sounds

cd /usr/src
wget http://downloads.digium.com/pub/telephony/sounds/asterisk-core-sounds-en-ulaw-current.tar.gz
wget http://downloads.digium.com/pub/telephony/sounds/asterisk-core-sounds-en-wav-current.tar.gz
wget http://downloads.digium.com/pub/telephony/sounds/asterisk-core-sounds-en-gsm-current.tar.gz
wget http://downloads.digium.com/pub/telephony/sounds/asterisk-extra-sounds-en-ulaw-current.tar.gz
wget http://downloads.digium.com/pub/telephony/sounds/asterisk-extra-sounds-en-wav-current.tar.gz
wget http://downloads.digium.com/pub/telephony/sounds/asterisk-extra-sounds-en-gsm-current.tar.gz
wget http://downloads.asterisk.org/pub/telephony/sounds/asterisk-moh-opsound-gsm-current.tar.gz
wget http://downloads.asterisk.org/pub/telephony/sounds/asterisk-moh-opsound-ulaw-current.tar.gz
wget http://downloads.asterisk.org/pub/telephony/sounds/asterisk-moh-opsound-wav-current.tar.gz
#Place the audio files in their proper places:
cd /var/lib/asterisk/sounds
tar -zxf /usr/src/asterisk-core-sounds-en-gsm-current.tar.gz
tar -zxf /usr/src/asterisk-core-sounds-en-ulaw-current.tar.gz
tar -zxf /usr/src/asterisk-core-sounds-en-wav-current.tar.gz
tar -zxf /usr/src/asterisk-extra-sounds-en-gsm-current.tar.gz
tar -zxf /usr/src/asterisk-extra-sounds-en-ulaw-current.tar.gz
tar -zxf /usr/src/asterisk-extra-sounds-en-wav-current.tar.gz
mkdir /var/lib/asterisk/mohmp3
mkdir /var/lib/asterisk/quiet-mp3
ln -s /var/lib/asterisk/mohmp3 /var/lib/asterisk/default
cd /var/lib/asterisk/mohmp3
tar -zxf /usr/src/asterisk-moh-opsound-gsm-current.tar.gz
tar -zxf /usr/src/asterisk-moh-opsound-ulaw-current.tar.gz
tar -zxf /usr/src/asterisk-moh-opsound-wav-current.tar.gz
rm -f CHANGES*
rm -f LICENSE*
rm -f CREDITS*
cd /var/lib/asterisk/moh
rm -f CHANGES*
rm -f LICENSE*
rm -f CREDITS*
cd /var/lib/asterisk/sounds
rm -f CHANGES*
rm -f LICENSE*
rm -f CREDITS*
cd /var/lib/asterisk/quiet-mp3
sox ../mohmp3/macroform-cold_day.wav macroform-cold_day.wav vol 0.25
sox ../mohmp3/macroform-cold_day.gsm macroform-cold_day.gsm vol 0.25
sox -t ul -r 8000 -c 1 ../mohmp3/macroform-cold_day.ulaw -t ul macroform-cold_day.ulaw vol 0.25
sox ../mohmp3/macroform-robot_dity.wav macroform-robot_dity.wav vol 0.25
sox ../mohmp3/macroform-robot_dity.gsm macroform-robot_dity.gsm vol 0.25
sox -t ul -r 8000 -c 1 ../mohmp3/macroform-robot_dity.ulaw -t ul macroform-robot_dity.ulaw vol 0.25
sox ../mohmp3/macroform-the_simplicity.wav macroform-the_simplicity.wav vol 0.25
sox ../mohmp3/macroform-the_simplicity.gsm macroform-the_simplicity.gsm vol 0.25
sox -t ul -r 8000 -c 1 ../mohmp3/macroform-the_simplicity.ulaw -t ul macroform-the_simplicity.ulaw vol 0.25
sox ../mohmp3/reno_project-system.wav reno_project-system.wav vol 0.25
sox ../mohmp3/reno_project-system.gsm reno_project-system.gsm vol 0.25
sox -t ul -r 8000 -c 1 ../mohmp3/reno_project-system.ulaw -t ul reno_project-system.ulaw vol 0.25
sox ../mohmp3/manolo_camp-morning_coffee.wav manolo_camp-morning_coffee.wav vol 0.25
sox ../mohmp3/manolo_camp-morning_coffee.gsm manolo_camp-morning_coffee.gsm vol 0.25
sox -t ul -r 8000 -c 1 ../mohmp3/manolo_camp-morning_coffee.ulaw -t ul manolo_camp-morning_coffee.ulaw vol 0.25
nano /etc/httpd/conf.d/record.conf

Alias /RECORDINGS/ "/var/spool/asterisk/monitorDONE/"

<Directory "/var/spool/asterisk/monitorDONE">
    Options Indexes MultiViews
    AllowOverride None
    Order allow,deny
    Allow from all
    Require all granted 
        <files *.mp3>
            Forcetype application/forcedownload
        </files>
</Directory>

Now make sure you install firewalld and the dynamic portal by going here: https://dialer.one/how-to-scratch-install-the-dynportal-on-centos/

If you have any problems feel free to stop by our live support channel on Skype

for synchronization problems:

yourserverip/vicidial/admin.php

go to Admin-> Servers-> update Asterisk Version: 13.29.2-vici

Reboot

I hope this helps

-Chris aka carpenox

Video Version

How to – scratch install Vicidial on Ubuntu

Realtime Report

How to – scratch install Vicidial on Ubuntu

This article will go over how to scratch install Vicidial on Ubuntu 14 – 22

Step 1 – The Basics

apt-get update
apt-get upgrade
apt-get install apache2 -y
apt-get install build-essential -y
apt-get install mariadb-client-10.3 -y
apt-get install mariadb-server -y

apt-get install subversion libjansson-dev sqlite autoconf automake libxml2-dev libncurses5-dev -y

add-apt-repository ppa:ondrej/php

apt-get install iftop lame libmysqlclient* -y

apt update
apt upgrade

sudo apt-get install apache2 apache2-bin apache2-data libapache2-mod-php7.4 php7.4 php7.4-cli php7.4-common php7.4-json php7.4-mysql php7.4-readline sox lame screen libnet-telnet-perl php7.4-mysqli -y

apt-get install libasterisk-agi-perl -y

apt-get install libelf-dev -y

apt-get install autogen libtool shtool -y

apt-get install libc6-i386 -y

Step 2 – The CPAN’s

root@vici01:~# cpan

install below modules

install CPAN::Meta::Requirements
install CPAN
reload cpan
install YAML
install MD5
install Digest::MD5
install Digest::SHA1
install Bundle::CPAN
reload cpan
install DBI
force install DBD::mysql
install Net::Telnet
install Time::HiRes
install Net::Server
install Switch
install Mail::Sendmail
install Unicode::Map
install Jcode
install Spreadsheet::WriteExcel
install OLE::Storage_Lite
install Proc::ProcessTable
install IO::Scalar
install Spreadsheet::ParseExcel
install Curses
install Getopt::Long
install Net::Domain
install Term::ReadKey
install Term::ANSIColor
install Spreadsheet::XLSX
install Spreadsheet::Read
install LWP::UserAgent
install HTML::Entities
install HTML::Strip
install HTML::FormatText
install HTML::TreeBuilder
install Time::Local
install MIME::Decoder
install Mail::POP3Client
install Mail::IMAPClient
install Mail::Message
install IO::Socket::SSL
install MIME::Base64
install MIME::QuotedPrint
install Crypt::Eksblowfish::Bcrypt
install readline

Step 3 – Install Asterisk and Dahdi:

Install dahdi

apt install dahdi*

Test dahdi

modprobe dahdi

root@vici02:~# /usr/sbin/dahdi_cfg -v

DAHDI Tools Version – 2.11.1-rc1

DAHDI Version: 2.11.1-rc1

Echo Canceller(s):

Configuration

======================

Channel map:

0 channels to configure.

Install Asterisk

cd /usr/src
wget http://download.vicidial.com/beta-apps/asterisk-16.17.0-vici.tar.gz
tar -xvf asterisk-16.17.0-vici.tar.gz
cd asterisk-16.17.0-vici/
./contrib/scripts/install_prereq install 
./bootstrap.sh

This could take time..

./configure –libdir=/usr/lib –with-gsm=internal –enable-opus –enable-srtp –with-ogg=/usr/lib64/ –with-ssl –enable-asteriskssl –with-pjproject-bundled

make && make menuconfig

select app_meetme in Applications(Vicidial Need this for conference)

make install && make samples && make basic-pbx

Step 4 – WebRTC Extra steps(IF YOU DONT NEED WEBRTC SKIP BELOW STEPS)

Note: Since WebRTC need SSL i am using my Public Domain to Generate SSL from Let’s Encrypt.
How to Generate SSL: Link here

sample http.conf

cat /etc/asterisk/http.conf
[general]
enabled=yes
bindaddr=0.0.0.0
bindport=8088
enablestatic=yes
tlsenable=yes
tlsbindaddr=YOURPUBLICIP:8089

(replace cyburdial.com with your domain)

tlscertfile=/etc/letsencrypt/live/cyburdial/fullchain.pem
tlsprivatekey=/etc/letsencrypt/live/cyburdial/privkey.pem

Install VICIDIAL from Source:
cd /usr/src
mkdir astguiclient/
cd astguiclient/
svn checkout svn://svn.eflo.net/agc_2-X/trunk
cd trunk/
MySQL setup for VICIDIAL:

Step 5 – Create Database

mysql
SET GLOBAL connect_timeout=60;
CREATE DATABASE `asterisk` DEFAULT CHARACTER SET utf8 COLLATE utf8_unicode_ci;
CREATE USER 'cron'@'localhost' IDENTIFIED BY '1234';
GRANT SELECT,INSERT,UPDATE,DELETE,LOCK TABLES on asterisk.* TO cron@'%' IDENTIFIED BY '1234';
CREATE USER 'custom'@'localhost' IDENTIFIED BY 'custom1234';
GRANT SELECT,INSERT,UPDATE,DELETE,LOCK TABLES on asterisk.* TO custom@'%' IDENTIFIED BY 'custom1234';
GRANT SELECT,INSERT,UPDATE,DELETE,LOCK TABLES on asterisk.* TO cron@localhost IDENTIFIED BY '1234';
GRANT SELECT,INSERT,UPDATE,DELETE,LOCK TABLES on asterisk.* TO custom@localhost IDENTIFIED BY 'custom1234';
GRANT RELOAD ON *.* TO cron@'%';
GRANT RELOAD ON *.* TO cron@localhost;
GRANT RELOAD ON *.* TO custom@'%';
GRANT RELOAD ON *.* TO custom@localhost;
flush privileges;
use asterisk;
\. /usr/src/astguiclient/trunk/extras/MySQL_AST_CREATE_tables.sql
\. /usr/src/astguiclient/trunk/extras/first_server_install.sql
ALTER TABLE phones ALTER template_id SET DEFAULT '';
quit

Load the initial database

cd /usr/src/astguiclient/trunk/extras
mysql -uroot -p asterisk < MySQL_AST_CREATE_tables.sql

Load First instalation setup database

mysql -uroot -p asterisk < first_server_install.sql

Load sample sip and iax phones(this contain default user pass, carefull when you installing in vpc)

mysql -uroot -p asterisk < sip-iax_phones.sql

Do back to root Directory of vicidial

cd ..
perl install.pl

Follow the setup with appropriate value.

Configiguration example

Populate ISO country codes

cd /usr/src/astguiclient/trunk/bin
perl ADMIN_area_code_populate.pl

update the Server IP with latest IP address.(VICIDIAL DEFAULT IP IS 10.10.10.15)

perl /usr/src/astguiclient/trunk/bin/ADMIN_update_server_ip.pl –old-server_ip=10.10.10.15

Say ‘Yes’ to all

Add crontab entries(Conf generation, Autodialing, Audio mix and other keepalive processes run from here.

###recording mixing/compressing/ftping scripts

0,3,6,9,12,15,18,21,24,27,30,33,36,39,42,45,48,51,54,57 * * * * /usr/share/astguiclient/AST_CRON_audio_1_move_mix.pl

0,3,6,9,12,15,18,21,24,27,30,33,36,39,42,45,48,51,54,57 * * * * /usr/share/astguiclient/AST_CRON_audio_1_move_mix.pl –MIX
0,3,6,9,12,15,18,21,24,27,30,33,36,39,42,45,48,51,54,57 * * * * /usr/share/astguiclient/AST_CRON_audio_1_move_VDonly.pl
1,4,7,10,13,16,19,22,25,28,31,34,37,40,43,46,49,52,55,58 * * * * /usr/share/astguiclient/AST_CRON_audio_2_compress.pl –GSM

2,5,8,11,14,17,20,23,26,29,32,35,38,41,44,47,50,53,56,59 * * * * /usr/share/astguiclient/AST_CRON_audio_3_ftp.pl –GSM

###keepalive script for astguiclient processes

* * * * /usr/share/astguiclient/ADMIN_keepalive_ALL.pl –cu3way

###kill Hangup script for Asterisk updaters

* * * * /usr/share/astguiclient/AST_manager_kill_hung_congested.pl

###updater for voicemail

* * * * /usr/share/astguiclient/AST_vm_update.pl

###updater for conference validator

* * * * /usr/share/astguiclient/AST_conf_update.pl

###flush queue DB table every hour for entries older than 1 hour

11 * * * * /usr/share/astguiclient/AST_flush_DBqueue.pl -q

###fix the vicidial_agent_log once every hour and the full day run at night

33 * * * * /usr/share/astguiclient/AST_cleanup_agent_log.pl
50 0 * * * /usr/share/astguiclient/AST_cleanup_agent_log.pl –last-24hours

###uncomment below if using QueueMetrics

#*/5 * * * * /usr/share/astguiclient/AST_cleanup_agent_log.pl –only-qm-live-call-check

###uncomment below if using Vtiger

#1 1 * * * /usr/share/astguiclient/Vtiger_optimize_all_tables.pl –quiet

###updater for VICIDIAL hopper

* * * * /usr/share/astguiclient/AST_VDhopper.pl -q

###adjust the GMT offset for the leads in the vicidial_list table

1 1,7 * * * /usr/share/astguiclient/ADMIN_adjust_GMTnow_on_leads.pl –debug

###reset several temporary-info tables in the database

2 1 * * * /usr/share/astguiclient/AST_reset_mysql_vars.pl

###optimize the database tables within the asterisk database

3 1 * * * /usr/share/astguiclient/AST_DB_optimize.pl

###adjust time on the server with ntp

30 * * * * /usr/sbin/ntpdate -u pool.ntp.org 2>/dev/null 1>&2

###VICIDIAL agent time log weekly and daily summary report generation

2 0 * * 0 /usr/share/astguiclient/AST_agent_week.pl
22 0 * * * /usr/share/astguiclient/AST_agent_day.pl

###VICIDIAL campaign export scripts (OPTIONAL)

32 0 * * * /usr/share/astguiclient/AST_VDsales_export.pl

42 0 * * * /usr/share/astguiclient/AST_sourceID_summary_export.pl

###remove old recordings more than 7 days old

24 0 * * * /usr/bin/find /var/spool/asterisk/monitorDONE -maxdepth 2 -type f -mtime +7 -print | xargs rm -f

###roll logs monthly on high-volume dialing systems

30 1 1 * * /usr/share/astguiclient/ADMIN_archive_log_tables.pl

###remove old vicidial logs and asterisk logs more than 2 days old

28 0 * * * /usr/bin/find /var/log/astguiclient -maxdepth 1 -type f -mtime +2 -print | xargs rm -f
29 0 * * * /usr/bin/find /var/log/asterisk -maxdepth 3 -type f -mtime +2 -print | xargs rm -f
30 0 * * * /usr/bin/find / -maxdepth 1 -name “screenlog.0*” -mtime +4 -print | xargs rm -f

###cleanup of the scheduled callback records

25 0 * * * /usr/share/astguiclient/AST_DB_dead_cb_purge.pl –purge-non-cb -q

###GMT adjust script – uncomment to enable

45 0 * * * /usr/share/astguiclient/ADMIN_adjust_GMTnow_on_leads.pl –list-settings

###Dialer Inventory Report

1 7 * * * /usr/share/astguiclient/AST_dialer_inventory_snapshot.pl -q –override-24hours

###inbound email parser

  • * * * * /usr/share/astguiclient/AST_inbound_email_parser.pl
    Note: Lookout for the recording removal cron. It might fill your server.

Add entries to rc.local file to start vicidial and related services

###OPTIONAL enable ip_relay(for same-machine trunking and blind monitoring)

/usr/share/astguiclient/ip_relay/relay_control start 2>/dev/null 1>&2

###roll the Asterisk logs upon reboot

/usr/share/astguiclient/ADMIN_restart_roll_logs.pl

###clear the server-related records from the database

/usr/share/astguiclient/AST_reset_mysql_vars.pl

###load dahdi drivers

modprobe dahdi

/usr/sbin/dahdi_cfg -vvvvvvvvvvvvv

###sleep for 20 seconds before launching Asterisk

sleep 20

###start up asterisk

/usr/share/astguiclient/start_asterisk_boot.pl

Then Reboot the server.

VICIDIAL processes run on screen. There should be 9 Processes running on the screen.
root@vici01:~# screen -ls

There are screens on:

2240.ASTVDremote (03/21/2019 02:16:03 AM) (Detached)

2237.ASTVDauto (03/21/2019 02:16:03 AM) (Detached)

2234.ASTlisten (03/21/2019 02:16:02 AM) (Detached)

2231.ASTsend (03/21/2019 02:16:02 AM) (Detached)

2228.ASTupdate (03/21/2019 02:16:02 AM) (Detached)

2025.ASTconf3way (03/21/2019 02:15:02 AM) (Detached)

2019.ASTVDadapt (03/21/2019 02:15:02 AM) (Detached)

1826.asterisk (03/21/2019 02:14:51 AM) (Detached)

1819.astshell20190321021448 (03/21/2019 02:14:49 AM) (Detached)

9 Sockets in /var/run/screen/S-root.
All Set now. Now, You can configure web interface and logins.
Vicidial Admin login :
http://VICIDIAL_SERVER_IP/vicidial/admin.php
user: 6666
Pass: 1234

How to – install a webphone/viciphone on your Vicidial server

webrtc installation

How to – install a webphone/viciphone on your Vicidial server

UPDATED: Oct. 10th 2023

I’ve been having a bunch of people ask me to write up an article for installing the Viciphone which I never did before because Viciphone.com has some really great instructions already. But I will create this post with picture and alternative Viciphones for you guys to use. There is also an easier method by using my auto installer on my GitHub at this link: https://github.com/carpenox/vicidial-install-scripts. This will complete all the steps below for CentOS, Alma, Rocky or Ubuntu based systems. Leap or ViciBox users will still have to follow the commands below:

CyburPhone
CyburPhone

Step 1 – Create the SSL certificate to use for your server and viciphone

This is a pretty easy process using certbot which uses letsencrypt. the first thing you have to do is setup your FQDN(Fully qualified domain name) to point to your server. For this demonstration I will show you with namecheap.com registrar services. You want to add an A record as shown below:

This you need to run the following command for certbot:

  • certbot certonly –webroot

You’re output should look as it does below:

Step 2 – Install the SSL certificate in Apache

  • cd /etc/apache
  • nano ssl-global.conf
  • scroll down until you see these two lines and change them to point to your certificate and uncomment the SSLCertificateFIle and SSLCertificateKeyFile as show below:
  • cd vhosts.d/
  • nano 1111-default-ssl.conf
  • Edit this file if you have installed using the Vicibox iso, if this is a scratch install you can skip this step.

Step 3 – Install the SSL certificate in Asterisk

  • cd /etc/asterisk/
  • nano http.conf
  • enter the following information as shown below:

[general]
enabled=yes
bindaddr=0.0.0.0
bindport=8088
enablestatic=yes
tlsenable=yes
tlsbindaddr=0.0.0.0:8089
tlscertfile=/etc/letsencrypt/live/cyburdial.com/cert.pem
tlsprivatekey=/etc/letsencrypt/live/cyburdial.com/privkey.pem

  • service apache restart
  • service asterisk restart
  • run this command to make sure the ports are now open and running: ss -ltnu

Go into Aterisk with “asterisk -r” to verify it and type the command: http show status

Step 4 – Install Viciphone 3 or you can try my version of the Viciphone which I call CyburPhone

I will provide two githubs of which you can choose which version you want to use. The first one is by Mike from Viciphone.com of whom I have the utmost respect for his work on the Viciphone to improve it and update to sip.js-0.20. His link is:

https://github.com/vicimikec/ViciPhone

ViciPhone
ViciPhone

To use this you need to go into your root web directory and then git cloning by running the following commands:

  • cd /srv/www/htdocs for Leap or cd /var/www/html for CentOS, Alma or Rocky
  • git clone https://github.com/ccabrerar/ViciPhone.git

Or if you prefer to use my version which looks like this:

CyburPhone

You can go to my github at:

https://github.com/carpenox/CyburPhone

You should already be in the web directory at this point but to use my webrtc phone clone it with this command:

  • git clone https://github.com/carpenox/CyburPhone.git

Now that you’ve downloaded the webrtc phone you’ve decided to use, you need to set the proper permissions for it, for this article I will demonstrate on my version

  • chmod -R 777 CyburPhone/
  • chown -R wwwrun:www CyburPhone/ – Leap
  • chown -R apache:apache CyburPhone – CentOS, Alma and Rocky

You would do the same thing for the Viciphone by just replacing CyburPhone with ViciPhone

Thats it for the phone installation, now to set what you need in the Vicidial GUI

Step 4 – Setting the webphone in Vicidial

Go into Admin > system settings and scroll down near the bottom:

Set the webphone url to the above or if you’re using the Viciphone use https://yourdomain.com/ViciPhone/viciphone.php

Step 5 – Setting the Web Socket URL on the server

Go to admin > servers > your server

Step 6 – Creating the webrtc template

Go to admin > templates and create a new template

Enter the folllwing into the template and change the domain to yours:

type=friend
host=dynamic
encryption=yes
avpf=yes
icesupport=yes
directmedia=no
transport=wss
force_avp=yes
dtlsenable=yes
dtlsverify=no
dtlscertfile=/etc/letsencrypt/live/cyburdial.com/cert.pem
dtlsprivatekey=/etc/letsencrypt/live/cyburdial.com/privkey.pem
dtlssetup=actpass
rtcp_mux=yes

WebRTC Template

Thats all there is to it, now you are all set to use webrtc technology and do away with annoying softphone configurations and reps always complaining about their phone not registering, lol. I hope this article has helped and if you have any problems, feel free to stop by our live support channel on skype or post a comment here: https://join.skype.com/ujkQ7i5lV78O

I hope this helps

-Chris aka carpenox

How to – Scratch install the dynportal on CentOs, Rocky or Alma Linux

how-to-scratch-install-the-dynportal-on-centos/

How to – Scratch install the dynportal on CentOs, Rocky, or Alma Linux

This article will go over the steps to Scratch install the dynportal on a scratch CentOs, Rocky or Alma Linux Vicidial box that normally comes with the ISO. I have created the files you need and host them on one of my sites for download.

Step 1 – Download the necessary files

You will need 4 files to get this working on your server that you can download below

yum install -y firewalld
cd /home
wget https://dialer.one/dynportal.zip
wget https://dialer.one/firewall.zip
wget https://dialer.one/aggregate
wget https://dialer.one/VB-firewall

Step 2 – Move and unzip the files

You can copy and paste the following

  • mkdir -p /var/www/vhosts/dynportal
  • mv /home/dynportal.zip /var/www/vhosts/dynportal/
  • mv /home/firewall.zip /etc/firewalld/
  • cd /var/www/vhosts/dynportal/
  • unzip dynportal.zip
  • cd etc/httpd/conf.d/
  • mv viciportal-ssl.conf viciportal.conf /etc/httpd/conf.d/
  • cd /etc/firewalld/
  • unzip -o firewall.zip
  • mv /home/aggregate /usr/bin/
  • chmod +x /usr/bin/aggregate
  • mv /home/VB-firewall /usr/bin/
  • chmod +x /usr/bin/VB-firewall
Unzip your files

Step 3 – Add your SSL cert to dynportal-ssl.conf and location for redirect is defaults.inc.php

You need to edit your dynportal-ssl.conf file in /etc/httpd/conf.d/

nano /etc/httpd/conf.d/viciportal-ssl.conf

change the location to your SSL cert files

Scratch install the dynportal on CentOs
Dynportal SSL config

nano /var/www/vhosts/dynportal/inc/defaults.inc.php

Step 4 – add entry to crontab

Add the following lines to the bottom of your crontab by typing: crontab -e

### ViciBox integrated firewall, by default just load the VoIP Black list and reload it every 4 hours
### You can lock everyone out of your server if you set this wrong, so understand what you are doing!!!
@reboot /usr/bin/VB-firewall --whitelist=ViciWhite --dynamic --quiet
* * * * * /usr/bin/VB-firewall --whitelist=ViciWhite --dynamic --quiet --flush

Step 5 – Add ports to firewall and apache

Now use firewall-cmd and open port 446 on the firewall for public zone like such:

firewall-offline-cmd --add-port=446/tcp --zone=public --permanent

And edit the apache conf file to add the port to it:

  • nano /etc/httpd/conf/httpd.conf
  • Add this line: Listen 446

Step 6 – Restart services

  • service firewalld restart
  • service httpd restart
  • systemctl enable firewalld

That’s it, now go to http://yourdomain.com:446/valid8.php and you should see the following:

Dynportal Interface
Dynportal Interface

Why doesn’t my webphone/Viciphone work anymore?

webrtc installation

Why doesn’t my webphone/Viciphone work anymore?

UPDATE: October of 2023

There is a new issue since the evolution of the ViciPhone version 3 and CyburPhone version 3.2.5 that has been happening and I will go over how to solve it for everyone. The new feature in ViciDial that uses a settings container called “viciphone settings” has a setting by default that has the webphone dial its own extension which then gets you a result of a sound file telling you that “The number you have dialed is not in service”. The solution for this is simple, just need to change one line in the settings container as described below:

  1. Go into your Vicidial admin GUI
  2. Click on Admin and then Settings Containers
  3. Change the line that says “dialRegExten” from a 1 to a 0 as shown below

This will now fix your webphone. If you have any questions feel free to comment below or join our live support on Skype: https://join.skype.com/ujkQ7i5lV78O

2021 Issue Solution:

This article is to help those of you having problems with viciphone lately. It seems that googles stun server has reached end of life and no longer works correctly. You need to change the stun server to a different one. Here is a list of public stun servers:

Free Public STUN servers

https://gist.github.com/mondain/b0ec1cf5f60ae726202e

How do I change my STUN server for viciphone?

Good question, you need to edit your rtp.conf file for asterisk.

  • cd /etc/asterisk
  • nano rtp.conf
  • scroll down to the very bottom and change it to one on the list above

That’s it, youre done. If you have any problems or questions feel free to comment below.

I hope this helps.

-Chris aka Nox

How to – Secure Vicidial, correctly. Part 1

secure vicidial

How to – Secure Vicidial, correctly. Part 1

This article will show you how to secure Vicidial server correctly. This is definitely one of the topics, that I am asked about the most, so with that being said, this will be a multipart series with different “layers” of security from the basic way you need to secure your system in todays remote world, and as advanced as encrypted passwords, recordings, two factor authentication and more.

secure vicidial
Securing Vicidial

The steps I will cover in this article, will be the steps to take once you have finished installing a fresh Vicidial server. It will cover a single server setup, not a cluster which requires some additional steps to be shown later on in this series. This article will also presume you are setting this up for remote access, not just local. Let’s get started.


Secure Vicidial

Step 1 – Setup access through YAST firewall.

At the Linux CLI, type “yast firewall” and the following screen will pop up:

secure vicidial

Go down to “Interfaces” and select your NIC card that has WAN access and change the zone from default to public:

Change default zone to public

Then TAB over to the public zone and remove all entries but apache2-ssl and ssh, then add viciportal-ssl.

Public Zone services to allow

Finally, add these services to your “Trusted” zone and TAB over to [Accept] and press enter.

Trusted Zone services to allow

This completes the first step for securing your Vicidial server’s firewall access.


Step 2 – Granting access for Dynamic portal & IP whitelist access only through the VB-firewall crontab entry

The next thing you need to do is change the crontab entry from blacklist being blocked to whitelist and dynamic access only. To do so, type “crontab -e” at your Linux CLI and you should see the following:

crontab -e

“Page down” until you see the VB-firewall entries near the bottom and change them as you see below:

Make the changes you see above and press cntl+X to save and follow the prompts to save it.

Ok, so these steps above will prepare your server for the next steps of this process which I have written in other articles already, but I will link them here for easy navigation.


Step 3 – Enabling IP Whitelist

You can follow my blog post about IP whitelist, here.


Step 4 – Setting up the dynamic portal

You can follow the article for these instructions, here.

Dynportal
Dynportal

Well, that’s it for part 1, you have now setup your system for secure remote access to your server through IP whitelist & dynamic portal only. As always, feel free to comment below with any questions or issues you have along the way. My team and I are always available to help our Vicidial community secure themselves against the threats todays world comes with such as BazarCall malware, Ryuk and Conti Ransomwares and other cyber threats that directly target the telecommunications industry. Please protect yourself accordingly, if you need help with this, please fill out the form below for a FREE security audit or if you need some technical assistance on your servers.


Well, that’s it from us here at CyburDial for today, but please stay tuned for Part 2 of this series which will cover adding in other servers for a cluster type environment and how to allow access only to certain services on each server that are needed for communication between the cluster such as MySQL.

I hope this helps.

-Nox