How to – Setup Two Factor Authentication (2FA) on your ViciDial system
This article will go over how to setup two factor authentication on your Vicidial system using the phone method. Later on I will add the SMS and Email methods.
Step 1 – Create the 2FA settings container
First we need to create the 2FA settings container that we will need to choose in system settings when we enable two factor authentication. Below is an example of how to setup a container for a phone call auth:
Step 2 – Set an email and mobile phone on the admin user
You must make sure to add an email and mobile phone to the admin user you are saying 2FA for or you will lock yourself out of the system.
Step 3 – Enable two factor authentication on system settings
The next thing we need to do is turn this feature on and set a couple variables needed for it to work. To do this go to Admin then system settings as shown below:
Now when you hit submit, it’s going to turn on 2FA and if you didn’t set it up correctly you will be locked out of the system for good or until you fix it via MySQL with the following code:
mysql -p
> use asterisk
> UPDATE system_settings SET two_factor_auth_hours='0';
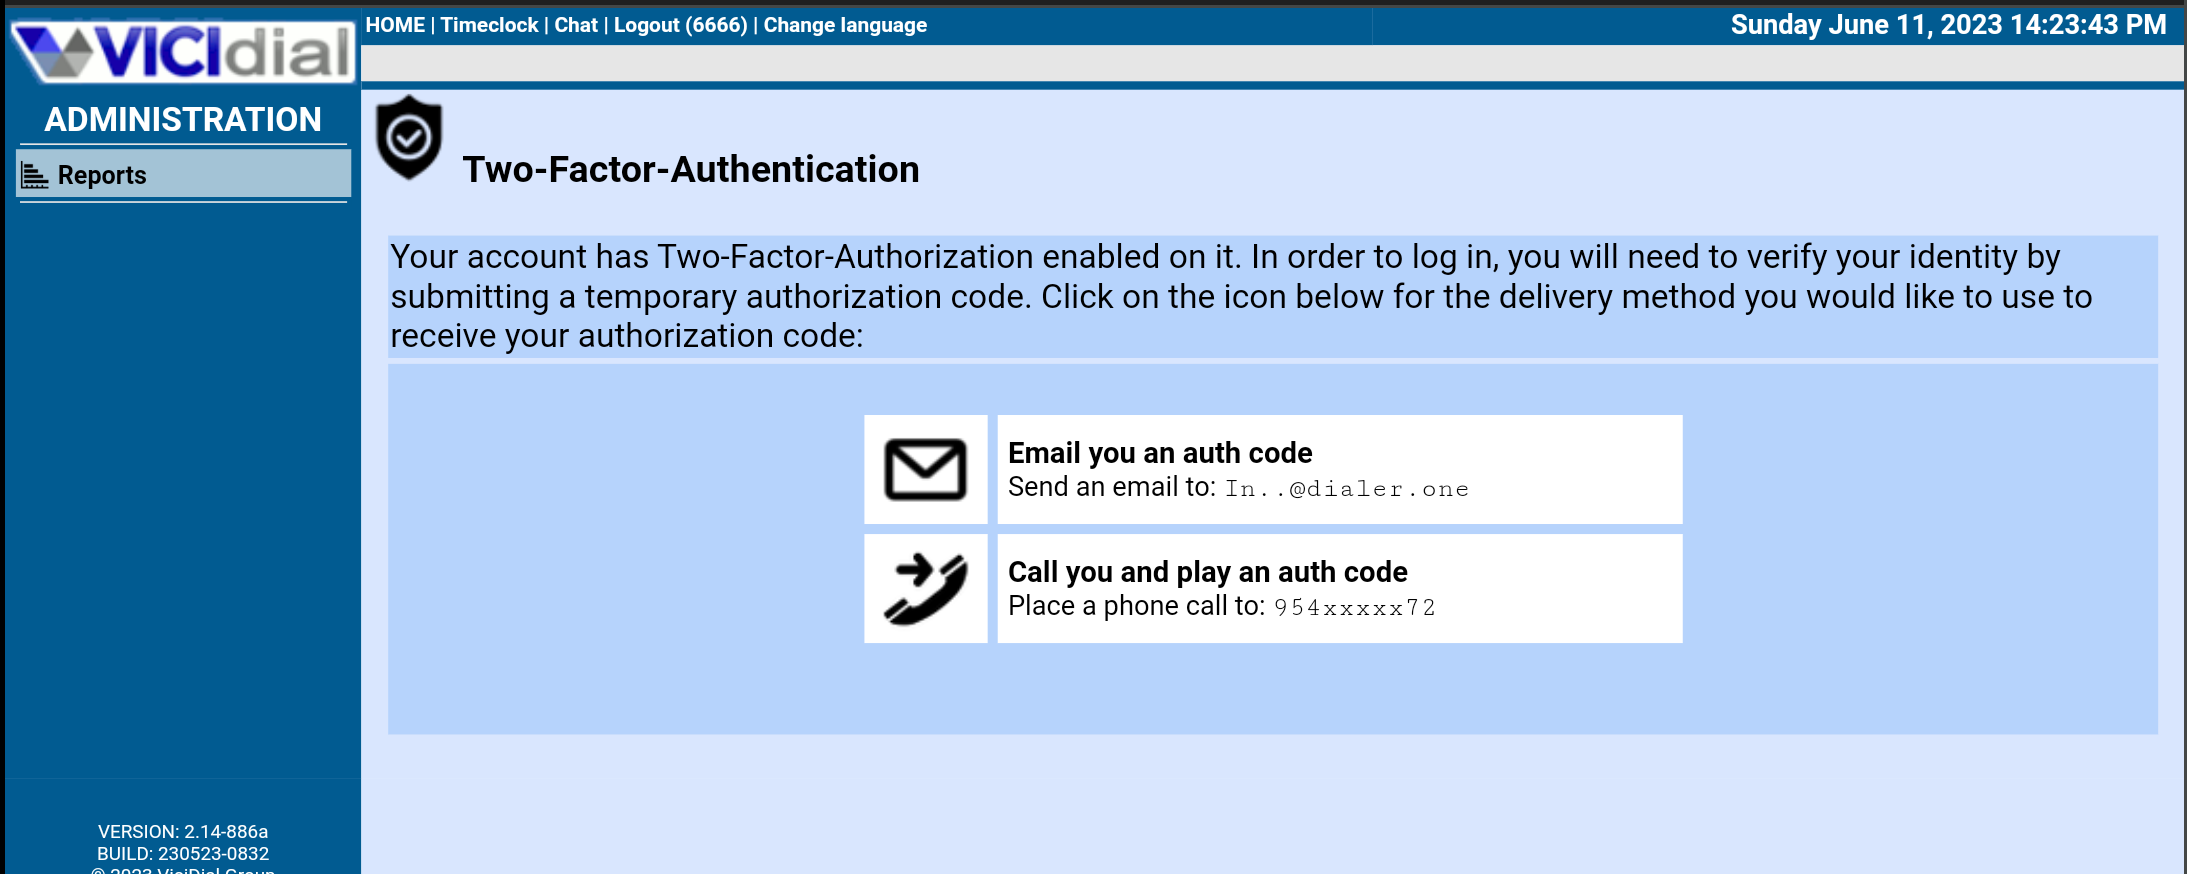
If you did everything correctly you should see this when you try to login:
Hopefully this has helped you guys set this up with less headache than I went through.
Why do my agents say paused when they are on a live call?
Why do your agents say paused while still on a live call? The simple answer is Google. Yes Chrome has enabled a more complex JavaScript throttling which you can read more about on ViciDial’s docs section here. There’s a few ways to fix this problem. One is to just use webphones and it won’t happen. The second is to enable hidden sounds in system settings and finally, the third is to change Agent Screen Timer from “setTimeout” to “EventSource”
Option 1 – Use WebPhones(WebRTC)
Just install and use webphones which you can do following these directions.
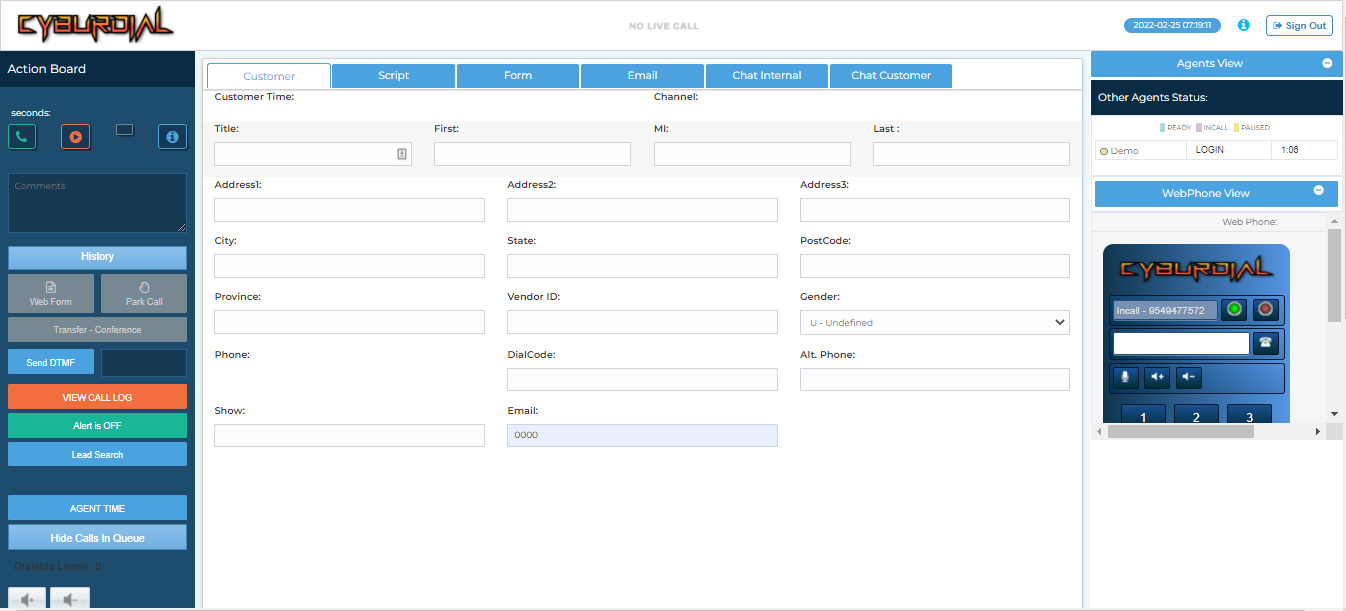
CyburPhone
Option 2 – Enable hidden sounds
Within System Settings you can enable a feature called hidden sounds. You set a volume which doesn’t matter because it’s silent but I chose 25 and then set the timer for how long. Then set the sound of not auto selected but choose “click_quiet”. Now with Google’s new throttling settings which will time you out as early as 10 seconds, set this to 5 as shown below:
Option 3 – Change “Agent Screen Timer”
Change the Agent Screen Timer from setTimeout to EventSource in system settings as shown below:
This can also be changed to “setTimeoutAudioLoop” of the first change didn’t help.
Hopefully one of these 3 options will help you get back to business as usual. When your ready to have a custom system built with full CRM integrations and API features gone over with you one by one figuring out how we can make your business more efficient and profitable then join my chat and one of our trips will help you get started or fill out this form and someone will reach out to you. I hope this has helped.
Optimize Outbound Calls with Predictive and Automated Dialer Software
Every second counts when it comes to sales.
And you know time is money. This is why cloud-based predictive dialer and auto dialer software is in demand these days.
These systems help you save time and optimize outbound calls by connecting agents to quality leads while offering capabilities to enhance customer satisfaction, agent productivity, and revenue.
Previously, agents had to manually dial each phone number, wait for leads to attend the call, and manage everything in traditional systems. As a result, much of their time was spent on other stuff than their core job: selling. This is why they used to make fewer calls every day, which can negatively influence revenue.
Predictive and auto dialer software solves these issues by automating manual, repetitive tasks that include automatic dialing, managing lists, scheduling, notifications, reports, and more with lots of additional features to help you and your agents further.
In this article, I’ll discuss the software, how it can help your agents and bring more revenue and growth to your business.
Ready?
Let’s go! ?
Auto Dialer Software
Autodialer software is a system that dials phone numbers automatically for agents. It either assigns calls to available agents or plays recorded messages when someone answers the calls.
Auto dialers increase agent efficiency with automation and can manage more extensive outbound campaigns with heavy call volumes. They can also increase dial rates, aid in monitoring performance, reduce unproductive calls, and help increase conversion rates.
Most of these solutions are cloud-based and used by call centers to save time and streamline the process of connecting to prospects or customers without manual methods. It has different use cases such as telemarketing, market research, political campaigns, cold-emailing, and broadcasting payment reminders, service outages, appointment reminders, and more.
Benefits
The software reduces agents’ idle time by assigning only quality calls to save time and increase their productivity.
It offers better conversion rates by simplifying and accelerating complex sales processes while showing agents all the essential information about contacts.
You get real-time insights and reporting into your call performance, agent activity, and operations so you can enhance each aspect for better performance.
It improves your operational efficiency with the power of automation for dialing, follow-ups, reminders, and so on.
The software helps you stay compliant and avoid the risks of penalties.
Predictive Dialer Software
Predictive dialer software is a system that can automate the dialing and matching of phone numbers. It can automate calls seamlessly to enable sales reps to track all the missed calls, busy signals, no response calls, and so on.
Predictive dialers have more capabilities than just dialing numbers automatically. They predict human activities and actions using mathematical algorithms to figure out when a prospect or customer can take the calls. In addition to that, you can dial multiple phone numbers simultaneously using them.
The primary usage of these systems is to boost agent efficiency by connecting them to the right contacts at a suitable time for more conversions. Predictive dialers are utilized in call centers, the banking sector, and more.
Benefits
It offers intelligent call assigning to only the available agents
The software lets you organize and manage the client database seamlessly and update it
It works for both outbound and inbound calls
With excellent reporting, you can track the performance of teams and agents and train them accordingly.
It optimizes your agents, sales team, and overall organization by creating a competitive, productive environment for all the members.
It offers automatic workload management and assignment without human interference, prejudices, or bias.
Now take a look at CyburDial and why it ranks among the top dialer systems in the market.
So it seems that there is duplicate Listen directives for apache, more specifically, targeted towards the dynamic portal. What you need to do it edit the listen.conf for apache. You can do so by copying and pasting the following command into your Linux CLI:
nano /etc/apache2/listen.conf
You should now see what you see below. You’ll notice there is 2 entries for ports 81 and 446, just remove one from each and restart apache with “service apache2 restart”. That’s it, browse to your ViciDial admin URL and login.
That’s all there is to it, you should now have a working ViciBox install. Of you have any questions, feel free to comment here or join our group chat that has over 175 members from the ViciDial forums: https://join.skype.com/ujkQ7i5lV78O <—Click here or scam the QR Code below to join.
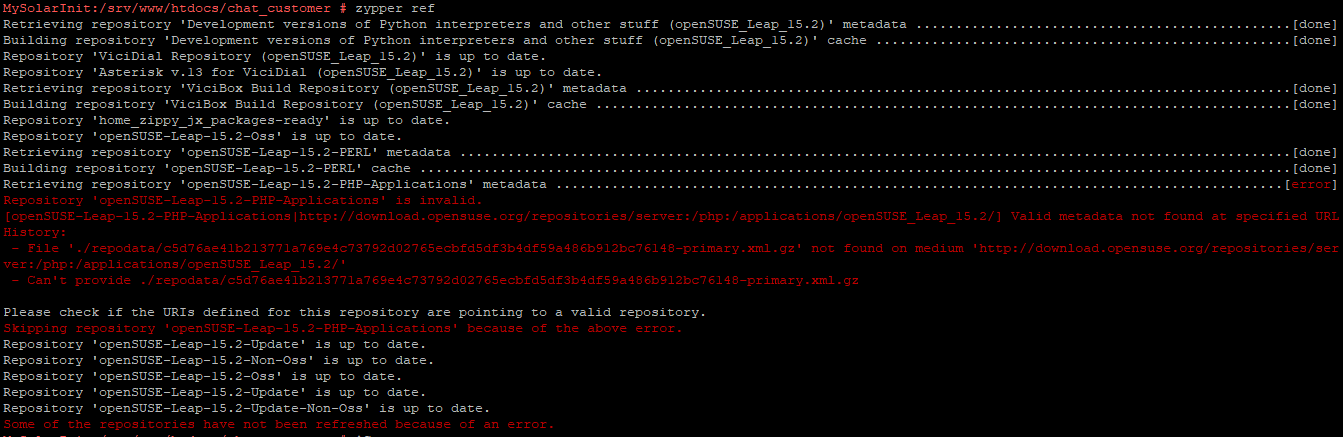
How To – Fix the Perl repo for ViciBox 10(Leap 15.3)
If you’ve tried to update your ViciBox 10 system you’ll see that the Perl repo gives an error and you can’t update from that repo any longer. The reason for this is because Leap 15.3 has gone end of life(EOL) and will no longer be getting updates. The other repos will begin to die as well and your system will remain vulnerable to hackers as dialer system are high priority targets right now for ransomware groups, denialof service attackers and crypto miners. So how do you fix this issue? You upgrade to leap 15.4 following this article: How to – Upgrade OpenSuSE Leap 15.3 to 15.4.
Repository ‘openSUSE-Leap-15.3-PERL’ is invalid.
Hopefully this helps those of you running into this problem and you’ll now be able to keep your systems secure.
This article will go over how to upgrade Leap 15.3 to 15.4 since 15.3 is end of life
Step 1. Preparations – Backup everything
Keep verified backups: Do not skip this step. Before typing the following commands, you must back up all data and config files. Also, ensure your system backup is up-to-date and restorable in an emergency. The author or nixCraft is not liable for damages due to failed upgrades.
Step 2. Update OpenSUSE 15.3 packages
The openSUSE Leap version 15.3 is only available as the 64-bit release. Next, type the following zypper command to update all existing packages. To refresh a repo, enter: $ sudo zypper ref Outputs:
Repository 'openSUSE-Leap-15.3' is up to date.
Repository 'openSUSE-Leap-15.3-Update' is up to date.
Repository 'openSUSE-Leap-15.3-Update-Non-Oss' is up to date.
Repository 'Update repository of openSUSE Backports' is up to date.
Retrieving repository 'Update repository with updates from SUSE Linux Enterprise 15' metadata[done]
Building repository 'Update repository with updates from SUSE Linux Enterprise 15' cache ....[done]
All repositories have been refreshed.
Update ALL installed packages with newer versions and patches
Before the upgrade procedure can begin, apply all pending upgrades or security patches. For example: $ sudo zypper up Outputs:
Loading repository data...
Warning: Repository 'openSUSE-Leap-15.3-Update' appears to be outdated. Consider using a different mirror or server.
Reading installed packages...

The following 10 packages are going to be upgraded:
  cups cups-client cups-config libcups2 libcupscgi1 libcupsimage2 libcupsmime1 libcupsppdc1
  libfreetype6 libqpdf26

10 packages to upgrade.
Overall download size: 8.4 MiB. Already cached: 0 B. After the operation, additional 79.8 KiB will
be used.
Continue? [y/n/v/...? shows all options] (y): y
Retrieving package cups-config-2.2.7-150000.3.35.1.x86_64    (1/10), 239.1 KiB (  3.1 MiB unpacked)
Retrieving: cups-config-2.2.7-150000.3.35.1.x86_64.rpm ......................................[done]
Retrieving package libfreetype6-2.10.4-150000.4.12.1.x86_64  (2/10), 447.3 KiB (  1.1 MiB unpacked)
Retrieving: libfreetype6-2.10.4-150000.4.12.1.x86_64.rpm ....................................[done]
....
..
Checking for file conflicts: ................................................................[done]
( 1/10) Installing: cups-config-2.2.7-150000.3.35.1.x86_64 ..................................[done]
( 2/10) Installing: libfreetype6-2.10.4-150000.4.12.1.x86_64 ................................[done]
( 3/10) Installing: libqpdf26-9.0.2-150200.3.3.1.x86_64 .....................................[done]
....
( 9/10) Installing: cups-client-2.2.7-150000.3.35.1.x86_64 ..................................[done]
Failed to try-restart cups-lpd@.service: Unit name cups-lpd@.service is missing the instance name.
See system logs and 'systemctl status cups-lpd@.service' for details.
(10/10) Installing: cups-2.2.7-150000.3.35.1.x86_64 .........................................[done]
Executing %posttrans scripts ................................................................[done]
Step 3. Reboot the server
Now note down the current Linux kernel version, type: $ uptime $ uname -mrs You must reboot the Linux cloud box, using the shutdown command or reboot command: $ sudo systemctl reboot ## OR ## $ sudo shutdown -r now Log in using the ssh command once system comes back online: $ ssh ec2-user@your-aws-ec2-dns-ip-here ## OR ## $ ssh root@your-Linode-dnsname-OR-ip-here Then verify Linux kernel version: $ uname -mrs Also note down the OpenSUSE Linux version using the cat command: $ cat /etc/os-release
Step 4. Upgrading OpenSUSE 15.3 to 15.4
Now my cloud server is fully patched. It is time to update the server to OpenSUSE version 15.4.
List the repositories
The update repository must exist and is enabled and update before upgrading to 15.3. Verify it using the zypper command as follows: $ sudo zypper repos --uri ## OR type ## $ sudo zypper lr -u Output indicating that there are no 3rd party repos and Update repos are enabled on my OpenSUSE 15.3 server:
Repository priorities are without effect. All enabled repositories share the same priority.

# | Alias                             | Name                                                                                        | Enabled | GPG Check | Refresh | URI
--+-----------------------------------+---------------------------------------------------------------------------------------------+---------+-----------+---------+---------------------------------------------------------------
1 | openSUSE-Leap-15.3                | openSUSE-Leap-15.3                                                                          | Yes     | (r ) Yes  | Yes     | http://download.opensuse.org/distribution/leap/15.3/repo/oss/
2 | openSUSE-Leap-15.3-Update         | openSUSE-Leap-15.3-Update                                                                   | Yes     | (r ) Yes  | Yes     | http://download.opensuse.org/update/leap/15.3/oss/
3 | openSUSE-Leap-15.3-Update-Non-Oss | openSUSE-Leap-15.3-Update-Non-Oss                                                           | Yes     | (r ) Yes  | Yes     | http://download.opensuse.org/update/leap/15.3/non-oss/
4 | repo-backports-debug-update       | Update repository with updates for openSUSE Leap debuginfo packages from openSUSE Backports | No      | ----      | ----    | http://download.opensuse.org/update/leap/15.3/backports_debug/
5 | repo-backports-update             | Update repository of openSUSE Backports                                                     | Yes     | (r ) Yes  | Yes     | http://download.opensuse.org/update/leap/15.3/backports/
6 | repo-sle-debug-update             | Update repository with debuginfo for updates from SUSE Linux Enterprise 15                  | No      | ----      | ----    | http://download.opensuse.org/debug/update/leap/15.3/sle/
7 | repo-sle-update                   | Update repository with updates from SUSE Linux Enterprise 15                                | Yes     | (r ) Yes  | Yes     | http://download.opensuse.org/update/leap/15.3/sle/
Verify that we can get latest OpenSUSE 15.4 version, run: $ sudo zypper --releasever=15.4 lr -u Here is what I see
Warning: Enforced setting: $releasever=15.4
Repository priorities are without effect. All enabled repositories share the same priority.

# | Alias                             | Name                                                                                        | Enabled | GPG Check | Refresh | URI
--+-----------------------------------+---------------------------------------------------------------------------------------------+---------+-----------+---------+---------------------------------------------------------------
1 | openSUSE-Leap-15.3                | openSUSE-Leap-15.3                                                                          | Yes     | (r ) Yes  | Yes     | http://download.opensuse.org/distribution/leap/15.4/repo/oss/
2 | openSUSE-Leap-15.3-Update         | openSUSE-Leap-15.3-Update                                                                   | Yes     | (r ) Yes  | Yes     | http://download.opensuse.org/update/leap/15.4/oss/
3 | openSUSE-Leap-15.3-Update-Non-Oss | openSUSE-Leap-15.3-Update-Non-Oss                                                           | Yes     | (r ) Yes  | Yes     | http://download.opensuse.org/update/leap/15.4/non-oss/
4 | repo-backports-debug-update       | Update repository with updates for openSUSE Leap debuginfo packages from openSUSE Backports | No      | ----      | ----    | http://download.opensuse.org/update/leap/15.4/backports_debug/
5 | repo-backports-update             | Update repository of openSUSE Backports                                                     | Yes     | (r ) Yes  | Yes     | http://download.opensuse.org/update/leap/15.4/backports/
6 | repo-sle-debug-update             | Update repository with debuginfo for updates from SUSE Linux Enterprise 15                  | No      | ----      | ----    | http://download.opensuse.org/debug/update/leap/15.4/sle/
7 | repo-sle-update                   | Update repository with updates from SUSE Linux Enterprise 15                                | Yes     | (r ) Yes  | Yes     | http://download.opensuse.org/update/leap/15.4/sle/
In the above output results, check the last URI column). All repository links should contain 15.4 or openSUSE_Leap_15.4 as a version number. If not check if your Leap repos defined in /etc/zypp/repos.d/ are using the $releasever variable already in the URIs. For example, try the grep command: $ sudo grep baseurl /etc/zypp/repos.d/*.repo If you see hard-coded version 15.3 Leap version number, then you need to modify them first. This can be done using the sed command to find and replace with sed: $ sudo sed -i 's/15.3/${releasever}/g' /etc/zypp/repos.d/*.repo Now verify again: $ sudo zypper --releasever=15.4 lr -u
Running the upgrade for 15.4
It is time to switch and refresh all repositories to 15.4 using the following syntax and grab the repository metadata: $ sudo zypper --releasever=15.4 ref For slower
Warning: Enforced setting: $releasever=15.4
Retrieving repository 'openSUSE-Leap-15.3' metadata ................................................................................................................................................................................................................................[done]
Building repository 'openSUSE-Leap-15.3' cache .....................................................................................................................................................................................................................................[done]
Retrieving repository 'openSUSE-Leap-15.3-Update' metadata .........................................................................................................................................................................................................................[done]
Building repository 'openSUSE-Leap-15.3-Update' cache ..............................................................................................................................................................................................................................[done]
Retrieving repository 'openSUSE-Leap-15.3-Update-Non-Oss' metadata .................................................................................................................................................................................................................[done]
Building repository 'openSUSE-Leap-15.3-Update-Non-Oss' cache ......................................................................................................................................................................................................................[done]
Retrieving repository 'Update repository of openSUSE Backports' metadata ...........................................................................................................................................................................................................[done]
Building repository 'Update repository of openSUSE Backports' cache ................................................................................................................................................................................................................[done]
Retrieving repository 'Update repository with updates from SUSE Linux Enterprise 15' metadata ......................................................................................................................................................................................[done]
Building repository 'Update repository with updates from SUSE Linux Enterprise 15' cache ...........................................................................................................................................................................................[done]
All repositories have been refreshed.
Next, execute the following command for full distribution upgrade to 15.4 from 15.3. Please note that command must be typed from non-GUI (KDE/GNOME) mode. Hence, it is recommended you run the command from either runlevel 3 (text + network), or a virtual console (see how to switch boot target to text or GUI in systemd Linux for more info.). You can press Ctrl-Alt-F2 (all at the same time) to switch to virtual terminal 2. One can also issue the following command: $ sudo systemctl set-default multi-user.target Let us start the distribution upgrade that will get your system to the new version: $ sudo zypper --releasever=15.4 dup OR first download everything on slower internet connection to avoid any problem with upgrades: $ sudo zypper --releasever=15.4 dup --download-in-advance Once the dup is finished, openSUSE sets the releasever variable to the new version 15.4:
Final confirmation
At the following prompt type y and hit the [Enter] key to start upgrade procedure:
The following 11 packages are going to be REMOVED:
  kernel-default-5.3.18-150300.59.87.1 kernel-default-5.3.18-150300.59.90.1 kernel-default-extra-5.3.18-150300.59.87.1
  kernel-default-extra-5.3.18-150300.59.90.1 kernel-default-optional-5.3.18-150300.59.87.1
  kernel-default-optional-5.3.18-150300.59.90.1 librsvg-lang libusbguard0 libwebkit2gtk3-lang libyui-ncurses-pkg15
  systemd-icon-branding-openSUSE

The following package requires a system reboot:
  kernel-default-5.14.21-150400.24.18.1

486 packages to upgrade, 4 to downgrade, 55 new, 11 to remove.
Overall download size: 688.7 MiB. Already cached: 0 B. After the operation, additional 51.0 MiB will be used.

    Note: System reboot required.
Continue? [y/n/v/...? shows all options] (y): y
The zypper command will download, install, or upgrade a total of 486 packages on my cloud server. The procedure to download and install packages takes its own sweet time. So, naturally, your Internet and cloud server speed plays a significant role. In the end, you should see an output as follows showing you must reboot the OpenSUSE server or desktop:
....
..
dracut: *** Stripping files done ***
dracut: *** Creating image file '/boot/initrd-5.14.21-150400.24.18-default' ***
dracut: *** Creating initramfs image file '/boot/initrd-5.14.21-150400.24.18-default' done ***
(403/552) Installing: kernel-default-5.14.21-150400.24.18.1.x86_64 ......................................................[done]
(404/552) Removing kernel-default-5.3.18-150300.59.87.1.x86_64 ..........................................................[done]
(405/552) Removing kernel-default-5.3.18-150300.59.90.1.x86_64 ..........................................................[done]
(406/552) Installing: util-linux-lang-2.37.2-150400.8.3.1.noarch ........................................................[done]
(407/552) Installing: systemd-network-249.12-150400.8.10.1.x86_64 .......................................................[done]
(408/552) Installing: kernel-default-extra-5.14.21-150400.24.18.1.x86_64 ................................................[done]
(409/552) Installing: grub2-systemd-sleep-plugin-2.06-150400.11.5.2.noarch ..............................................[done]
.....
..
Executing %posttrans scripts ............................................................................................[done]
There are running programs which still use files and libraries deleted or updated by recent upgrades. They should be restarted to benefit from the latest updates. Run 'zypper ps -s' to list these programs.

Since the last system boot core libraries or services have been updated.
Reboot is suggested to ensure that your system benefits from these updates.
Make sure everything is working. First, find OpenSuse Linux Version and other info: $ uname -mrs $ cat /etc/os-release $ hostnamectl
Then check your Linux server log file. For instance, use the journalctl command/tail command/dmesg command command and others: $ sudo tail -f /var/log/nginx/www.nixcraft_com_access.log $ dmesg | more $ journalctl -xe
Step 6: Apply any newly released updates
Finally, again use the zypper command to apply security patches, software updates and Linux kernel: $ sudo zypper refresh $ sudo zypper patch $ sudo zypper update # if a new Linux kernel installed, reboot the box $ sudo reboot
Hopefully this will help a lot of you keep up to date and secure
What does – The statuses at the bottom of each list mean?
List Statuses Breakdown
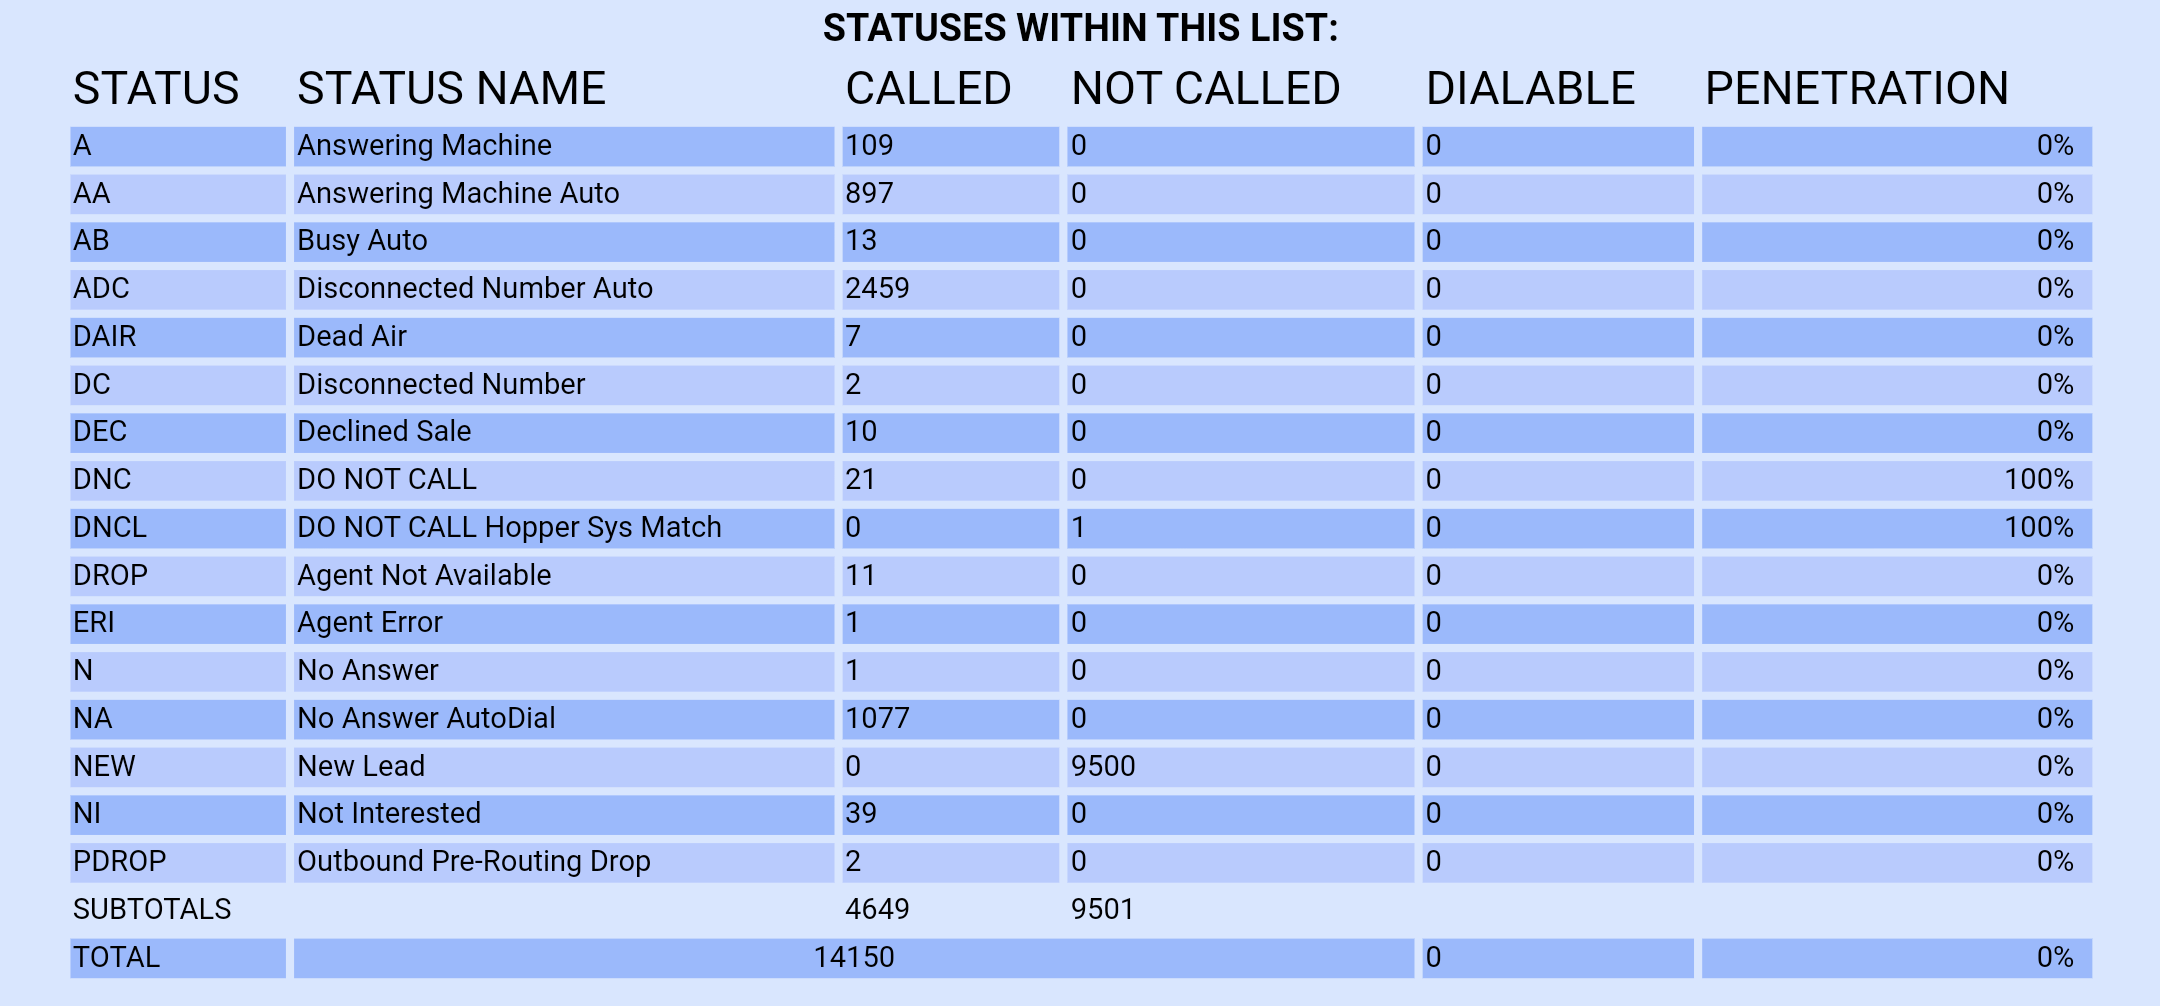
In this article, I will go over what the list statuses mean in relation to reporting. What I’m talking about is at the bottom of each list as shown in the picture below:
All of these different statuses can become pretty confusing, especially because they are not all on the agent screen and some are not even on the system statuses either which becomes really challenging. Ok so let’s stay from the to, I’ll outline them all on a simple “List” layout.
A – Answering machine disposition marked by an agent
AA – Answering machine disposition automatically detected by the AMD(Answering Machine Detection) system
AB – Busy signal automatically detected by the carrier
ADC – Disconnected number detected by carrier
ADCT – Congested number reported by carrier
B – Busy disposition marked by agent
CallBK – Agent setup a callback which can be done in there agent interface and a calendar down to them
CBHold – Scheduled ANYONE callback that has not hit it’s trigger, or an AGENTONLY callback
DAIR – Dead air dispo marked by an agent, usually because they hear nothing when they get the call
DC – Disconnected number marked by an agent
Dec – Declined sale dispo marked by agent because customer denied ever purchasing anything from your business
DNC – Do Not Call dispo marked by agent, usually requested by customer
DNCL – Do Not Call dispo automatically marked by system because a number already marked DNC was in there Hopper
ERI – Agent error – usually closes browser accidentally or logs out accidentally, or similar
The next 5 dispos are related to KHOMP AMD also used with a 3rd party service called AI AMD(Artificially Intelligent Answering Machine Detection) If interested in this message me via Skype -:- live:carpenox_3 | Back to the list statuses
N – No Answer dispo marked by the agent, usually because no one answered the phone
NA – No Answer dispo automatically detected, Any outbound call that does not receive an Answer signal(or other signal) from the carrier. This can include ring-no-answer, disconnected, carrier congestion and other errors
New – New Lead, never called
NI – Not Interested dispo marked by agent
NP – No Pitch No Price dispo marked by agent, didn’t get a chance to read the pitch and/or give the price
Sale – Agent closed the call and made the sale
The last thing I want to go over is the other columns, “called”, “not called”, “dialable” and”penetration”.
Called – The number of leads dialed since the lists last reset
Not Called – The amount of leads not called since last reset
Dialable – How many of the “Not Called” leads are dialable at that time, in my example you’ll see 0 because when I took that screen shot I was outside of allowed call times for that campaign or list. So it shows you dialable leads within time zone parameters
Penetration – Some dispos get the lead marked as “completed”, such as Sale, DNC, Not interested, etc. So as leads with a completed status get marked, it takes those out of rotation and calculated what percent along with all the rest of the dispositions and puts it as penetrated
Campaign List Statuses
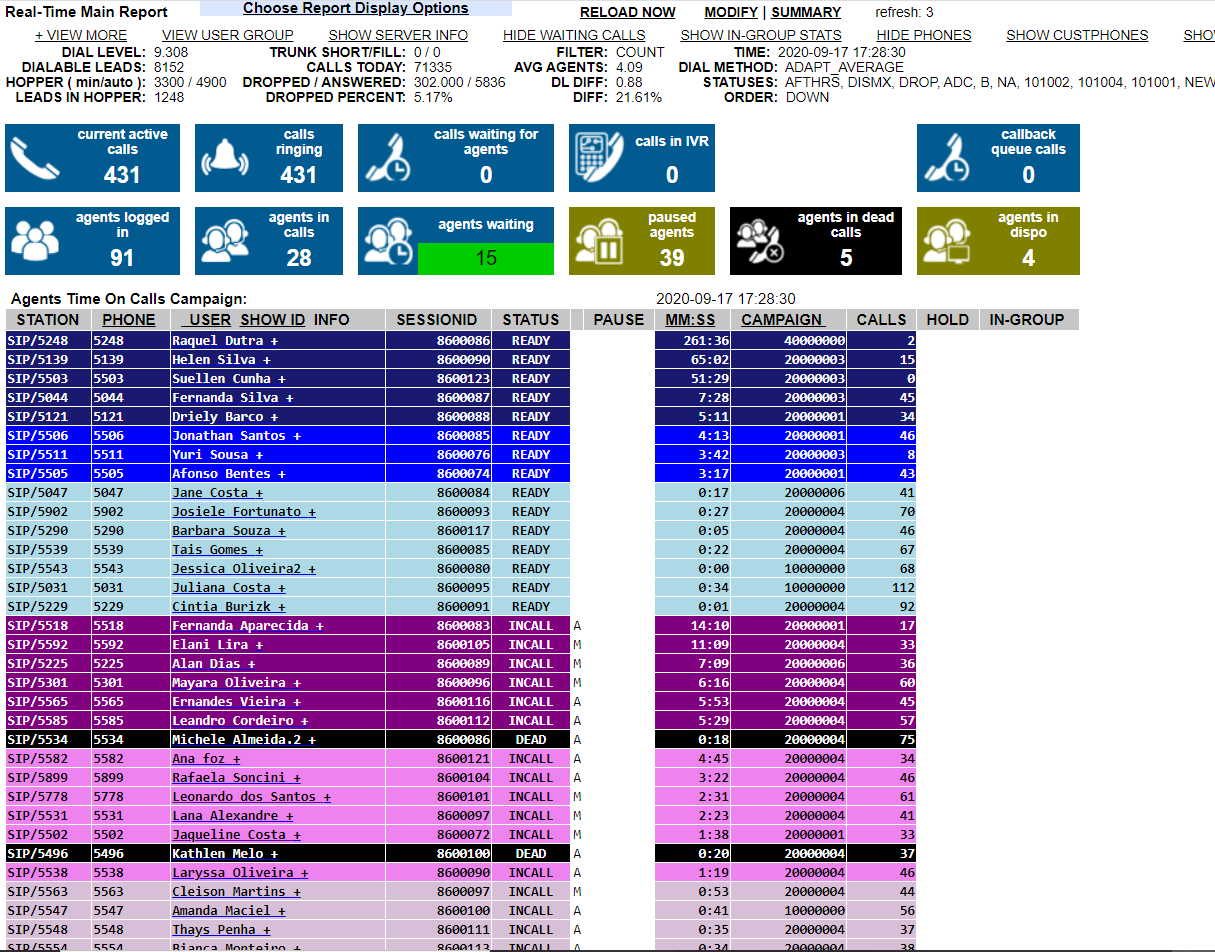
The other place you’ll see a similar layout of statuses is at the bottom of any campaign. I’ll go over what this means as well. Below is a picture to help you follow along:
As you can see above it looks very similar to the results on the bottom of each list, except this combines all active lists on the campaign and shows you only called and not called results. What this means is the numbers next to each dispo for the called campaign have all been dialed since the last reset of the lists attached and active, and the same for the not called except those numbers are how many leads have not been dialed since the last lists reset.
I hope this article has helped some of you that may have been confused about this past of the system, comment below or join our chat: https://join.skype.com/ujkQ7i5lV78O of you have any questions.
This article will go over how to integrate Queuemetrics with ViciDial
ViciDial integration
ViciDial is an enterprise class, open source call center suite in use by many large call centers around the world.
VICIdial has a full featured predictive dialer. It can also function as an ACD for inbound calls, or closer calls coming from VICIdial outbound frontiers. It is capable of inbound, outbound, and blended call handling.
It can also be easily integrated with QueueMetrics.
A working ViciDial instance, version 2.0.4 or later
It is very important that all servers involved (be they for QueueMetrics or ViciDial or general Asterisk usage) are on the same time zone and time, aligned with sub-second precision by an NTP daemon. If this is not so, the setting may lead to data corruption and inaccurate reports.
In order to translate ViciDial data to QueueMetrics, the following conventions are used:
The campaign_id in ViciDial is seen as the queue in QueueMetrics
The user ID in ViciDial is prepended by “agent/” and translated to the agent code in QueueMetrics (e.g. user 123 appears as agent/123)
The UniqueID for the call appears as Asterisk’s unique id prepended with server_id field (e.g. 1-1170345123.1234)
In this example, we imagine that:
The QueueMetrics server has IP 1.2.3.4
The QueueMetrics database server has IP 1.2.3.5 and the QM database is called “queuemetrics”
The ViciDial server has IP 1.2.3.6
Changes to QueueMetrics database
ViciDial and QueueMetrics work together by sharing the database.
You must log on to the QueueMetrics database and create a user for ViciDial to connect to it. We use a different username from the one QM uses so it is easy to monitor who is doing what.
GRANT ALL PRIVILEGES ON queuemetrics.* TO vicidial@'1.2.3.6' IDENTIFIED BY 'qm';
ViciDial will also need special indexing on the ‘queue_log’ table to work efficiently:
CREATE INDEX vici_time_id on queue_log(time_id);
CREATE INDEX vici_call_id on queue_log(call_id);
Changes to ViciDial
The system configuration can easily be set from the ViciDial Admin / System Settings page:
Enable QueueMetrics logging: set to 1
QueueMetrics server IP: this is the IP for the MySQL DB server, in our example “1.2.3.5”
QueueMetrics DB name: the database name, in our example “queuemetrics”
QueueMetrics DB login: the database login, in our example “vicidial”
QueueMetrics DB password: the database password, in our example “qm”
QueueMetrics URL: the login URL for QM, e.g. “http://1.2.3.4:8080/queuemetrics”
QueueMetrics LogID: leave it to VIC (this in an ID for the server)
QueueMetrics EnterQueue Prepend: This field is used to allow for prepending of one of the vicidial_list data fields in front of the phone number of the customer for customized QueueMetrics reports. Default is NONE to avoid populating anything.
A set of cron jobs is expected to run to keep the logs updated; check that they are present by issuing a ‘crontab -e’:
### fix the vicidial_agent_log once every hour and the full day run at night
33 * * * * /usr/share/astguiclient/AST_cleanup_agent_log.pl
50 0 * * * /usr/share/astguiclient/AST_cleanup_agent_log.pl --last-24hours
*/5 * * * * /usr/share/astguiclient/AST_cleanup_agent_log.pl --only-qm-live-call-check
1 1 * * * /usr/share/astguiclient/Vtiger_optimize_all_tables.pl --quiet
Also, you will need to install the PHP XML-RPC library in order to have audio data accessible from the QueueMetrics server:
pear install XML_RPC-1.5.1
Changes to QueueMetrics
Edit the ‘configuration.properties’ file in order to set the following properties:
# This is the default queue log file.
default.queue_log_file=sql:P01
By default, ViciDial logs all data to partition “P01”.
After this, you need to define each ViciDial campaign as a QueueMetrics queue, and set it properly as an inbound or outbound one. After that, you can freely create composite queues to report on all or some activity at once.
The live monitoring asks for an extension to send the call to, this is an extension dialed on the active voicemail server as defined in the system settings. If there is no active voicemail defined then the live monitor will place the call to the extension on the server that the agent is on.
As far as I know, no one uses this anymore, but I wanted to give those of you that are interested the ability to give it a try if you wanted, so here it is
How to – enable and use password encryption in ViciDial
This article is going to go over how to enable and use password encryption in ViciDial. By default passwords are displayed in plain text in the ViciDial Admin GUI, this will show you how to encrypt those.
Step 1: Installing the Bcrypt perl module
Using the CPAN console install the Bcrypt, run the below command
cpan install Crypt::Eksblowfish::Bcrypt
Step 2: Enabling the Password Encryption
By default the Password encryption is disabled in Vicidial and we need to enable it by using a perl script via the Linux command line as show below:
Now navigate to ADMIN > SYSTEM SETTINGS > PASSWORD ENCRYPTION and you’ll see the Password Encryption is now enabled. Now all new users added to the system will automatically be encrypted.
Step 3: Encrypting Plain Text Password
All the users passwords which are created before enabling the Password encryption, will remain as clear plain text ,to encrypt the existing plain text passwords either manually edit them and update or run the below command to convert all the plain text to encrypted text.
/usr/share/astguiclient/ADMIN_bcrypt_convert.pl –clear-plaintext-pass or /usr/share/astguiclient/ADMIN_bcrypt_convert.pl –debugX –update-override –clear-plaintext-pass
How to Reset the Forgotten Password
If you have forget the admin password , you need to update the password under mysql/mariadb with the hashed password, for non-admin users either you can update the password from admin login or follow the below procedure.
Step 1: Generate the Hash Password
Run the below command from SSH console with the password which you want to set of a user for example for admin user 6666 i need to set a password as admin123
/srv/www/htdocs/agc/bp.pl –pass=admin123
The above command will output the HASHED value of admin123 ,copy that proceed to step 2
Step 2: Updating the Mysql user table
once hash password generated run the below mysql command with the password generated in step 1
mysql -p use asterisk; UPDATE vicidial_users set pass_hash=’kfYvywV959fn09rSZML70wHjjxsaYjm’ where user=’6666′;
Now you can login to the vicidial admin or agent portal with the new password.
I hope this helps some of you who need to have tighter security for your systems.
How to – Remove the water drop/bloop sound from ViciDial
Ok, so as most of you probably know already, Asterisk is not going to be using meetMe anymore and they have set it to “End of life” so it will no longer get any updates. So what does this mean for Vicidial which uses MeetMe channels for all its sounds and communications? Well, there is another module called confbridge which can also handle these jobs and actually can do so better and has room for some more advanced features over time I’m sure. Ok so let’s start with the main issue a lot of people are going to have, really because they are scared more than anything, is confbridge needs at least Asterisk 16 to work so our first step is going to be to update Asterisk from 13 to 16. The good news is once you do this, you can remove the water drop sound from the customer side of the calls you make so they no longer know you are calling from a call center and hangup before you even get a chance to say hi. Before getting to step 1, make sure you are at the latest SVN which at the time of this article is 3636 by following this article.
Step 1 – Upgrade to Asterisk 16
ok so lets go ahead and install Asterisk 16 by following the steps from the article below:
We had to fix the Asterisk 16 install over Asterisk 13 by running “make uninstall” and then reinstalling as shown here:
Fixing Asterisk 16 install
Now we need to stop the current Asterisk 13 from running and start back up the new Asterisk 16.
asterisk -r
core restart now
/usr/share/astguiclient/start_asterisk_boot.pl
asterisk -r (make sure the version you see is 16)
Step 2 – Add new confbridge extensions
We need to edit extensions.conf and add some new conferences for confbridge to use so lets start by going into the asterisk directory:
cd /etc/asterisk nano extensions.conf paste the following under the [default] section:
; --------------------------
; ConfBridge Extensions
; --------------------------

; use to send a agent channel into the conference
exten => _9600XXX,1,Answer()
exten => _9600XXX,n,Playback(sip-silence)
exten => _9600XXX,n,ConfBridge(${EXTEN},vici_agent_bridge,vici_customer_user)
exten => _9600XXX,n,Hangup()

;; used to send an customer channel into the conference
exten => _29600XXX,1,Answer()
exten => _29600XXX,n,Playback(sip-silence)
exten => _29600XXX,n,ConfBridge(${EXTEN:1},vici_agent_bridge,vici_agent_user)
exten => _29600XXX,n,Hangup()

;; used by an admin to enter the confernece
exten => _39600XXX,1,Answer()
exten => _39600XXX,n,Playback(sip-silence)
exten => _39600XXX,n,ConfBridge(${EXTEN:1},vici_agent_bridge,vici_admin_user)
exten => _39600XXX,n,Hangup()

;; used to monitor a conference
exten => _49600XXX,1,Answer()
exten => _49600XXX,n,Playback(sip-silence)
exten => _49600XXX,n,ConfBridge(${EXTEN:1},vici_agent_bridge,vici_monitor_user)
exten => _49600XXX,n,Hangup()

;; used to record into a conference
exten => _59600XXX,1,Answer()
exten => _59600XXX,n,Playback(sip-silence)
exten => _59600XXX,n,ConfBridge(${EXTEN:1},vici_agent_bridge,vici_recording_user)
exten => _59600XXX,n,Hangup()

;; used to barge a conference
exten => _69600XXX,1,Answer()
exten => _69600XXX,n,Playback(sip-silence)
exten => _69600XXX,n,ConfBridge(${EXTEN:1},vici_agent_bridge,vici_barge_user)
exten => _69600XXX,n,Hangup()

;; used to trigger DTMF tones in a conference
exten => _79600XXX,1,Answer()
exten => _79600XXX,n,Playback(sip-silence)
exten => _79600XXX,n,ConfBridge(${EXTEN:1},vici_agent_bridge,vici_dtmf_user)
exten => _79600XXX,n,Hangup()

;; used to play an audio file to a conference
exten => _89600XXX,1,Answer()
exten => _89600XXX,n,Playback(sip-silence)
exten => _89600XXX,n,ConfBridge(${EXTEN:1},vici_agent_bridge,vici_audio_user)
exten => _89600XXX,n,Hangup()

;; used to kick all channels from a conference
exten => _99600XXX,1,ConfKick(${EXTEN:1},all)
exten => _99600XXX,2,Hangup()
exten => _55559600XXX,1,ConfKick(${EXTEN:4},all)
exten => _55559600XXX,2,Hangup()
Save and exit
Step 3 – Add additional code for confbridge to work correctly
We have to edit a couple files so first lets do:
nano /etc/asterisk/confbridge.conf and paste this at the bottom: #include confbridge-vicidial.conf
Now create a new file called confbridge-vicidial.conf and add the following lines:
; Bridge Profile for agent conferences
[vici_agent_bridge]
type=bridge
max_members=10
record_conference=no
internal_sample_rate=8000
mixing_interval=40
video_mode=none
sound_join=enter
sound_leave=leave
sound_has_joined=sip-silence
sound_has_left=sip-silence
sound_kicked=sip-silence
sound_muted=sip-silence
sound_unmuted=sip-silence
sound_only_person=confbridge-only-participant
sound_only_one=sip-silence
sound_there_are=sip-silence
sound_other_in_party=sip-silence
sound_begin=sip-silence
sound_wait_for_leader=sip-silence
sound_leader_has_left=sip-silence
sound_get_pin=sip-silence
sound_invalid_pin=sip-silence
sound_locked=sip-silence
sound_locked_now=sip-silence
sound_unlocked_now=sip-silence
sound_error_menu=sip-silence
sound_participants_muted=sip-silence


; User Profile for agent channels
[vici_agent_user]
type=user
admin=no
quiet=no
startmuted=no
marked=yes
dtmf_passthrough=yes
hear_own_join_sound=yes
dsp_drop_silence=yes

; User Profile for admin channels
[vici_admin_user]
type=user
admin=yes
quiet=no
startmuted=no
marked=yes
dtmf_passthrough=yes
dsp_drop_silence=yes

; User Profile for monitoring
[vici_monitor_user]
type=user
admin=no
quiet=no
startmuted=yes
marked=no
dtmf_passthrough=no
dsp_drop_silence=yes

; User Profile for barging
[vici_barge_user]
type=user
admin=no
quiet=no
startmuted=no
marked=no
dtmf_passthrough=yes
dsp_drop_silence=yes

; User Profile for customers channels
[vici_customer_user]
type=user
admin=no
quiet=no
startmuted=no
marked=yes
dtmf_passthrough=yes
hear_own_join_sound=no
dsp_drop_silence=yes

; User Profile for call recording channels
[vici_recording_user]
type=user
admin=no
quiet=yes
startmuted=yes
marked=no
dtmf_passthrough=no
dsp_drop_silence=yes

; User Profile for audio playback channels
[vici_audio_user]
type=user
admin=no
quiet=yes
startmuted=yes
marked=no
dtmf_passthrough=no
dsp_drop_silence=yes

; User Profile for triggering DTMF
[vici_dtmf_user]
type=user
admin=no
quiet=yes
startmuted=yes
marked=no
dtmf_passthrough=yes
dsp_drop_silence=yes
Step 4 – Add ConfBridge Conferences to Database
Go into mysql and add the conferences to the vicidial_confbridges table by pasting the following commands:
(Click Enter for Y) Next enter your server IP and press enter twice to chaneg it in the DB as show below:
Update Server IP
Step 5 – Code changes to ViciDial files
There are some files now that have to be patched in order to include the changes needed for confbrides to work. They are in the “extras/ConfBridge/” directory of the svn/trunk codebase. Lets copy the files over to where they are needed, this will depend on if you are using a single server or a cluster to where the files go. Here is a list of where they go:
Dialers:
/usr/share/astguiclient/ -
- ADMIN_keepalive_ALL.pl.diff
- ADMIN_update_server_ip.pl.diff
- AST_DB_optimize.pl.diff
- AST_reset_mysql_vars.pl.diff
- AST_VDremote_agents.pl.diff
- AST_conf_update_screen.pl

Webservers:
/srv/www/htdocs/agc/ -
- vicidial.php.diff
- vdc_db_query.php.diff
- manager_send.php.diff
/srv/www/htdocs/vicidial/ -
- non_agent_api.php.diff

You can copy and paste the entire code below to get it all done
Step 6 – Add the confbridge keepalive and turn off the conf_update keepalive in crontab
A new screen session has been added called 'AST_conf_update_screen.pl'. This screen session replaces both the AST_conf_update.pl and AST_conf_update_3way.pl scripts. It checks both MeetMe and ConfBridge conferences for unnecessary channels and removes them. For instance if an agent does a Leave 3way and a few minutes later one of the remaining channels hangs up. This script will remove the remaining channel and free the conference for use by Vicidial. This screen session is optional for use with MeetMe but is required to be used with ConfBridge.
Add C to VARactive_keepalives
To enable this screen session you need to add a 'C' to the 'VARactive_keepalives' variable in the '/etc/astguiclient.conf' on your dialers, and comment out the following line from your crontab:

                ### updater for conference validator
                #* * * * * /usr/share/astguiclient/AST_conf_update.pl

You can configure the refresh interval for how often the screen session checks for unnecessary channels by changing "Conf Update Interval" in Admin -> Servers.
Step 7- Make the needed changes in ViciDial GUI
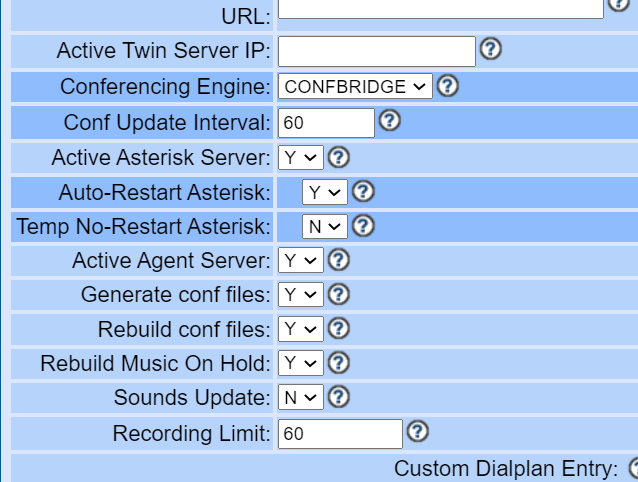
Login to the ViciDial Admin GUI and go to Admin > Servers and click on the server(s) that are dialers and change the conferencing engine to “CONFBRIDGE” as shown below:
Change conferencing Engine to CONFBRIDGE
Step 8 – Add confbridge to manager.conf
nano /etc/asterisk/manager.conf
Go to the bottom and paste:

[confcron]
secret = 1234
read = command,reporting
write = command,reporting

eventfilter=Event: Meetme
eventfilter=Event: Confbridge
Thats a lot to get through but now that its done your customers will no longer hear the “Water drop” or “bloop” sound that they do now and you’re ready for the future of Asterisk now that meetme has been deprecated. Thats it for now, you’re all done. Hopefully this helps those of you who are a little intimidated to try the change and like always, if you have any problems, feel free to visit our Skype live support with almost 200 Vicidial experts from around the world.


