How to – Switch ViciDial from meetme to confbridge
Ok, so as most of you probably know already, Asterisk is not going to be using meetMe anymore and they have set it to “End of life” so it will no longer get any updates. So what does this mean for Vicidial which uses MeetMe channels for all its sounds and communications? Well, there is another module called confbridge which can also handle these jobs and actually can do so better and has room for some more advanced features over time I’m sure. Ok so let’s start with the main issue a lot of people are going to have, really because they are scared more than anything, is confbridge needs at least Asterisk 16 to work so our first step is going to be to update Asterisk from 13 to 16. Make sure you are at the latest SVN which at the time of this article is 3636 by following this article.
Step 1 – Upgrade to Asterisk 16
ok so lets go ahead and install Asterisk 16 by following the steps below:
First you will need to follow this article on how to download, patch and compile Asterisk 16 or you can use the compile commands below:

./configure --libdir=/usr/lib64 --with-pjproject-bundled --with-jansson-bundled
rm -rf menuselect.makeopts
make menuselect*
**** Go down one to applications and hit enter, go down until you find the "meetme" app and press space bar, then hit "X" ****
make && make install
make uninstall
make install
We had to fix the Asterisk 16 install over Asterisk 13 by running “make uninstall” and then reinstalling as shown here:

Now we need to stop the current Asterisk 13 from running and start back up the new Asterisk 16.
asterisk -r
core restart now
/usr/share/astguiclient/start_asterisk_boot.pl
asterisk -r (make sure the version you see is 16)
Step 2 – Add new confbridge extensions
We need to edit extensions.conf and add some new conferences for confbridge to use so lets start by going into the asterisk directory:
cd /etc/asterisk
nano extensions.conf
paste the following at the bottom:
; --------------------------
; ConfBridge Extensions
; --------------------------

; use to send a agent channel into the conference
exten => _9600XXX,1,Answer()
exten => _9600XXX,n,Playback(sip-silence)
exten => _9600XXX,n,ConfBridge(${EXTEN},vici_agent_bridge,vici_customer_user)
exten => _9600XXX,n,Hangup()

;; used to send an customer channel into the conference
exten => _29600XXX,1,Answer()
exten => _29600XXX,n,Playback(sip-silence)
exten => _29600XXX,n,ConfBridge(${EXTEN:1},vici_agent_bridge,vici_agent_user)
exten => _29600XXX,n,Hangup()

;; used by an admin to enter the confernece
exten => _39600XXX,1,Answer()
exten => _39600XXX,n,Playback(sip-silence)
exten => _39600XXX,n,ConfBridge(${EXTEN:1},vici_agent_bridge,vici_admin_user)
exten => _39600XXX,n,Hangup()

;; used to monitor a conference
exten => _49600XXX,1,Answer()
exten => _49600XXX,n,Playback(sip-silence)
exten => _49600XXX,n,ConfBridge(${EXTEN:1},vici_agent_bridge,vici_monitor_user)
exten => _49600XXX,n,Hangup()

;; used to record into a conference
exten => _59600XXX,1,Answer()
exten => _59600XXX,n,Playback(sip-silence)
exten => _59600XXX,n,ConfBridge(${EXTEN:1},vici_agent_bridge,vici_recording_user)
exten => _59600XXX,n,Hangup()

;; used to barge a conference
exten => _69600XXX,1,Answer()
exten => _69600XXX,n,Playback(sip-silence)
exten => _69600XXX,n,ConfBridge(${EXTEN:1},vici_agent_bridge,vici_barge_user)
exten => _69600XXX,n,Hangup()

;; used to trigger DTMF tones in a conference
exten => _79600XXX,1,Answer()
exten => _79600XXX,n,Playback(sip-silence)
exten => _79600XXX,n,ConfBridge(${EXTEN:1},vici_agent_bridge,vici_dtmf_user)
exten => _79600XXX,n,Hangup()

;; used to play an audio file to a conference
exten => _89600XXX,1,Answer()
exten => _89600XXX,n,Playback(sip-silence)
exten => _89600XXX,n,ConfBridge(${EXTEN:1},vici_agent_bridge,vici_audio_user)
exten => _89600XXX,n,Hangup()

;; used to kick all channels from a conference
exten => _99600XXX,1,ConfKick(${EXTEN:1},all)
exten => _99600XXX,2,Hangup()
exten => _55559600XXX,1,ConfKick(${EXTEN:4},all)
exten => _55559600XXX,2,Hangup()
Save and exit
Step 3 – Add additional code for confbridge to work correctly
We have to edit a couple files so first lets do:
nano /etc/asterisk/confbridge.conf and paste this at the bottom:
#include confbridge-vicidial.conf
Now create a new file called confbridge-vicidial.conf and add the following lines:
; Bridge Profile for agent conferences
[vici_agent_bridge]
type=bridge
max_members=10
record_conference=no
internal_sample_rate=8000
mixing_interval=40
video_mode=none
sound_join=enter
sound_leave=leave
sound_has_joined=sip-silence
sound_has_left=sip-silence
sound_kicked=sip-silence
sound_muted=sip-silence
sound_unmuted=sip-silence
sound_only_person=confbridge-only-participant
sound_only_one=sip-silence
sound_there_are=sip-silence
sound_other_in_party=sip-silence
sound_begin=sip-silence
sound_wait_for_leader=sip-silence
sound_leader_has_left=sip-silence
sound_get_pin=sip-silence
sound_invalid_pin=sip-silence
sound_locked=sip-silence
sound_locked_now=sip-silence
sound_unlocked_now=sip-silence
sound_error_menu=sip-silence
sound_participants_muted=sip-silence


; User Profile for agent channels
[vici_agent_user]
type=user
admin=no
quiet=no
startmuted=no
marked=yes
dtmf_passthrough=yes
hear_own_join_sound=yes
dsp_drop_silence=yes

; User Profile for admin channels
[vici_admin_user]
type=user
admin=yes
quiet=no
startmuted=no
marked=yes
dtmf_passthrough=yes
dsp_drop_silence=yes

; User Profile for monitoring
[vici_monitor_user]
type=user
admin=no
quiet=no
startmuted=yes
marked=no
dtmf_passthrough=no
dsp_drop_silence=yes

; User Profile for barging
[vici_barge_user]
type=user
admin=no
quiet=no
startmuted=no
marked=no
dtmf_passthrough=yes
dsp_drop_silence=yes

; User Profile for customers channels
[vici_customer_user]
type=user
admin=no
quiet=no
startmuted=no
marked=yes
dtmf_passthrough=yes
hear_own_join_sound=no
dsp_drop_silence=yes

; User Profile for call recording channels
[vici_recording_user]
type=user
admin=no
quiet=yes
startmuted=yes
marked=no
dtmf_passthrough=no
dsp_drop_silence=yes

; User Profile for audio playback channels
[vici_audio_user]
type=user
admin=no
quiet=yes
startmuted=yes
marked=no
dtmf_passthrough=no
dsp_drop_silence=yes

; User Profile for triggering DTMF
[vici_dtmf_user]
type=user
admin=no
quiet=yes
startmuted=yes
marked=no
dtmf_passthrough=yes
dsp_drop_silence=yes
Step 4 – Add ConfBridge Conferences to Database
Go into mysql and add the conferences to the vicidial_confbridges table by pasting the following commands:
mysql -A asterisk
INSERT INTO `vicidial_confbridges` VALUES
(9600000,'10.10.10.17','','0',NULL),
(9600001,'10.10.10.17','','0',NULL),
(9600002,'10.10.10.17','','0',NULL),
(9600003,'10.10.10.17','','0',NULL),
(9600004,'10.10.10.17','','0',NULL),
(9600005,'10.10.10.17','','0',NULL),
(9600006,'10.10.10.17','','0',NULL),
(9600007,'10.10.10.17','','0',NULL),
(9600008,'10.10.10.17','','0',NULL),
(9600009,'10.10.10.17','','0',NULL),
(9600010,'10.10.10.17','','0',NULL),
(9600011,'10.10.10.17','','0',NULL),
(9600012,'10.10.10.17','','0',NULL),
(9600013,'10.10.10.17','','0',NULL),
(9600014,'10.10.10.17','','0',NULL),
(9600015,'10.10.10.17','','0',NULL),
(9600016,'10.10.10.17','','0',NULL),
(9600017,'10.10.10.17','','0',NULL),
(9600018,'10.10.10.17','','0',NULL),
(9600019,'10.10.10.17','','0',NULL),
(9600020,'10.10.10.17','','0',NULL),
(9600021,'10.10.10.17','','0',NULL),
(9600022,'10.10.10.17','','0',NULL),
(9600023,'10.10.10.17','','0',NULL),
(9600024,'10.10.10.17','','0',NULL),
(9600025,'10.10.10.17','','0',NULL),
(9600026,'10.10.10.17','','0',NULL),
(9600027,'10.10.10.17','','0',NULL),
(9600028,'10.10.10.17','','0',NULL),
(9600029,'10.10.10.17','','0',NULL),
(9600030,'10.10.10.17','','0',NULL),
(9600031,'10.10.10.17','','0',NULL),
(9600032,'10.10.10.17','','0',NULL),
(9600033,'10.10.10.17','','0',NULL),
(9600034,'10.10.10.17','','0',NULL),
(9600035,'10.10.10.17','','0',NULL),
(9600036,'10.10.10.17','','0',NULL),
(9600037,'10.10.10.17','','0',NULL),
(9600038,'10.10.10.17','','0',NULL),
(9600039,'10.10.10.17','','0',NULL),
(9600040,'10.10.10.17','','0',NULL),
(9600041,'10.10.10.17','','0',NULL),
(9600042,'10.10.10.17','','0',NULL),
(9600043,'10.10.10.17','','0',NULL),
(9600044,'10.10.10.17','','0',NULL),
(9600045,'10.10.10.17','','0',NULL),
(9600046,'10.10.10.17','','0',NULL),
(9600047,'10.10.10.17','','0',NULL),
(9600048,'10.10.10.17','','0',NULL),
(9600049,'10.10.10.17','','0',NULL),
(9600050,'10.10.10.17','','0',NULL),
(9600051,'10.10.10.17','','0',NULL),
(9600052,'10.10.10.17','','0',NULL),
(9600053,'10.10.10.17','','0',NULL),
(9600054,'10.10.10.17','','0',NULL),
(9600055,'10.10.10.17','','0',NULL),
(9600056,'10.10.10.17','','0',NULL),
(9600057,'10.10.10.17','','0',NULL),
(9600058,'10.10.10.17','','0',NULL),
(9600059,'10.10.10.17','','0',NULL),
(9600060,'10.10.10.17','','0',NULL),
(9600061,'10.10.10.17','','0',NULL),
(9600062,'10.10.10.17','','0',NULL),
(9600063,'10.10.10.17','','0',NULL),
(9600064,'10.10.10.17','','0',NULL),
(9600065,'10.10.10.17','','0',NULL),
(9600066,'10.10.10.17','','0',NULL),
(9600067,'10.10.10.17','','0',NULL),
(9600068,'10.10.10.17','','0',NULL),
(9600069,'10.10.10.17','','0',NULL),
(9600070,'10.10.10.17','','0',NULL),
(9600071,'10.10.10.17','','0',NULL),
(9600072,'10.10.10.17','','0',NULL),
(9600073,'10.10.10.17','','0',NULL),
(9600074,'10.10.10.17','','0',NULL),
(9600075,'10.10.10.17','','0',NULL),
(9600076,'10.10.10.17','','0',NULL),
(9600077,'10.10.10.17','','0',NULL),
(9600078,'10.10.10.17','','0',NULL),
(9600079,'10.10.10.17','','0',NULL),
(9600080,'10.10.10.17','','0',NULL),
(9600081,'10.10.10.17','','0',NULL),
(9600082,'10.10.10.17','','0',NULL),
(9600083,'10.10.10.17','','0',NULL),
(9600084,'10.10.10.17','','0',NULL),
(9600085,'10.10.10.17','','0',NULL),
(9600086,'10.10.10.17','','0',NULL),
(9600087,'10.10.10.17','','0',NULL),
(9600088,'10.10.10.17','','0',NULL),
(9600089,'10.10.10.17','','0',NULL),
(9600090,'10.10.10.17','','0',NULL),
(9600091,'10.10.10.17','','0',NULL),
(9600092,'10.10.10.17','','0',NULL),
(9600093,'10.10.10.17','','0',NULL),
(9600094,'10.10.10.17','','0',NULL),
(9600095,'10.10.10.17','','0',NULL),
(9600096,'10.10.10.17','','0',NULL),
(9600097,'10.10.10.17','','0',NULL),
(9600098,'10.10.10.17','','0',NULL),
(9600099,'10.10.10.17','','0',NULL),
(9600100,'10.10.10.17','','0',NULL),
(9600101,'10.10.10.17','','0',NULL),
(9600102,'10.10.10.17','','0',NULL),
(9600103,'10.10.10.17','','0',NULL),
(9600104,'10.10.10.17','','0',NULL),
(9600105,'10.10.10.17','','0',NULL),
(9600106,'10.10.10.17','','0',NULL),
(9600107,'10.10.10.17','','0',NULL),
(9600108,'10.10.10.17','','0',NULL),
(9600109,'10.10.10.17','','0',NULL),
(9600110,'10.10.10.17','','0',NULL),
(9600111,'10.10.10.17','','0',NULL),
(9600112,'10.10.10.17','','0',NULL),
(9600113,'10.10.10.17','','0',NULL),
(9600114,'10.10.10.17','','0',NULL),
(9600115,'10.10.10.17','','0',NULL),
(9600116,'10.10.10.17','','0',NULL),
(9600117,'10.10.10.17','','0',NULL),
(9600118,'10.10.10.17','','0',NULL),
(9600119,'10.10.10.17','','0',NULL),
(9600120,'10.10.10.17','','0',NULL),
(9600121,'10.10.10.17','','0',NULL),
(9600122,'10.10.10.17','','0',NULL),
(9600123,'10.10.10.17','','0',NULL),
(9600124,'10.10.10.17','','0',NULL),
(9600125,'10.10.10.17','','0',NULL),
(9600126,'10.10.10.17','','0',NULL),
(9600127,'10.10.10.17','','0',NULL),
(9600128,'10.10.10.17','','0',NULL),
(9600129,'10.10.10.17','','0',NULL),
(9600130,'10.10.10.17','','0',NULL),
(9600131,'10.10.10.17','','0',NULL),
(9600132,'10.10.10.17','','0',NULL),
(9600133,'10.10.10.17','','0',NULL),
(9600134,'10.10.10.17','','0',NULL),
(9600135,'10.10.10.17','','0',NULL),
(9600136,'10.10.10.17','','0',NULL),
(9600137,'10.10.10.17','','0',NULL),
(9600138,'10.10.10.17','','0',NULL),
(9600139,'10.10.10.17','','0',NULL),
(9600140,'10.10.10.17','','0',NULL),
(9600141,'10.10.10.17','','0',NULL),
(9600142,'10.10.10.17','','0',NULL),
(9600143,'10.10.10.17','','0',NULL),
(9600144,'10.10.10.17','','0',NULL),
(9600145,'10.10.10.17','','0',NULL),
(9600146,'10.10.10.17','','0',NULL),
(9600147,'10.10.10.17','','0',NULL),
(9600148,'10.10.10.17','','0',NULL),
(9600149,'10.10.10.17','','0',NULL),
(9600150,'10.10.10.17','','0',NULL),
(9600151,'10.10.10.17','','0',NULL),
(9600152,'10.10.10.17','','0',NULL),
(9600153,'10.10.10.17','','0',NULL),
(9600154,'10.10.10.17','','0',NULL),
(9600155,'10.10.10.17','','0',NULL),
(9600156,'10.10.10.17','','0',NULL),
(9600157,'10.10.10.17','','0',NULL),
(9600158,'10.10.10.17','','0',NULL),
(9600159,'10.10.10.17','','0',NULL),
(9600160,'10.10.10.17','','0',NULL),
(9600161,'10.10.10.17','','0',NULL),
(9600162,'10.10.10.17','','0',NULL),
(9600163,'10.10.10.17','','0',NULL),
(9600164,'10.10.10.17','','0',NULL),
(9600165,'10.10.10.17','','0',NULL),
(9600166,'10.10.10.17','','0',NULL),
(9600167,'10.10.10.17','','0',NULL),
(9600168,'10.10.10.17','','0',NULL),
(9600169,'10.10.10.17','','0',NULL),
(9600170,'10.10.10.17','','0',NULL),
(9600171,'10.10.10.17','','0',NULL),
(9600172,'10.10.10.17','','0',NULL),
(9600173,'10.10.10.17','','0',NULL),
(9600174,'10.10.10.17','','0',NULL),
(9600175,'10.10.10.17','','0',NULL),
(9600176,'10.10.10.17','','0',NULL),
(9600177,'10.10.10.17','','0',NULL),
(9600178,'10.10.10.17','','0',NULL),
(9600179,'10.10.10.17','','0',NULL),
(9600180,'10.10.10.17','','0',NULL),
(9600181,'10.10.10.17','','0',NULL),
(9600182,'10.10.10.17','','0',NULL),
(9600183,'10.10.10.17','','0',NULL),
(9600184,'10.10.10.17','','0',NULL),
(9600185,'10.10.10.17','','0',NULL),
(9600186,'10.10.10.17','','0',NULL),
(9600187,'10.10.10.17','','0',NULL),
(9600188,'10.10.10.17','','0',NULL),
(9600189,'10.10.10.17','','0',NULL),
(9600190,'10.10.10.17','','0',NULL),
(9600191,'10.10.10.17','','0',NULL),
(9600192,'10.10.10.17','','0',NULL),
(9600193,'10.10.10.17','','0',NULL),
(9600194,'10.10.10.17','','0',NULL),
(9600195,'10.10.10.17','','0',NULL),
(9600196,'10.10.10.17','','0',NULL),
(9600197,'10.10.10.17','','0',NULL),
(9600198,'10.10.10.17','','0',NULL),
(9600199,'10.10.10.17','','0',NULL),
(9600200,'10.10.10.17','','0',NULL),
(9600201,'10.10.10.17','','0',NULL),
(9600202,'10.10.10.17','','0',NULL),
(9600203,'10.10.10.17','','0',NULL),
(9600204,'10.10.10.17','','0',NULL),
(9600205,'10.10.10.17','','0',NULL),
(9600206,'10.10.10.17','','0',NULL),
(9600207,'10.10.10.17','','0',NULL),
(9600208,'10.10.10.17','','0',NULL),
(9600209,'10.10.10.17','','0',NULL),
(9600210,'10.10.10.17','','0',NULL),
(9600211,'10.10.10.17','','0',NULL),
(9600212,'10.10.10.17','','0',NULL),
(9600213,'10.10.10.17','','0',NULL),
(9600214,'10.10.10.17','','0',NULL),
(9600215,'10.10.10.17','','0',NULL),
(9600216,'10.10.10.17','','0',NULL),
(9600217,'10.10.10.17','','0',NULL),
(9600218,'10.10.10.17','','0',NULL),
(9600219,'10.10.10.17','','0',NULL),
(9600220,'10.10.10.17','','0',NULL),
(9600221,'10.10.10.17','','0',NULL),
(9600222,'10.10.10.17','','0',NULL),
(9600223,'10.10.10.17','','0',NULL),
(9600224,'10.10.10.17','','0',NULL),
(9600225,'10.10.10.17','','0',NULL),
(9600226,'10.10.10.17','','0',NULL),
(9600227,'10.10.10.17','','0',NULL),
(9600228,'10.10.10.17','','0',NULL),
(9600229,'10.10.10.17','','0',NULL),
(9600230,'10.10.10.17','','0',NULL),
(9600231,'10.10.10.17','','0',NULL),
(9600232,'10.10.10.17','','0',NULL),
(9600233,'10.10.10.17','','0',NULL),
(9600234,'10.10.10.17','','0',NULL),
(9600235,'10.10.10.17','','0',NULL),
(9600236,'10.10.10.17','','0',NULL),
(9600237,'10.10.10.17','','0',NULL),
(9600238,'10.10.10.17','','0',NULL),
(9600239,'10.10.10.17','','0',NULL),
(9600240,'10.10.10.17','','0',NULL),
(9600241,'10.10.10.17','','0',NULL),
(9600242,'10.10.10.17','','0',NULL),
(9600243,'10.10.10.17','','0',NULL),
(9600244,'10.10.10.17','','0',NULL),
(9600245,'10.10.10.17','','0',NULL),
(9600246,'10.10.10.17','','0',NULL),
(9600247,'10.10.10.17','','0',NULL),
(9600248,'10.10.10.17','','0',NULL),
(9600249,'10.10.10.17','','0',NULL),
(9600250,'10.10.10.17','','0',NULL),
(9600251,'10.10.10.17','','0',NULL),
(9600252,'10.10.10.17','','0',NULL),
(9600253,'10.10.10.17','','0',NULL),
(9600254,'10.10.10.17','','0',NULL),
(9600255,'10.10.10.17','','0',NULL),
(9600256,'10.10.10.17','','0',NULL),
(9600257,'10.10.10.17','','0',NULL),
(9600258,'10.10.10.17','','0',NULL),
(9600259,'10.10.10.17','','0',NULL),
(9600260,'10.10.10.17','','0',NULL),
(9600261,'10.10.10.17','','0',NULL),
(9600262,'10.10.10.17','','0',NULL),
(9600263,'10.10.10.17','','0',NULL),
(9600264,'10.10.10.17','','0',NULL),
(9600265,'10.10.10.17','','0',NULL),
(9600266,'10.10.10.17','','0',NULL),
(9600267,'10.10.10.17','','0',NULL),
(9600268,'10.10.10.17','','0',NULL),
(9600269,'10.10.10.17','','0',NULL),
(9600270,'10.10.10.17','','0',NULL),
(9600271,'10.10.10.17','','0',NULL),
(9600272,'10.10.10.17','','0',NULL),
(9600273,'10.10.10.17','','0',NULL),
(9600274,'10.10.10.17','','0',NULL),
(9600275,'10.10.10.17','','0',NULL),
(9600276,'10.10.10.17','','0',NULL),
(9600277,'10.10.10.17','','0',NULL),
(9600278,'10.10.10.17','','0',NULL),
(9600279,'10.10.10.17','','0',NULL),
(9600280,'10.10.10.17','','0',NULL),
(9600281,'10.10.10.17','','0',NULL),
(9600282,'10.10.10.17','','0',NULL),
(9600283,'10.10.10.17','','0',NULL),
(9600284,'10.10.10.17','','0',NULL),
(9600285,'10.10.10.17','','0',NULL),
(9600286,'10.10.10.17','','0',NULL),
(9600287,'10.10.10.17','','0',NULL),
(9600288,'10.10.10.17','','0',NULL),
(9600289,'10.10.10.17','','0',NULL),
(9600290,'10.10.10.17','','0',NULL),
(9600291,'10.10.10.17','','0',NULL),
(9600292,'10.10.10.17','','0',NULL),
(9600293,'10.10.10.17','','0',NULL),
(9600294,'10.10.10.17','','0',NULL),
(9600295,'10.10.10.17','','0',NULL),
(9600296,'10.10.10.17','','0',NULL),
(9600297,'10.10.10.17','','0',NULL),
(9600298,'10.10.10.17','','0',NULL),
(9600299,'10.10.10.17','','0',NULL);
exit
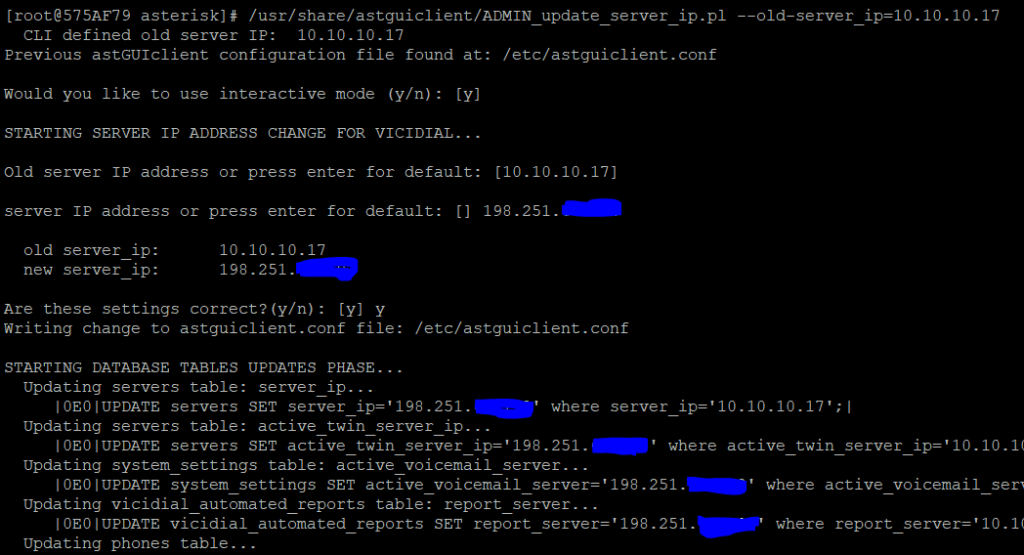
Update the IP to your server IP by running the following command:
/usr/share/astguiclient/ADMIN_update_server_ip.pl –old-server_ip=10.10.10.17 (Click Enter for Y)
Next enter your server IP and press enter twice to chaneg it in the DB as show below:
Step 5 – Code changes to ViciDial files
There are some files now that have to be patched in order to include the changes needed for confbrides to work. They are in the “extras/ConfBridge/” directory of the svn/trunk codebase. Lets copy the files over to where they are needed, this will depend on if you are using a single server or a cluster to where the files go. Here is a list of where they go:
Dialers:
/usr/share/astguiclient/ -
- ADMIN_keepalive_ALL.pl.diff
- ADMIN_update_server_ip.pl.diff
- AST_DB_optimize.pl.diff
- AST_reset_mysql_vars.pl.diff
- AST_VDremote_agents.pl.diff
- AST_conf_update_screen.pl

Webservers:
/srv/www/htdocs/agc/ -
- vicidial.php.diff
- vdc_db_query.php.diff
- manager_send.php.diff
/srv/www/htdocs/vicidial/ -
- non_agent_api.php.diff

You can copy and paste the entire code below to get it all done
cd /usr/src/astguiclient/trunk/extras/ConfBridge/
cp * /usr/share/astguiclient/
cd /usr/share/astguiclient/
mv manager_send.php.diff vdc_db_query.php.diff vicidial.php.diff /var/www/html/agc/
patch -p0 < ADMIN_keepalive_ALL.pl.diff
patch -p0 < ADMIN_update_server_ip.pl.diff
patch -p0 < AST_DB_optimize.pl.diff
chmod +x AST_conf_update_screen.pl
patch -p0 < AST_reset_mysql_vars.pl.diff
cd /var/www/html/agc/
patch -p0 < manager_send.php.diff
patch -p0 < vdc_db_query.php.diff
patch -p0 < vicidial.php.diff
Step 6 – Add the confbridge keepalive and turn off the conf_update keepalive in crontab
A new screen session has been added called 'AST_conf_update_screen.pl'. This screen session replaces both the AST_conf_update.pl and AST_conf_update_3way.pl scripts. It checks both MeetMe and ConfBridge conferences for unnecessary channels and removes them. For instance if an agent does a Leave 3way and a few minutes later one of the remaining channels hangs up. This script will remove the remaining channel and free the conference for use by Vicidial. This screen session is optional for use with MeetMe but is required to be used with ConfBridge.

To enable this screen session you need to add a 'C' to the 'VARactive_keepalives' variable in the '/etc/astguiclient.conf' on your dialers, and comment out the following line from your crontab:

                ### updater for conference validator
                #* * * * * /usr/share/astguiclient/AST_conf_update.pl

You can configure the refresh interval for how often the screen session checks for unnecessary channels by changing "Conf Update Interval" in Admin -> Servers.
Step 7- Make the needed changes in ViciDial GUI
Login to the ViciDial Admin GUI and go to Admin > Servers and click on the server(s) that are dialers and change the conferencing engine to “CONFBRIDGE” as shown below:

Thats a lot to get through but now that its done your customers will no longer hear the “Water drop” or “bloop” sound that they do now and you’re ready for the future of Asterisk now that meetme has been deprecated. Thats it for now, you’re all done. Hopefully this helps those of you who are a little intimidated to try the change and like always, if you have any problems, feel free to visit our Skype live support with almost 200 Vicidial experts from around the world.
-Chris aka carpenox


