Category Uncategorized
How to – Fix “Unable to lookup ‘SERVER_EXTERNAL_IP'”

How to – Fix “Unable to lookup ‘SERVER_EXTERNAL_IP'”

This error is the newer SVN versions and technically, won’t cause any issues, however here is the fix for it. Type the following command in your Linux Command Line:
sudo sed -i 's/SERVER_EXTERNAL_IP/0.0.0.0/' /etc/asterisk/pjsip.confThat’s all there is to it.
Here is a video for those of you who prefer videos from HBTutorials
Chris aka carpenox
How to – Upgrade any Leap ViciBox install to Leap 15.6
How to – Upgrade any Leap ViciBox install to Leap 15.6
A lot of people seem to be keeping their systems on older Vicibox installs such as v9 which is on Leap 15.1, v10 which is on Leap 15.3 or v11 which is on Leap 15.5 which are all end of life. The reasoning behind this, is you are thinking that you are safe with whitelist only IP access to the server, however, you are mistaken. As software reaches its end of life, it no longer receives updates. This means it also stops receiving security patches. Even with IP access only, your firewall can be hit with a denial of service attack, taking it offline. All your software, including MySQL, Apache, OpenSSH, and the Linux kernels themselves, can then be hacked using exploits to gain full root to your servers. This article will teach you how to upgrade any of these to the latest and only supported version of Leap, 15.6, so let’s get started.
Step 1 – Upgrade Repo URL’s
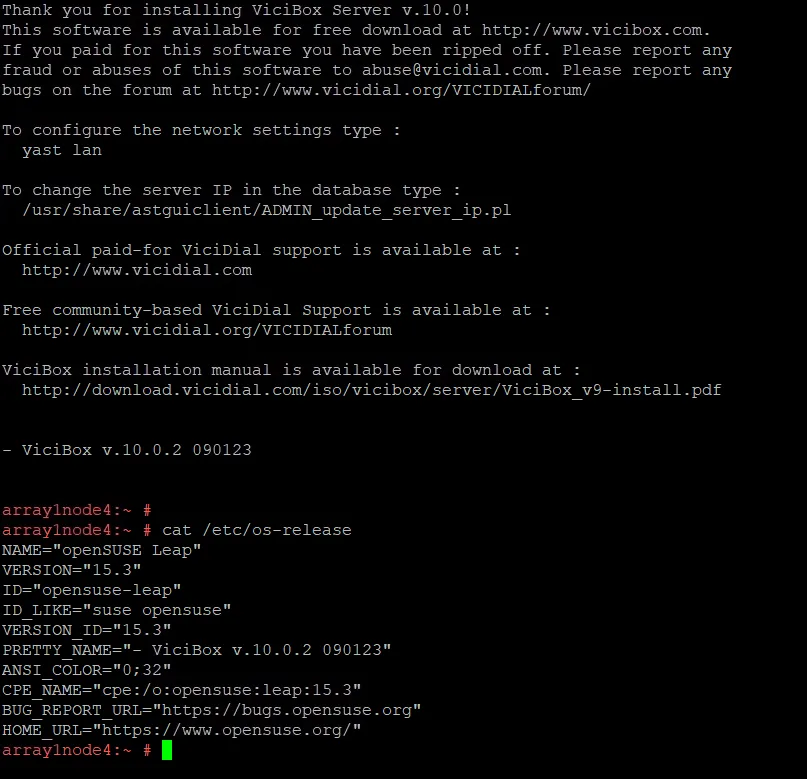
In this example, I am upgrading from ViciBox 10 from Leap 15.3 up to 15.6. You will notice the first line of code has s/15.3/15.6/g which you would need to replace the first part with whatever you are upgrading from, such as ViciBox 9 would be 15.1.
sed -i 's/15.3/15.6/g' /etc/zypp/repos.d/*.repo
zypper --releasever=15.6 lr -u
zypper lr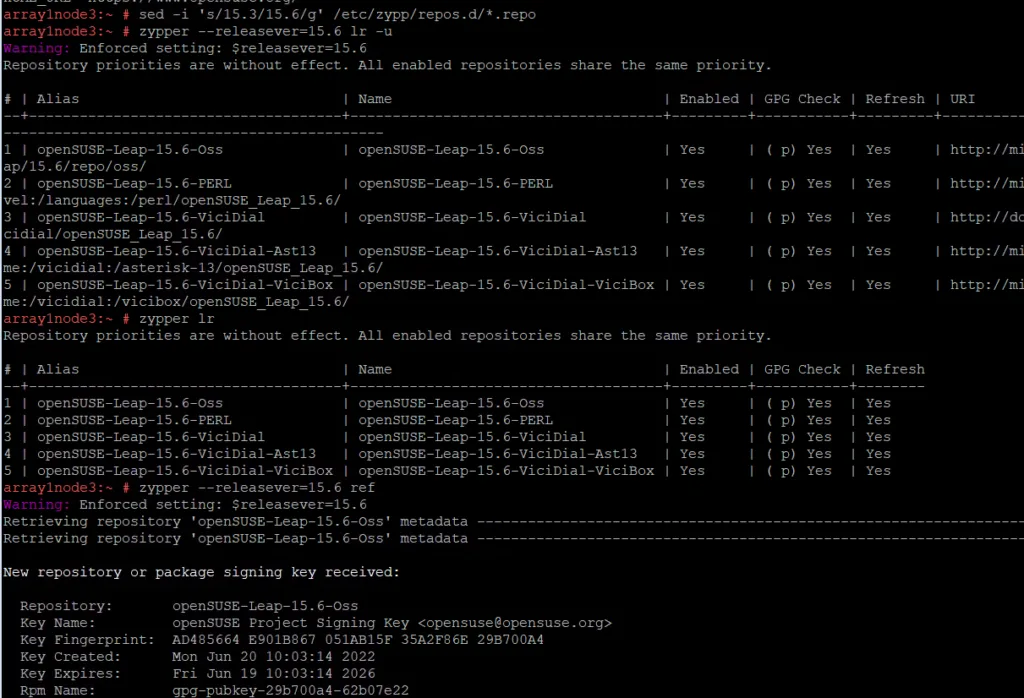
You can see in the picture above, these first steps will replace the repo URL’s, however, some have been changed even more than just the 15.6 portion and we will need to replace those. Below, I will show you how to find which ones to remove by the errors you receive that will be in red.
zypper --releasever=15.6 ref
zypper lr
zypper rr 2
zypper rr 3 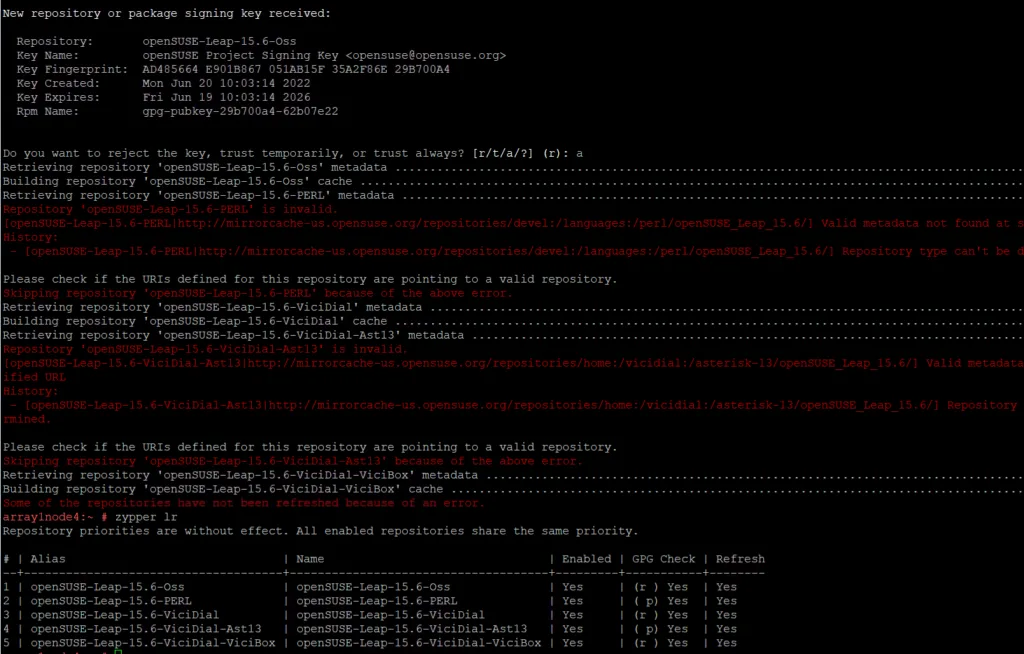
In this picture above, you can see repo #’s 2 and 4 are broken which is Perl and Ast-13 so I removed it with the code above by typing “zypper rr 2” and then “zypper rr 3” (its 3 here and not 4 because when we deleted #2, it moved up one). Now on the next step, we will add all the repo’s we need and replace the ones we deleted.
https://download.opensuse.org/repositories/devel:/languages:/python/15.6/devel:languages:python.repo
zypper ar http://download.opensuse.org/repositories/server:/php:/applications/15.6/server:php:applications.repo
zypper ar https://mirrorcache-us.opensuse.org/repositories/devel:/languages:/perl/15.6/devel:languages:perl.repo
zypper ar https://download.opensuse.org/repositories/home:/vicidial:/vicibox/openSUSE_Leap_15.6/home:vicidial:vicibox.repo
zypper ar https://download.opensuse.org/repositories/home:/vicidial:/asterisk-16/openSUSE_Leap_15.5/home:vicidial:asterisk-16.repo
zypper ar https://download.opensuse.org/update/leap/15.6/oss/openSUSE:Leap:15.6:Update.repo
zypper ar https://download.opensuse.org/update/leap/15.6/backports/openSUSE:Backports:SLE-15-SP6:Update.repo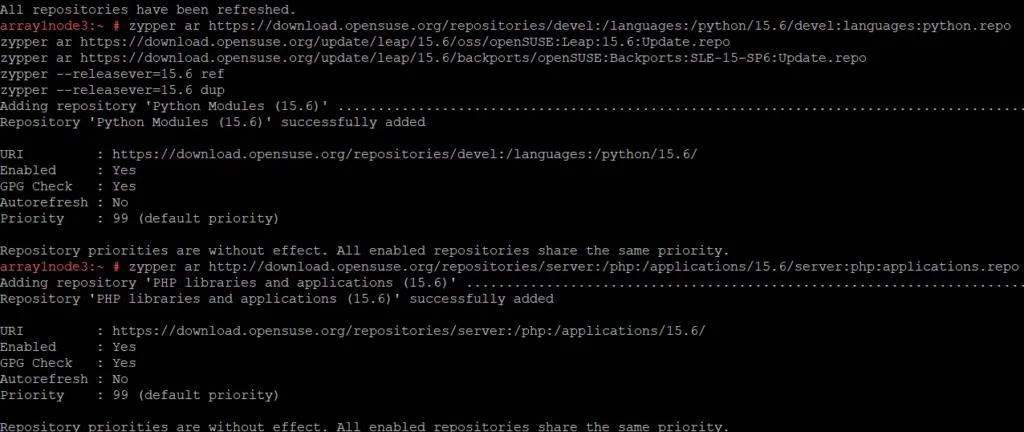
Now the hard part is done, lets run the updates.
Step 2 – Upgrade the OS
zypper --releasever=15.6 ref
zypper --releasever=15.6 dup
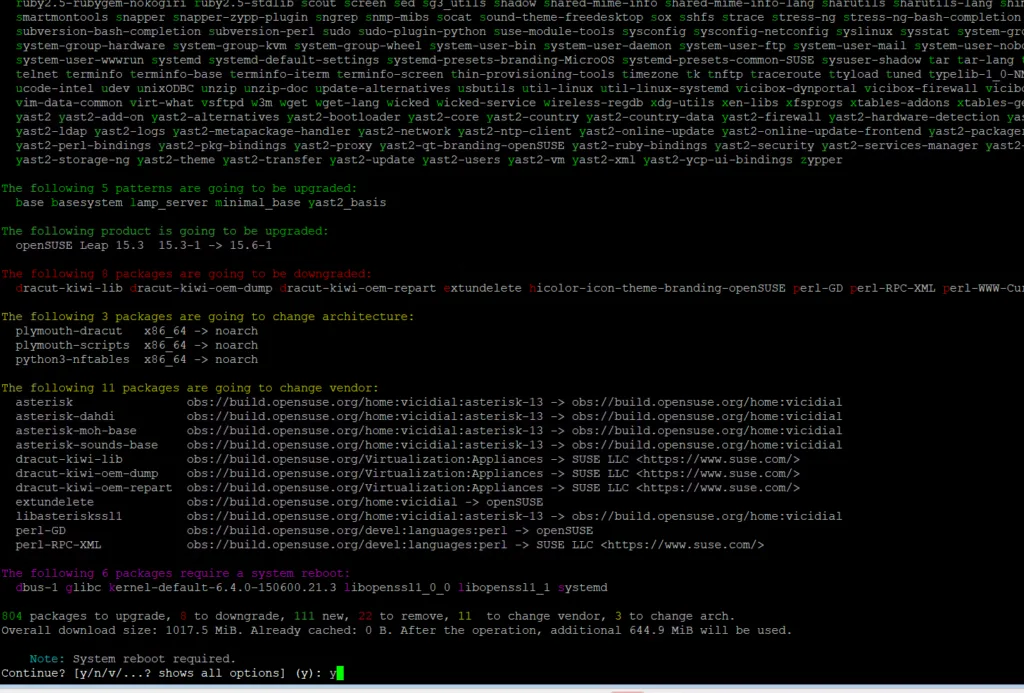
When you run these two commands, you will get errors, you want to make sure you are installing asterisk 16 so pressing 1 most of the way down, and then “breaking vicibox-install” towards the end which I believe was 4.
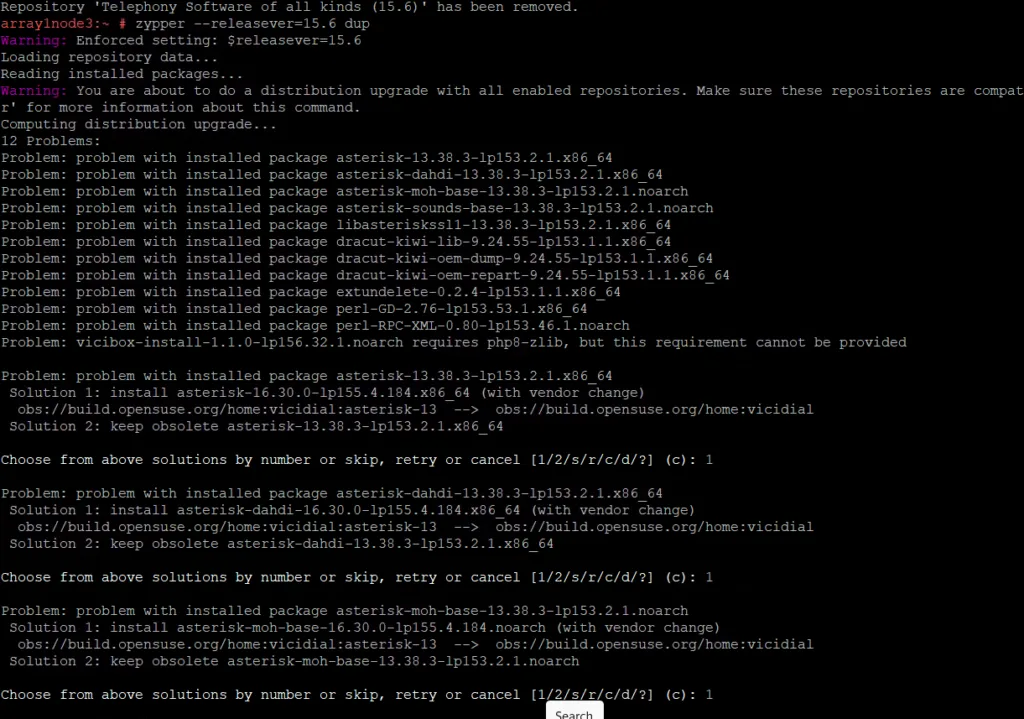
You will then reach the portion to say “y” like in the picture below:
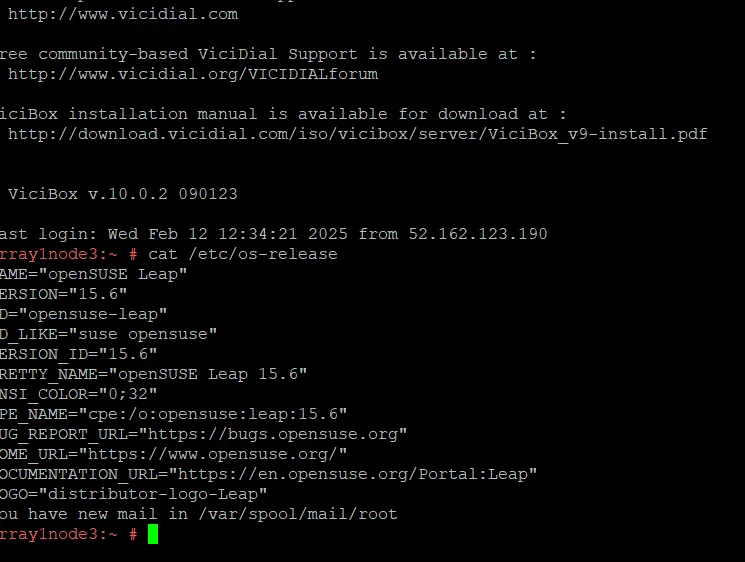
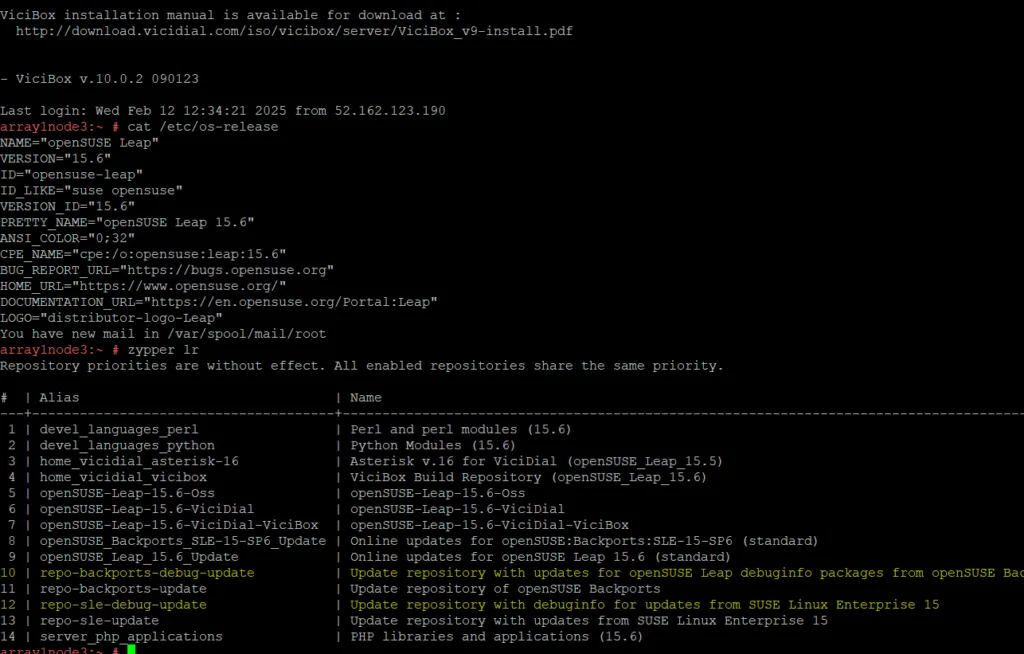
Once everything downloads and installs, you can reboot and you will see the new OS will be labeled as Leap 15.6 when you type “cat /etc/os-release” as you see below even though it is still labeled as ViciBox 10:
Step 3 – Confirm everything that ViciDial needs is installed
zypper install ppp ppp-devel autoconf automake kernel-default-devel kernel-devel gcc make libtool libedit-devel libedit kernel-default dahdi* libopenssl-devel

zypper install php screen php-mcrypt subversion php-cli php-gd php-curl php-mysql php-ldap php-zip php-fileinfo php-opcache

zypper in wget unzip make patch gcc gcc-c++ subversion php php-devel php-gd gd-devel readline-devel php-mbstring php-mcrypt

zypper in php-imap php-ldap php-mysqli php-odbc php-pear php-xml php-xmlrpc curl curl-devel perl-libwww-perl ImageMagick

zypper in newt-devel libxml2-devel kernel-devel sqlite-devel libuuid-devel sox sendmail lame-devel htop iftop perl-File-Which

zypper in php-opcache libss7 mariadb-devel libss7* libopen*

zypper install sqlite-devel httpd mod_ssl nano chkconfig libedit-devel uuid* libxml2*
Step 4 – Enable services
We need to reactive the asterisk and dahdi services by typing the following commands:
systemctl enable asterisk
systelctm enable dahdi
Reboot and verify everything is running correctly, check your sockets with “screen -ls” (make sure “send” and “listen” are there. Check dahdi with “dahdi_cfg -v” and if it errors, run “modprobe dahdi” and you should be good to go, but if you have any issues, join our discord at the bottom of any page for more help.
Chris aka carpenox
How to – Debug Webphones for ViciDial
How to – Debug Webphones for ViciDial

I get asked several times a day in the Discord and Skype group chats about how to fix peoples webphones. So this article will be the typical steps I take in order to debug these type of issues.
Step 1- Is Dahdi running?
The first thing I check is is dahdi running? I do this by typing “dahdi_cfg -v” and the output should look like it does below:
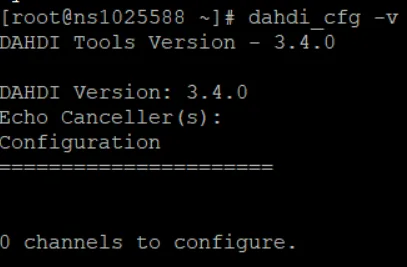
You do not want it to say “1 error(s) detected” as shown below:
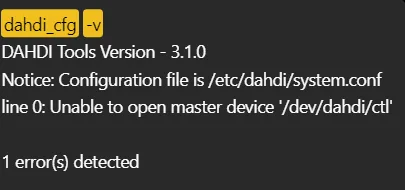
If it does respond like above, you need to run the command “modprobe dahdi” which will bring it into a state like the first picture which is good, retest to verify with “dahdi_cfg -v”. It could also need to be recompiled if it wasnt installed properly. I will create a separate article for this later this week.
Step 2 – Are the ports running?
if the above is functioning correctly, the next step is to make sure you see the ports that are needed for websockets to be running. You can do this by typing “ss -ltnu” and you should see ports 8088 and 8089 running like in the picture below:
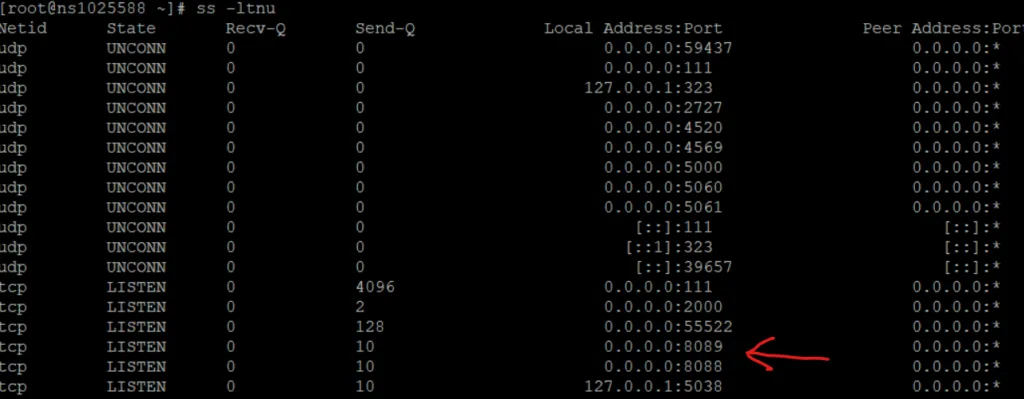
If the ports are showing correctly here, move on to step 3, if not it means your configuration file for web sockets is not setup correctly. To fix this you need to edit your /etc/asterisk/http.conf file and make sure it looks like below or you can copy this file from my github:
[general]
enabled=yes
bindaddr=0.0.0.0
bindport=8088
enablestatic=yes
tlsenable=yes
tlsbindaddr=0.0.0.0:8089
tlscertfile=/etc/letsencrypt/live/DOMAINNAME/fullchain.pem
tlsprivatekey=/etc/letsencrypt/live/DOMAINNAME/privkey.pem
One you update this file, restart Asterisk and check its status for web sockets by typing the follow commands:
asterisk -rx 'core restart now'
/usr/share/astguiclient/ADMIN_keepalive_ALL.pl
asterisk -rx 'http show status'
It should output as shown below:
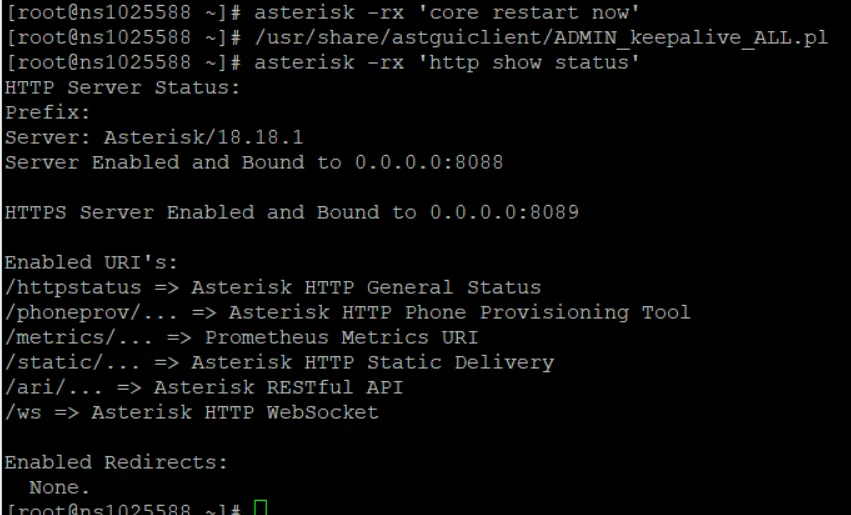
You can also verify the ports are running like we did in step 2 above.
Step 3 – Is the webrtc template setup correctly?
Now let’s login to the ViciDial admin GUI and make sure the webrtc template is setup with the proper settings. You can copy the template below and refer to the picture to verify yours is done correctly.
type=friend
host=dynamic
context=default
host=dynamic
trustrpid=yes
sendrpid=no
qualify=yes
qualifyfreq=600
transport=ws,wss,udp
encryption=yes
avpf=yes
icesupport=yes
rtcp_mux=yes
directmedia=no
disallow=all
allow=ulaw,opus,vp8,h264
nat=yes
directmedia=no
dtlsenable=yes
dtlsverify=no
dtlscertfile=/etc/letsencrypt/live/DOMAIN/cert.pem
dtlsprivatekey=/etc/letsencrypt/live/DOMAIN/privkey.pem
dtlssetup=actpass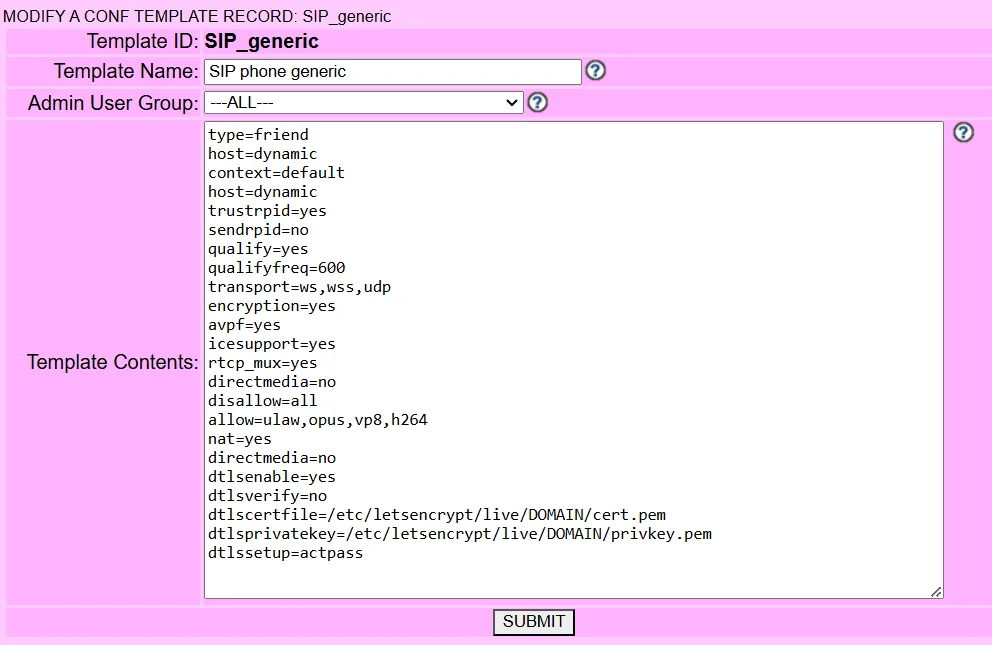
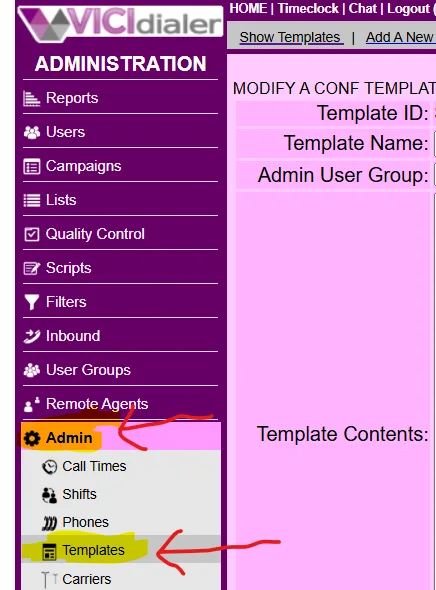
You can get to this area by going down to “Admin” then clicking “templates”
Step 4 – Is the web socket server setup?
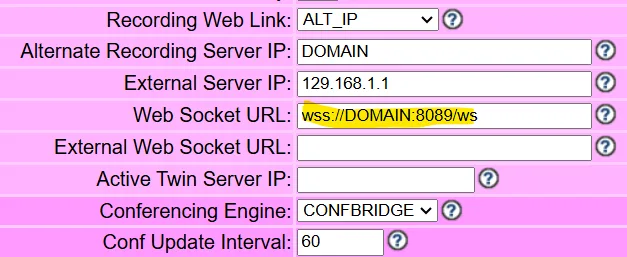
On this last step, go into admin once again and click on “servers” and make sure you have the websocket set in the “Web Socket URL” as shown below in the following format:
wss://DOMAIN:8089/ws
If everything here is setup correctly, your webphones should be working. However there is a couple other possible causes, such as not allowing the mic to access the agents webpage, broken headsets, expired or bad SSL certificates. You can acceess our support channels in the Discord and Skype links at the top of the page for more help, its free. Hopefully this helps solve some of the more common issues.
Chris aka carpenox
How to – Set Up Load Balanced Phones and Calling for ViciDial
How to – Set Up Load Balanced Phones and Calling for ViciDial
Step 1: Ensure Prerequisites
Before you start, make sure you have:
- VICIdial installed and running on multiple servers.
- A webphone such as Viciphone or CyburPhone
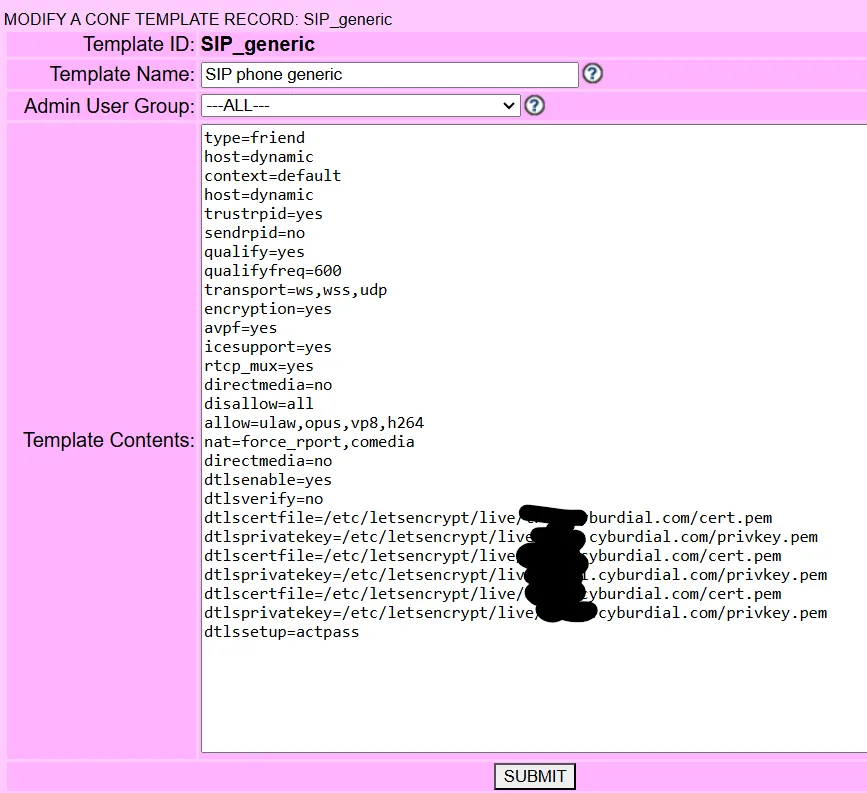
- A webrtc template ready to go with all the servers SSL certs as shown below
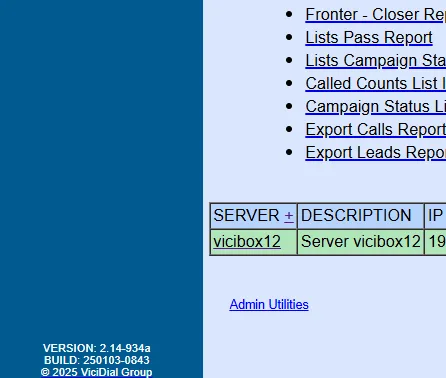
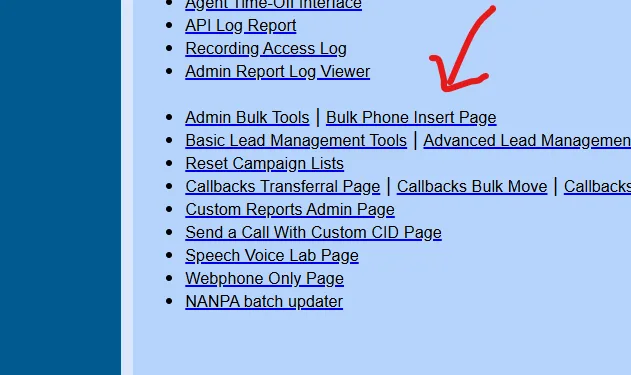
Step 2: Access the Bulk Phone Insert Page in the Admin Utilities on the Reports Page
- Log in to your VICIdial web interface.
- Navigate to the “Bulk Phone Insert Page” in the Admin utilities by clicking on the appropriate menu option in admin utilities on the reports page as shown below:
Step 3: Prepare Phone extensions and server IP’s
- Create a column in Excel or Google Sheets with your list of phone extensions as shown below
- Do the same for the server IP’s for all your telephony/asterisk servers

Step 4: Configure the Phone Alias and Phone info
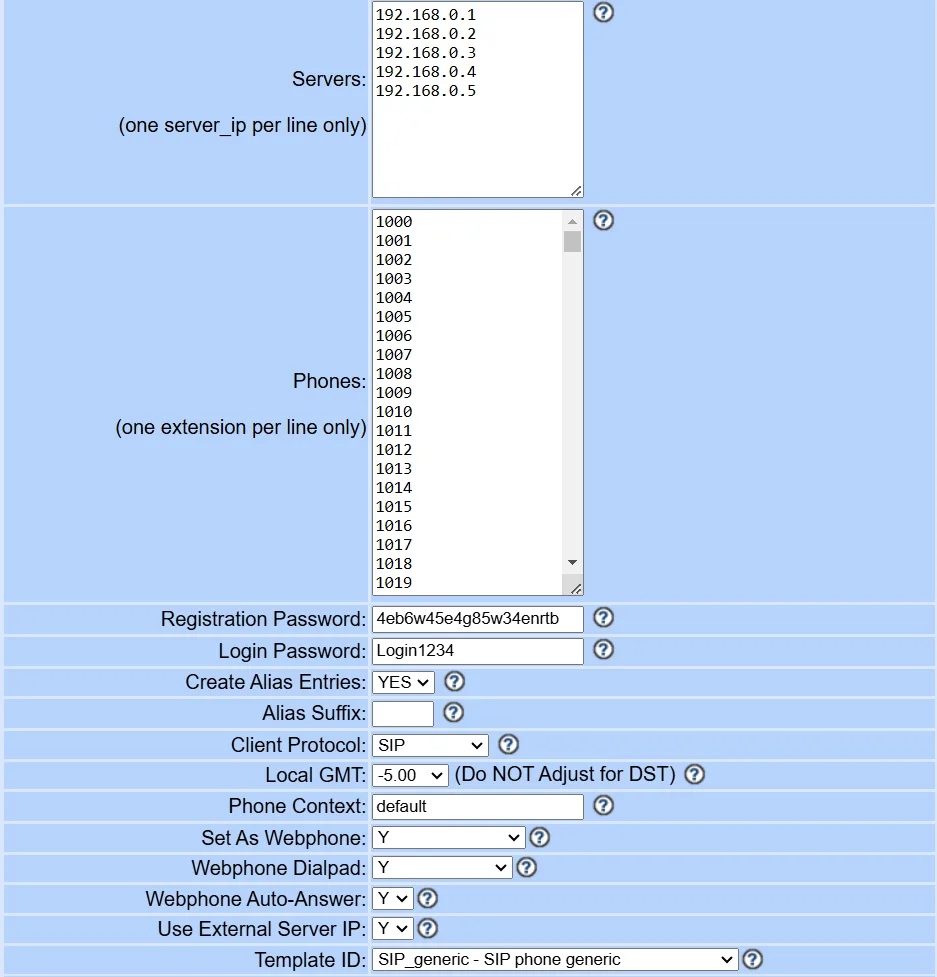
- On the Bulk Phone Insert Page, you’ll see all the options to set with an example below
- Copy your extensions and servers to the appropriate pages
- Configure the servers, phones, registration password(anything you want), Login Password(anything), Create Alias Entries = YES, Suffix you can leave blank, Context=default, Set as Webphone=Y, Template ID to your webrtc template and hit Submit.

That’s it, you have now properly load balanced your webphones across all your telephony servers. now we can move on to properly load balancing the calls on each.
Step 5: Enable Balance Dialing on all servers
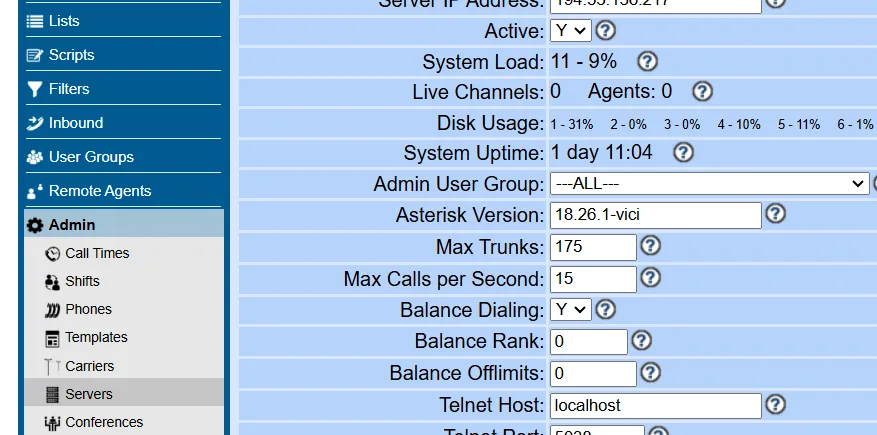
- Go into Admin > Servers and then into each telephony server and make sure “Balance Dialing” is set to Y
- You can give the servers higher ranks for harder calling on the ones with higher ranks where it says “Balance Rank”
| Balance Rank | This is the way the ranking works |
| This field allows you to set the order in which this server is to be used for balance dialing, if balance dialing is enabled. The server with the highest rank will be used first in placing Balance fill calls. Default is 0. | |
That is all there is to it, you have now properly load balanced your cluster with both the phones and the calls. This will help keep the dialing load equally spread out over your cluster, therefore not overwhelming one or two servers more than others. As always if you have any questions feel free to join our discord: https://discord.gg/ymGZJvF6hK
Chrris aka carpenox
How to – Renew your certbot SSL cert when it fails
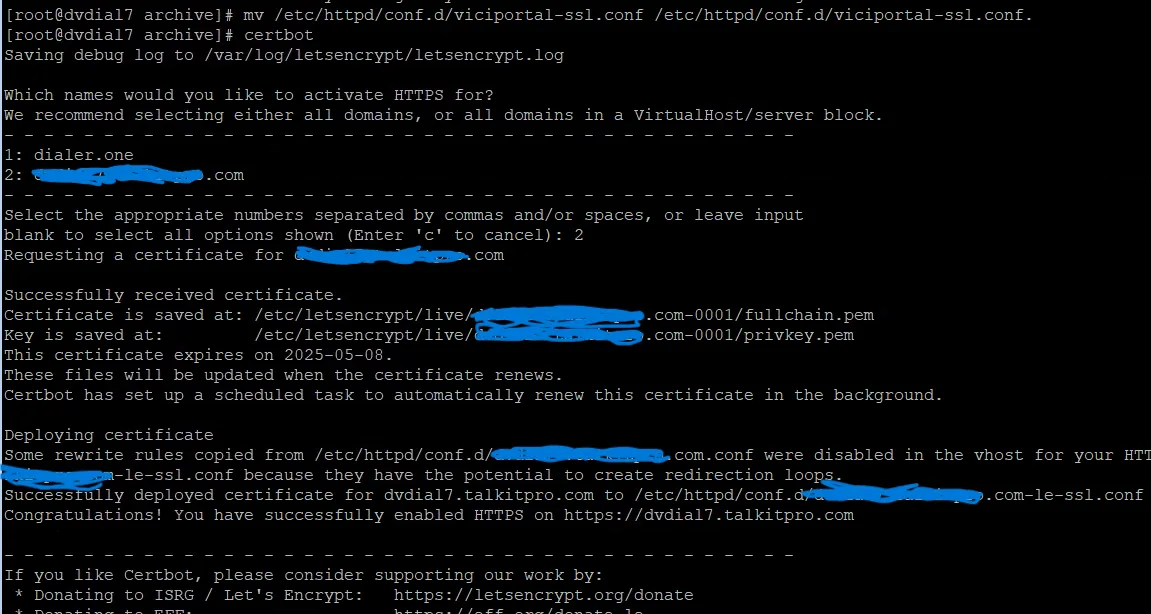
How to – Renew your certbot SSL cert when it fails
enewing a Let’s Encrypt SSL certificate can sometimes result in an “unauthorized” error. This error typically indicates that the certificate authority (CA) couldn’t verify your domain ownership2. Here’s a step-by-step guide to help you troubleshoot and resolve this issue:
Step 1 – Turn the firewall off and remove old files
So for some reason sometimes the certbot certificates renewal process will not go through and you will see an error like this saying “unauthorized”:
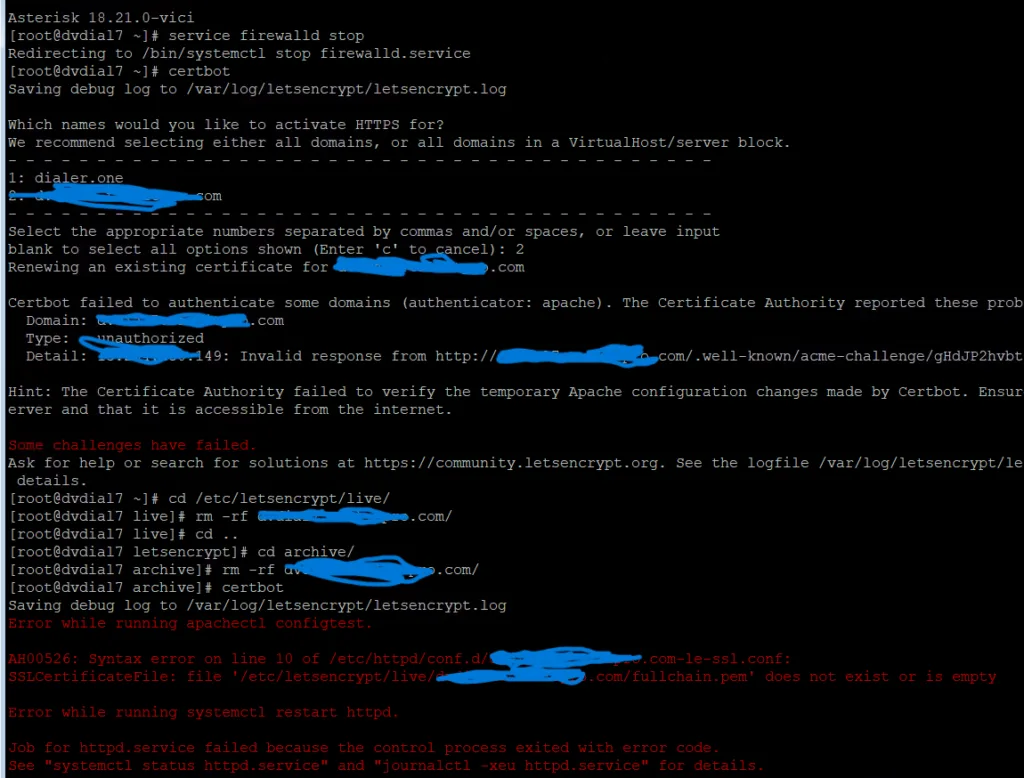
You need to remove the cert folders for archive and live in cd /etc/letsencrypt/ as shown above as well as the .conf file and rename the viciportal.conf file:
cd /etc/letsencrypt/live/
rm -rf dvdial.dialer.com/
cd /etc/letsencrypt/archive/
rm -rf dvdial.dialer.com/
rm -rf /etc/httpd/conf.d/dvdial.dialer.com-le-ssl.conf
mv /etc/httpd/conf.d/viciportal-ssl.conf /etc/httpd/conf.d/viciportal-ssl.conf.off
Replace “dvdial.dialer.one” with your domain
Step 2 – Rerun the certbot command
After step 1 is complete, you can rerun “certbot” which will recreate the .conf file we deleted and recreate the SSL cert, but with -0001 added to the new directories so we need to copy these new folders to the old locations for the viciportal.conf to work without changes.
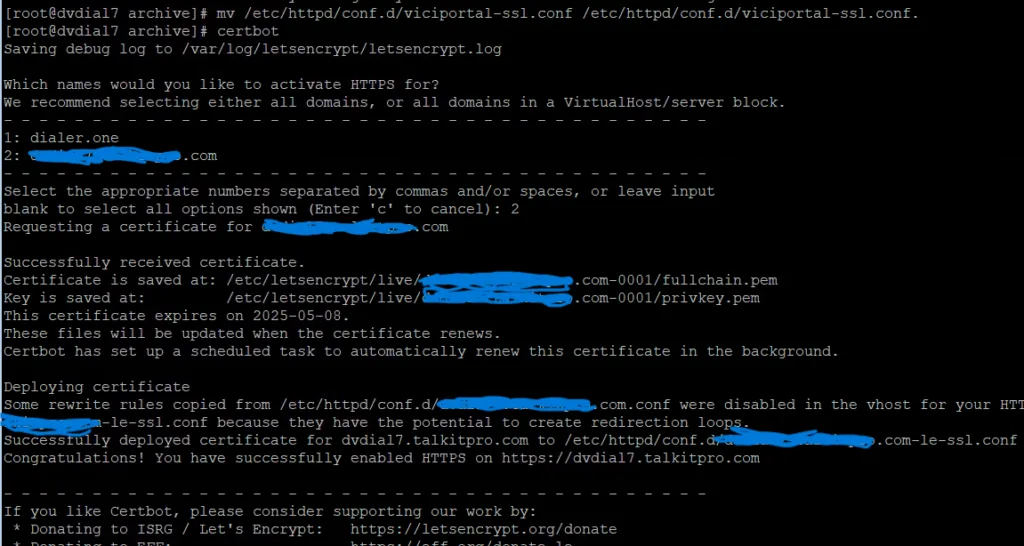
First rename the viciportal conf back to the correct name as shown below then copy the directories:
mv /etc/httpd/conf.d/viciportal-ssl.conf.off /etc/httpd/conf.d/viciportal-ssl.conf
cd /etc/letsencrypt/live/
cp -r dvdial.dialer.com-0001/ dvdial.dialer.com/
Step 3 – Restart Apache and Turn the firewall back on

service httpd restart
service firewalld start
This will work on any certs you have issued from my auto installers, its a bug I haven’t quite worked out yet. If you have any input to fix the renewals please comment here or join the Discord: https://discord.gg/ymGZJvF6hK
Chris aka carpenox
CyburDial’s New Merchandise Store

Welcome to CyburDial’s New Merchandise Store
We are beyond excited to announce that CyburDial has officially launched its brand-new merchandise store! Now, you can show your love for CyburDial with our exclusive range of products, designed to cater to every fan’s needs. From stylish clothing to practical everyday items, our merchandise collection has something for everyone. Visit our store at CyburDial Shop today and explore what’s in store!
Fashion Forward: Stylish Clothing Collection
Our clothing line features an array of options that reflect the CyburDial spirit. Whether you’re looking for a comfortable t-shirt for casual wear, a cozy hoodie for those chilly days, or a sleek sweater that makes a bold statement, we’ve got you covered.
- T-Shirts: Show off your CyburDial pride with our stylish t-shirts. Made from high-quality materials, these shirts are not only comfortable but also durable, ensuring that you can wear them for any occasion.
- Hoodies & Sweaters: Perfect for keeping you warm while representing your favorite brand. Our hoodies and sweaters come in various designs and colors, making them a versatile addition to your wardrobe.
Everyday Essentials: Mugs, Mousepads, and More
We understand that our fans want to incorporate their love for CyburDial into their daily lives, which is why we’ve expanded our merchandise collection to include essential items for your home and workspace.
- Mugs: Start your morning with a cup of coffee in our exclusive CyburDial mugs. Each mug features a unique design that captures the essence of our brand, making it the perfect addition to any kitchen or office.
- Mousepads: Upgrade your desk with our premium mousepads, designed for both style and functionality. With smooth surfaces that provide excellent tracking for your mouse, these mousepads will enhance your productivity while showing off your CyburDial pride.
Unique Collectibles: Glasses and Other Accessories
For those who appreciate the finer things in life, our merchandise store includes unique collectibles and accessories that add a touch of CyburDial to your everyday routine.
- Glasses: Enjoy your favorite beverages in style with our CyburDial glasses. These high-quality glasses are perfect for any occasion, whether you’re hosting a party or enjoying a quiet evening at home.
- Accessories & More: From keychains to phone cases, our store offers a variety of accessories that allow you to carry a piece of CyburDial with you wherever you go.
Shop Now and Show Your Support
Ready to dive into the world of CyburDial merchandise? Head over to CyburDial Shop and start browsing our collection today. By purchasing our merchandise, not only are you getting high-quality products, but you’re also supporting the CyburDial community and helping us continue to bring you the content and experiences you love.
Thank you for being a part of the CyburDial family. We can’t wait to see you rockin’ your new gear! Don’t forget to share your merch photos with us on social media using the hashtag #CyburDialMerch. Happy shopping!
Solve the math problem below and win $25 dollars!

Solve the math problem below and win $25 dollars! To be eligible, you just be able to receive cashapp or PayPal. The winner will be chosen at 12PM EDT today. Comment your answer down below for your chance to win.

Congratulations to Ofelia for being this week’s winner. We do this every Friday so try your luck next week!

What animal do you see? First person to comment below gets $25 bucks!
That’s right, lunch is on us today. $25 dollars to the person who gets the correct animal down below in the comments. Allowed one guess per user. Need to have cashapp or paypal.

Sign up for your free Q&A live session!

Sign up for your free Q&A live session!
Have questions about your dialer software such as Vicidial, RingCentral or GoAutoDial? How would you like a 1 on 1 session with one of the world’s leading authorities within this topic? Well, I, Chris aka carpenox from the Vicidial forum and the author of this industries most visited blog am giving away a FREE fifteen minute live session to everyone that needs a little help to overcome dialer obstacles. It’s not just for dialers either, ask me anything you’d like on how I went from being just a sales rep in a phone room up through the ranks to closer, then floor manager, followed by general manager and eventually brought on as an equal partner in one of South Florida’s largest vacation rooms and eventually to become my own boss, make my own hours, the ability to work where I want, unrestricted by the daily employment ground of getting ready for work, getting to work and staying for a 10 hour day, just to do it all again tomorrow. Well I can tell you now, my office is quite often poolside or on the beach, on cruise ship, or just in my home office and I wouldn’t change it for anything. So sign up now, ask me how I did it and how I can help you accomplish the same dreams, starting today!

