Cyburdial Turns 6: A Milestone Worth Celebrating


 Cyburdial Turns 6: A Milestone Worth Celebrating
Six years ago, Cyburdial launched with a bold vision: to redefine what’s possible in contact center infrastructure, automation, and creative branding. Today, we’re proud to celebrate six years of relentless innovation, client success, and community growth.
From tuning massive Vicidial clusters to designing cinematic Twitch overlays, our journey has been anything but ordinary. We’ve scaled MySQL performance across dozens of servers, scripted recovery flows that save hours of downtime, and built branding assets that leave lasting impressions. Every challenge has sharpened our edge—and every win has fueled our passion.
 What We’ve Achieved
– Supported hundreds of clients with custom deployments, troubleshooting, and automation
– Delivered scalable solutions across Docker, MySQL, Asterisk, and PostgreSQL
– Blended technical precision with creative storytelling—from mascot design to financial planning
– Built a reputation for reproducibility, reliability, and results
 Anniversary Offer: 35% Off Everything
To celebrate this milestone, we’re offering 35% off any product or service—whether you need:
– Cluster-wide config tuning
– AGI script debugging
– Branding assets for your next campaign
– Financial modeling or revenue analysis
– Or a fully automated deployment pipeline
This offer is valid through the end of the month. It’s our way of saying thank you—for trusting us, challenging us, and growing with us.
 What’s Next?
We’re not slowing down. Expect smarter automation, deeper integrations, and even more cinematic flair in everything we build. Whether you’re scaling your infrastructure or launching a new brand, Cyburdial is here to make it unforgettable.
Let’s make year seven even more epic!
https://dialer.one – Coupon Code: 6YEARS
How to – Fix: Unable to open master device ‘/dev/dahdi/ctl’ for Dahdi
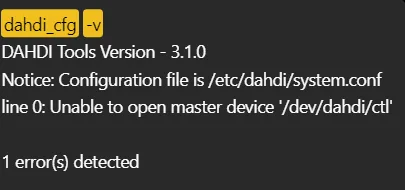
How to – Fix: Unable to open master device ‘/dev/dahdi/ctl’ for Dahdi
This happens after updating your operating system for redhat distro’s such as Alma, Rocky or CentOS. Its an easy fix thats outlined below:
Step 1 – Browse to proper directory
cd /usr/src/dahdi-linux-complete-3.4.0+3.4.0/Step 2 – Recompile Dahdi
make && make install && modprobe dahdiThat’s all there is to it.
How to – Fix “Unable to lookup ‘SERVER_EXTERNAL_IP'”

How to – Fix “Unable to lookup ‘SERVER_EXTERNAL_IP'”

This error is the newer SVN versions and technically, won’t cause any issues, however here is the fix for it. Type the following command in your Linux Command Line:
sudo sed -i 's/SERVER_EXTERNAL_IP/0.0.0.0/' /etc/asterisk/pjsip.confThat’s all there is to it.
Here is a video for those of you who prefer videos from HBTutorials
Chris aka carpenox
How to – Upgrade any Leap ViciBox install to Leap 15.6
How to – Upgrade any Leap ViciBox install to Leap 15.6
A lot of people seem to be keeping their systems on older Vicibox installs such as v9 which is on Leap 15.1, v10 which is on Leap 15.3 or v11 which is on Leap 15.5 which are all end of life. The reasoning behind this, is you are thinking that you are safe with whitelist only IP access to the server, however, you are mistaken. As software reaches its end of life, it no longer receives updates. This means it also stops receiving security patches. Even with IP access only, your firewall can be hit with a denial of service attack, taking it offline. All your software, including MySQL, Apache, OpenSSH, and the Linux kernels themselves, can then be hacked using exploits to gain full root to your servers. This article will teach you how to upgrade any of these to the latest and only supported version of Leap, 15.6, so let’s get started.
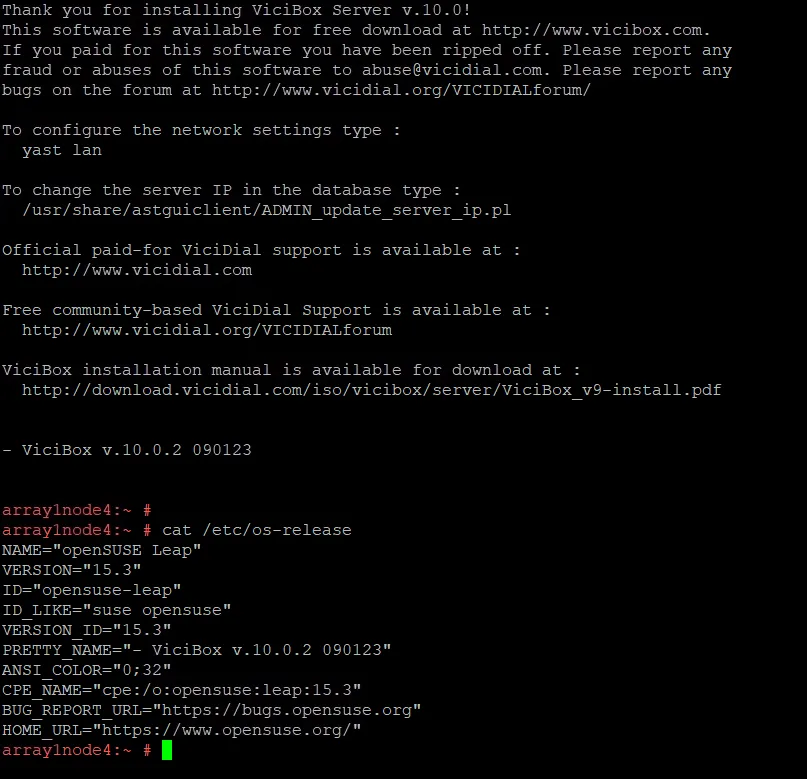
Step 1 – Upgrade Repo URL’s
In this example, I am upgrading from ViciBox 10 from Leap 15.3 up to 15.6. You will notice the first line of code has s/15.3/15.6/g which you would need to replace the first part with whatever you are upgrading from, such as ViciBox 9 would be 15.1.
sed -i 's/15.3/15.6/g' /etc/zypp/repos.d/*.repo
zypper --releasever=15.6 lr -u
zypper lr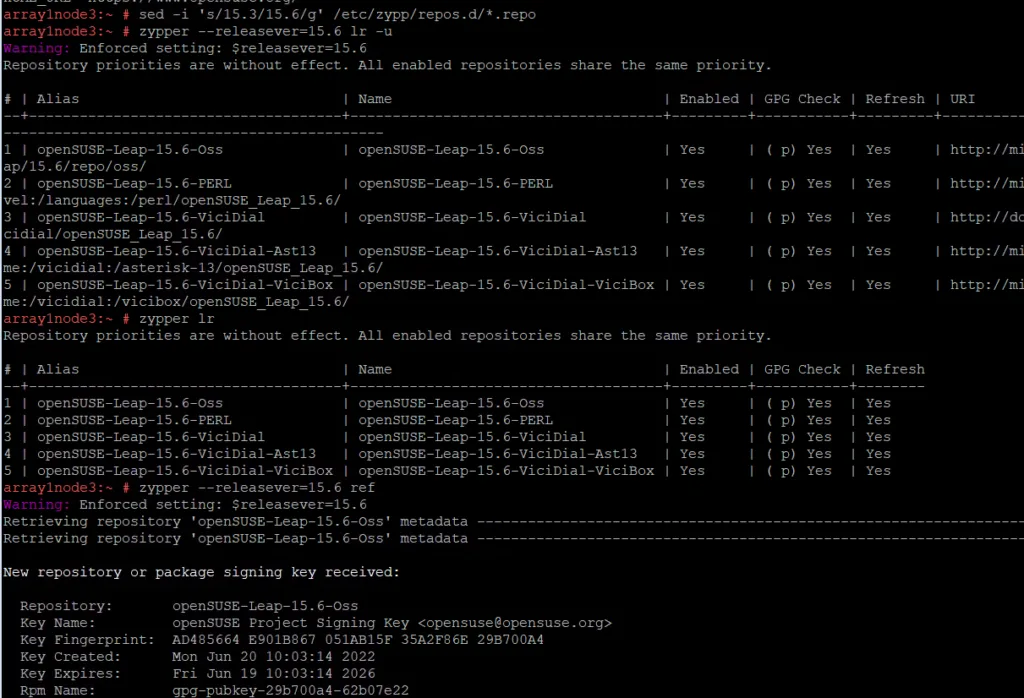
You can see in the picture above, these first steps will replace the repo URL’s, however, some have been changed even more than just the 15.6 portion and we will need to replace those. Below, I will show you how to find which ones to remove by the errors you receive that will be in red.
zypper --releasever=15.6 ref
zypper lr
zypper rr 2
zypper rr 3 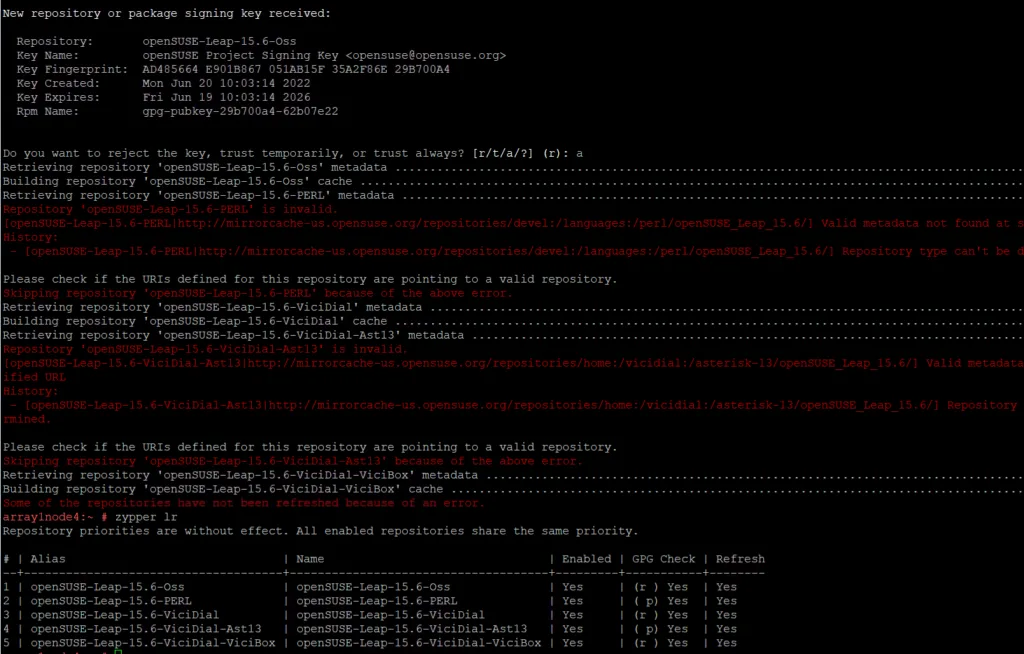
In this picture above, you can see repo #’s 2 and 4 are broken which is Perl and Ast-13 so I removed it with the code above by typing “zypper rr 2” and then “zypper rr 3” (its 3 here and not 4 because when we deleted #2, it moved up one). Now on the next step, we will add all the repo’s we need and replace the ones we deleted.
https://download.opensuse.org/repositories/devel:/languages:/python/15.6/devel:languages:python.repo
zypper ar http://download.opensuse.org/repositories/server:/php:/applications/15.6/server:php:applications.repo
zypper ar https://mirrorcache-us.opensuse.org/repositories/devel:/languages:/perl/15.6/devel:languages:perl.repo
zypper ar https://download.opensuse.org/repositories/home:/vicidial:/vicibox/openSUSE_Leap_15.6/home:vicidial:vicibox.repo
zypper ar https://download.opensuse.org/repositories/home:/vicidial:/asterisk-16/openSUSE_Leap_15.5/home:vicidial:asterisk-16.repo
zypper ar https://download.opensuse.org/update/leap/15.6/oss/openSUSE:Leap:15.6:Update.repo
zypper ar https://download.opensuse.org/update/leap/15.6/backports/openSUSE:Backports:SLE-15-SP6:Update.repo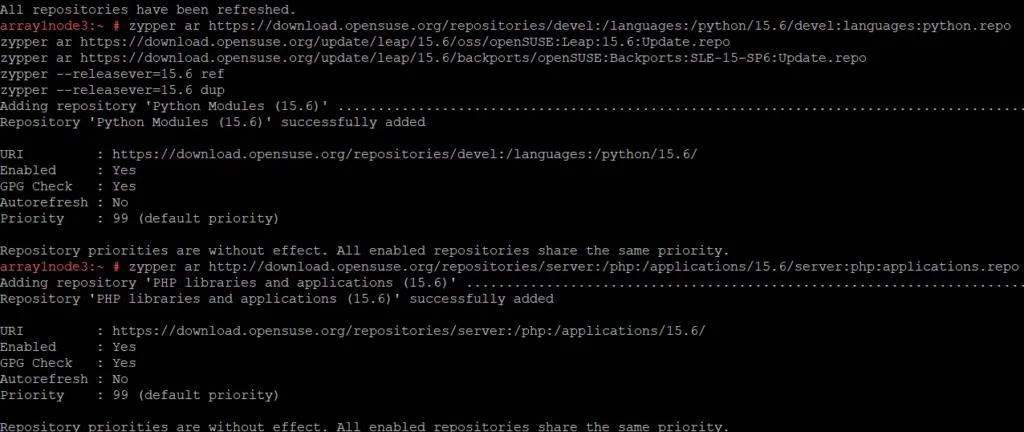
Now the hard part is done, lets run the updates.
Step 2 – Upgrade the OS
zypper --releasever=15.6 ref
zypper --releasever=15.6 dup
When you run these two commands, you will get errors, you want to make sure you are installing asterisk 16 so pressing 1 most of the way down, and then “breaking vicibox-install” towards the end which I believe was 4.
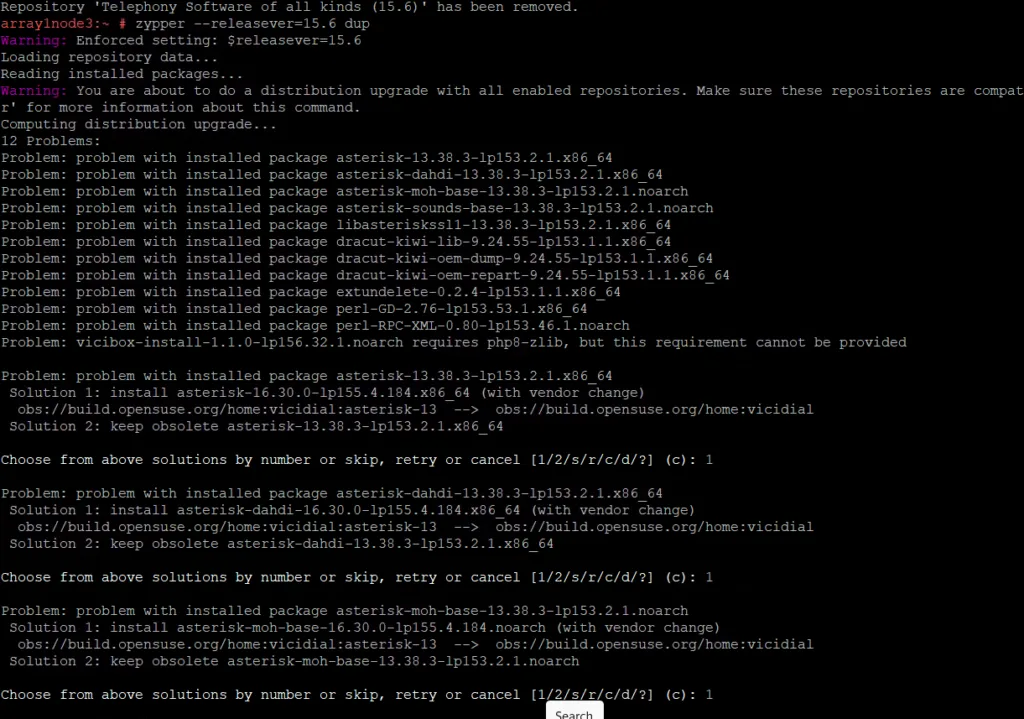
You will then reach the portion to say “y” like in the picture below:
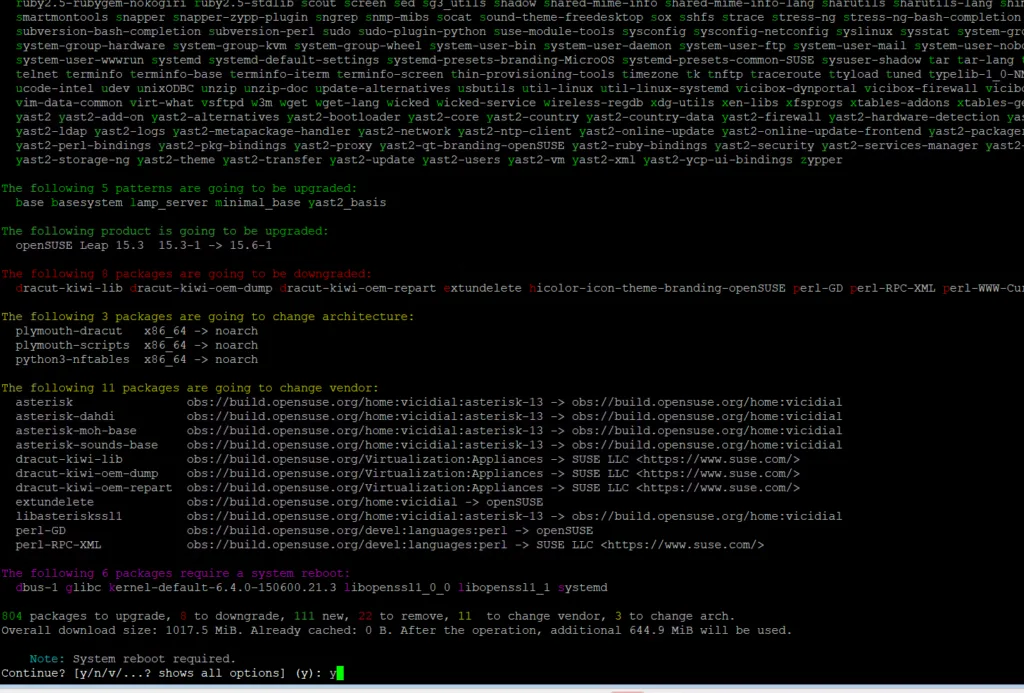
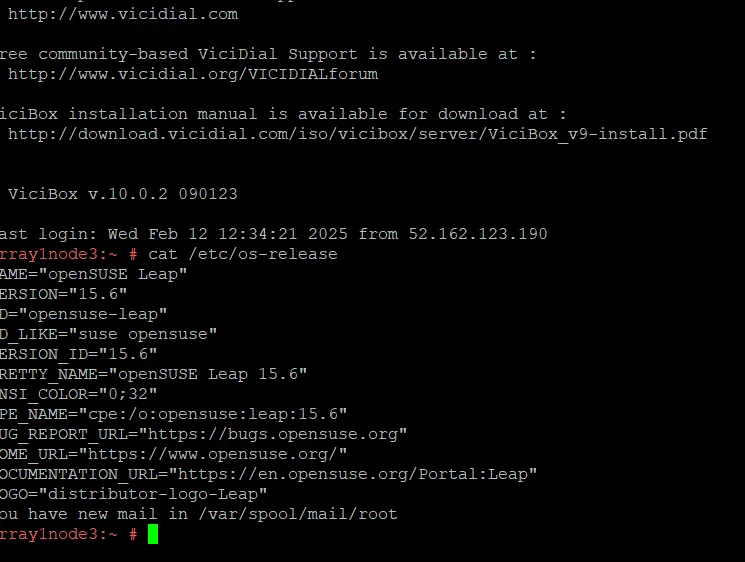
Once everything downloads and installs, you can reboot and you will see the new OS will be labeled as Leap 15.6 when you type “cat /etc/os-release” as you see below even though it is still labeled as ViciBox 10:
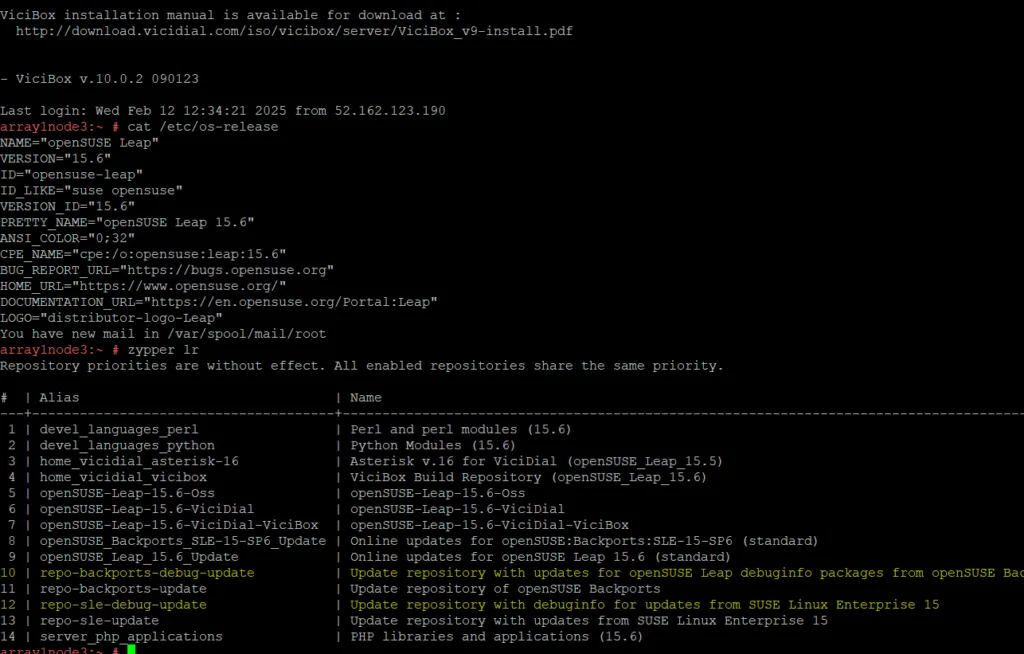
Step 3 – Confirm everything that ViciDial needs is installed
zypper install ppp ppp-devel autoconf automake kernel-default-devel kernel-devel gcc make libtool libedit-devel libedit kernel-default dahdi* libopenssl-devel

zypper install php screen php-mcrypt subversion php-cli php-gd php-curl php-mysql php-ldap php-zip php-fileinfo php-opcache

zypper in wget unzip make patch gcc gcc-c++ subversion php php-devel php-gd gd-devel readline-devel php-mbstring php-mcrypt

zypper in php-imap php-ldap php-mysqli php-odbc php-pear php-xml php-xmlrpc curl curl-devel perl-libwww-perl ImageMagick

zypper in newt-devel libxml2-devel kernel-devel sqlite-devel libuuid-devel sox sendmail lame-devel htop iftop perl-File-Which

zypper in php-opcache libss7 mariadb-devel libss7* libopen*

zypper install sqlite-devel httpd mod_ssl nano chkconfig libedit-devel uuid* libxml2*
Step 4 – Enable services
We need to reactive the asterisk and dahdi services by typing the following commands:
systemctl enable asterisk
systelctm enable dahdi
Reboot and verify everything is running correctly, check your sockets with “screen -ls” (make sure “send” and “listen” are there. Check dahdi with “dahdi_cfg -v” and if it errors, run “modprobe dahdi” and you should be good to go, but if you have any issues, join our discord at the bottom of any page for more help.
Chris aka carpenox
How to – Debug Webphones for ViciDial
How to – Debug Webphones for ViciDial

I get asked several times a day in the Discord and Skype group chats about how to fix peoples webphones. So this article will be the typical steps I take in order to debug these type of issues.
Step 1- Is Dahdi running?
The first thing I check is is dahdi running? I do this by typing “dahdi_cfg -v” and the output should look like it does below:
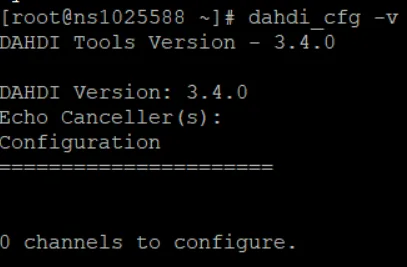
You do not want it to say “1 error(s) detected” as shown below:

If it does respond like above, you need to run the command “modprobe dahdi” which will bring it into a state like the first picture which is good, retest to verify with “dahdi_cfg -v”. It could also need to be recompiled if it wasnt installed properly. I will create a separate article for this later this week.
Step 2 – Are the ports running?
if the above is functioning correctly, the next step is to make sure you see the ports that are needed for websockets to be running. You can do this by typing “ss -ltnu” and you should see ports 8088 and 8089 running like in the picture below:
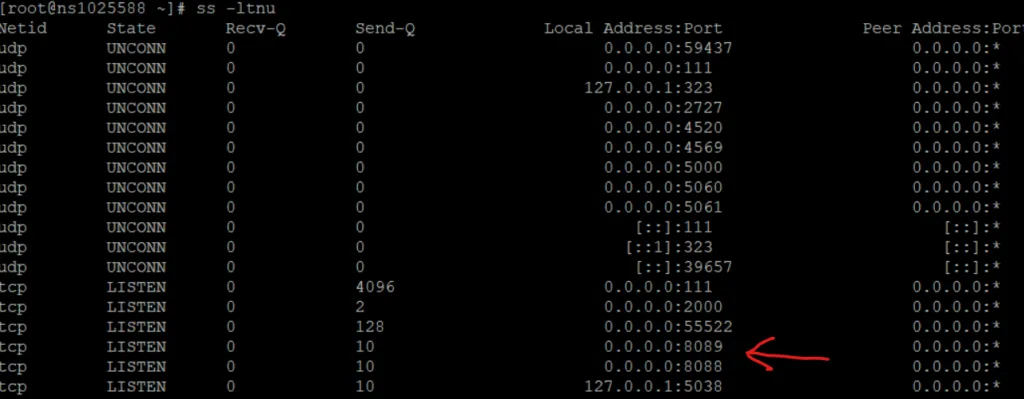
If the ports are showing correctly here, move on to step 3, if not it means your configuration file for web sockets is not setup correctly. To fix this you need to edit your /etc/asterisk/http.conf file and make sure it looks like below or you can copy this file from my github:
[general]
enabled=yes
bindaddr=0.0.0.0
bindport=8088
enablestatic=yes
tlsenable=yes
tlsbindaddr=0.0.0.0:8089
tlscertfile=/etc/letsencrypt/live/DOMAINNAME/fullchain.pem
tlsprivatekey=/etc/letsencrypt/live/DOMAINNAME/privkey.pem
One you update this file, restart Asterisk and check its status for web sockets by typing the follow commands:
asterisk -rx 'core restart now'
/usr/share/astguiclient/ADMIN_keepalive_ALL.pl
asterisk -rx 'http show status'
It should output as shown below:
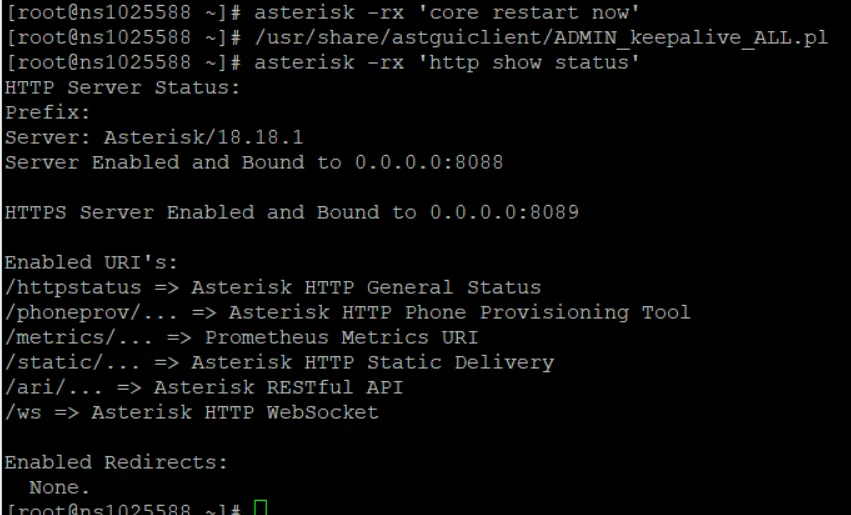
You can also verify the ports are running like we did in step 2 above.
Step 3 – Is the webrtc template setup correctly?
Now let’s login to the ViciDial admin GUI and make sure the webrtc template is setup with the proper settings. You can copy the template below and refer to the picture to verify yours is done correctly.
type=friend
host=dynamic
context=default
host=dynamic
trustrpid=yes
sendrpid=no
qualify=yes
qualifyfreq=600
transport=ws,wss,udp
encryption=yes
avpf=yes
icesupport=yes
rtcp_mux=yes
directmedia=no
disallow=all
allow=ulaw,opus,vp8,h264
nat=yes
directmedia=no
dtlsenable=yes
dtlsverify=no
dtlscertfile=/etc/letsencrypt/live/DOMAIN/cert.pem
dtlsprivatekey=/etc/letsencrypt/live/DOMAIN/privkey.pem
dtlssetup=actpass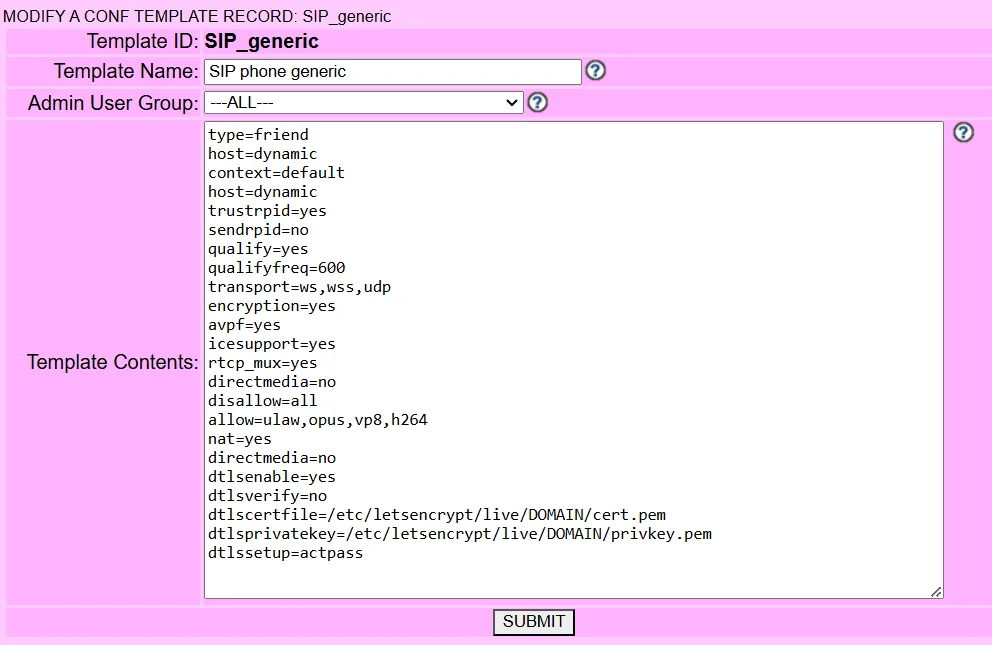
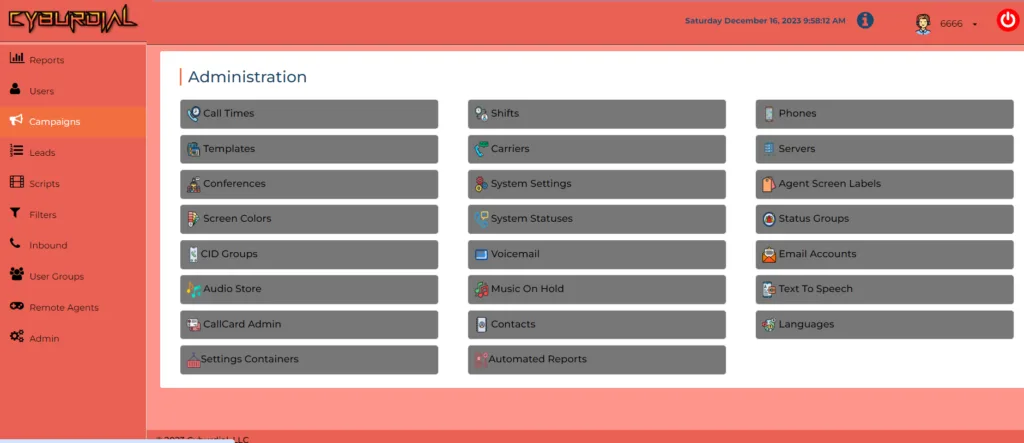
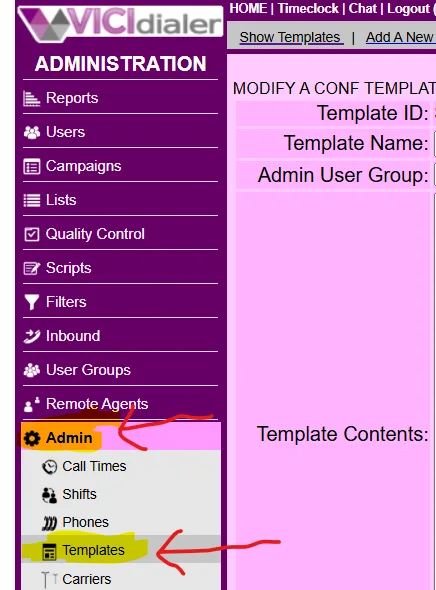
You can get to this area by going down to “Admin” then clicking “templates”
Step 4 – Is the web socket server setup?
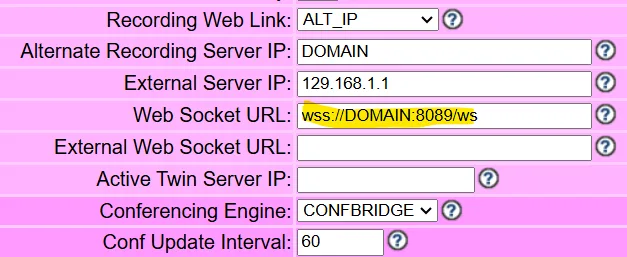
On this last step, go into admin once again and click on “servers” and make sure you have the websocket set in the “Web Socket URL” as shown below in the following format:
wss://DOMAIN:8089/ws
If everything here is setup correctly, your webphones should be working. However there is a couple other possible causes, such as not allowing the mic to access the agents webpage, broken headsets, expired or bad SSL certificates. You can acceess our support channels in the Discord and Skype links at the top of the page for more help, its free. Hopefully this helps solve some of the more common issues.
Chris aka carpenox
How to – Set Up Load Balanced Phones and Calling for ViciDial
How to – Set Up Load Balanced Phones and Calling for ViciDial
Step 1: Ensure Prerequisites
Before you start, make sure you have:
- VICIdial installed and running on multiple servers.
- A webphone such as Viciphone or CyburPhone
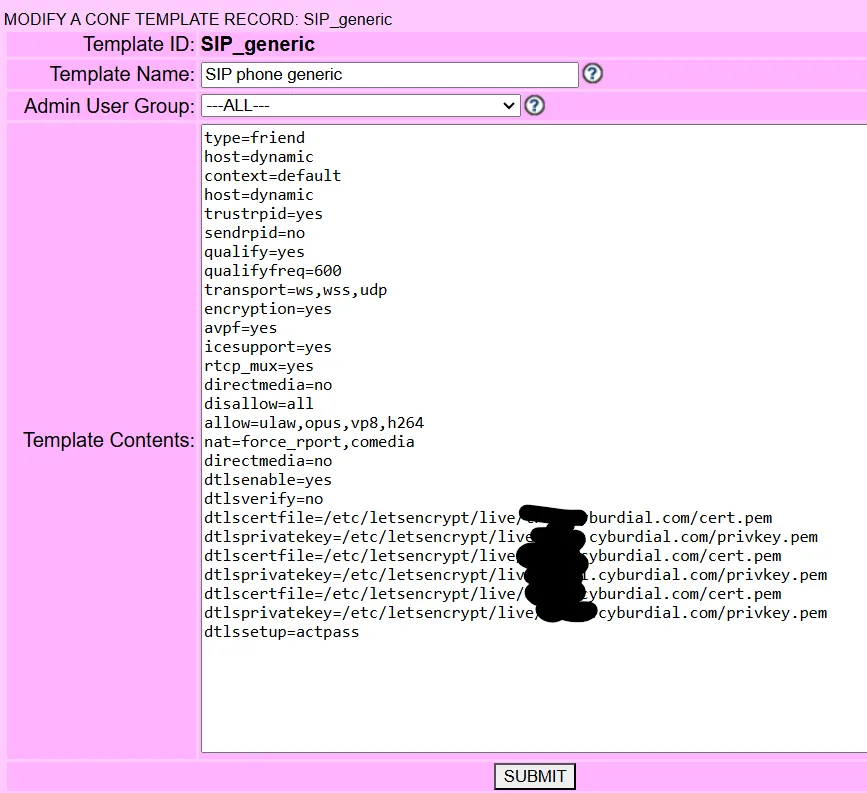
- A webrtc template ready to go with all the servers SSL certs as shown below
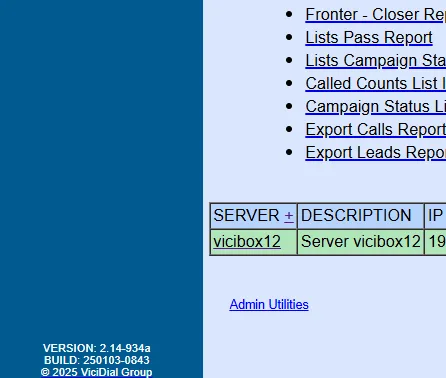
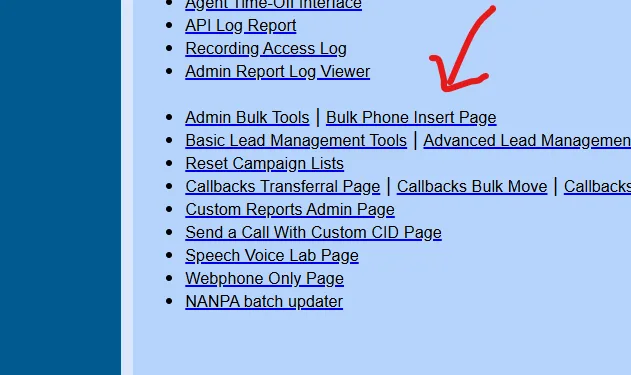
Step 2: Access the Bulk Phone Insert Page in the Admin Utilities on the Reports Page
- Log in to your VICIdial web interface.
- Navigate to the “Bulk Phone Insert Page” in the Admin utilities by clicking on the appropriate menu option in admin utilities on the reports page as shown below:
Step 3: Prepare Phone extensions and server IP’s
- Create a column in Excel or Google Sheets with your list of phone extensions as shown below
- Do the same for the server IP’s for all your telephony/asterisk servers

Step 4: Configure the Phone Alias and Phone info
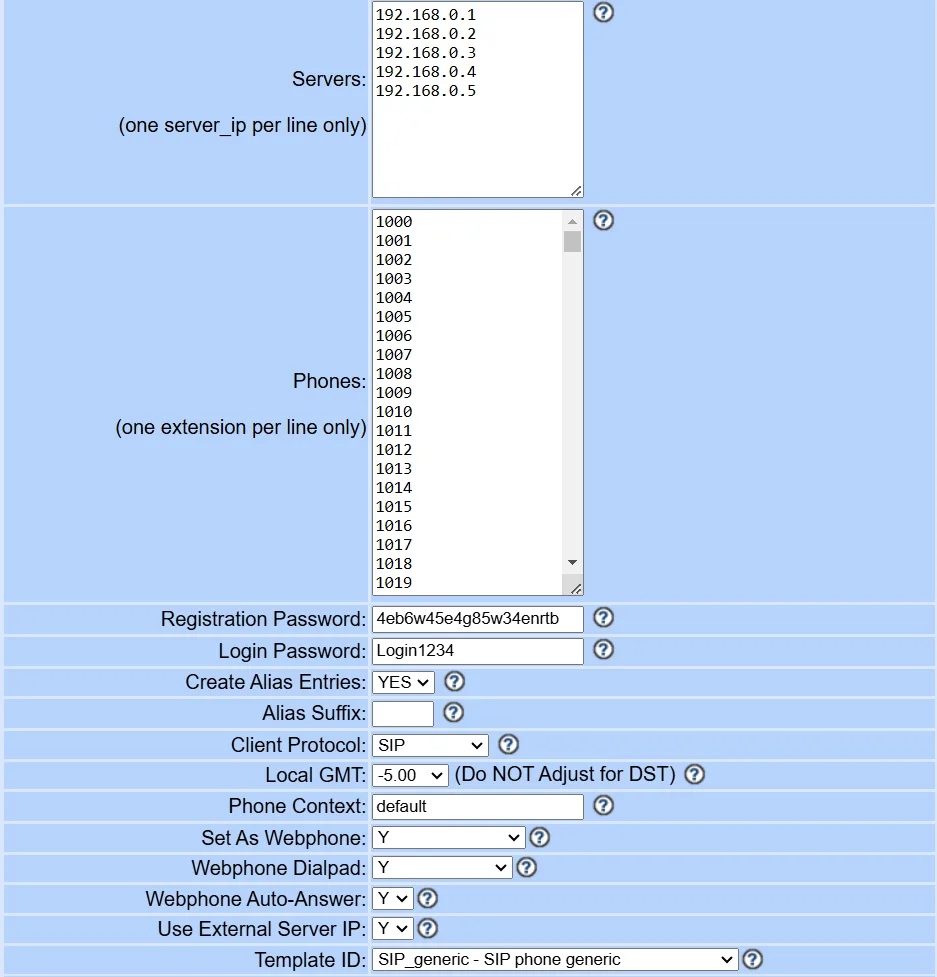
- On the Bulk Phone Insert Page, you’ll see all the options to set with an example below
- Copy your extensions and servers to the appropriate pages
- Configure the servers, phones, registration password(anything you want), Login Password(anything), Create Alias Entries = YES, Suffix you can leave blank, Context=default, Set as Webphone=Y, Template ID to your webrtc template and hit Submit.

That’s it, you have now properly load balanced your webphones across all your telephony servers. now we can move on to properly load balancing the calls on each.
Step 5: Enable Balance Dialing on all servers
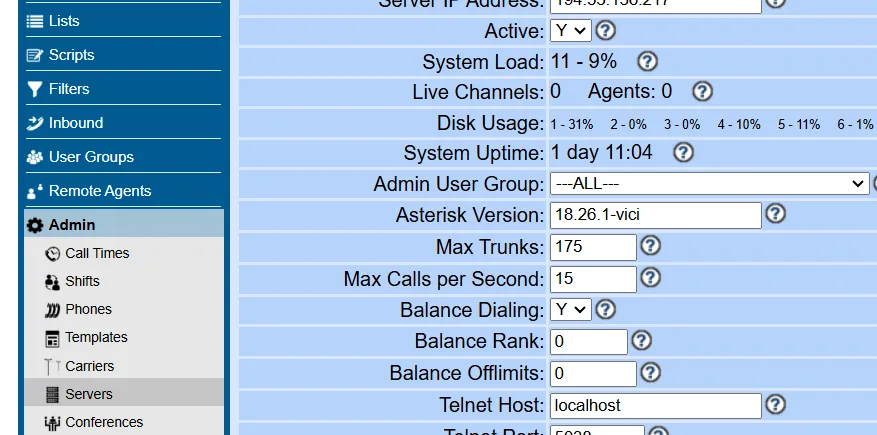
- Go into Admin > Servers and then into each telephony server and make sure “Balance Dialing” is set to Y
- You can give the servers higher ranks for harder calling on the ones with higher ranks where it says “Balance Rank”
| Balance Rank | This is the way the ranking works |
| This field allows you to set the order in which this server is to be used for balance dialing, if balance dialing is enabled. The server with the highest rank will be used first in placing Balance fill calls. Default is 0. | |
That is all there is to it, you have now properly load balanced your cluster with both the phones and the calls. This will help keep the dialing load equally spread out over your cluster, therefore not overwhelming one or two servers more than others. As always if you have any questions feel free to join our discord: https://discord.gg/ymGZJvF6hK
Chrris aka carpenox
How to – Renew your certbot SSL cert when it fails
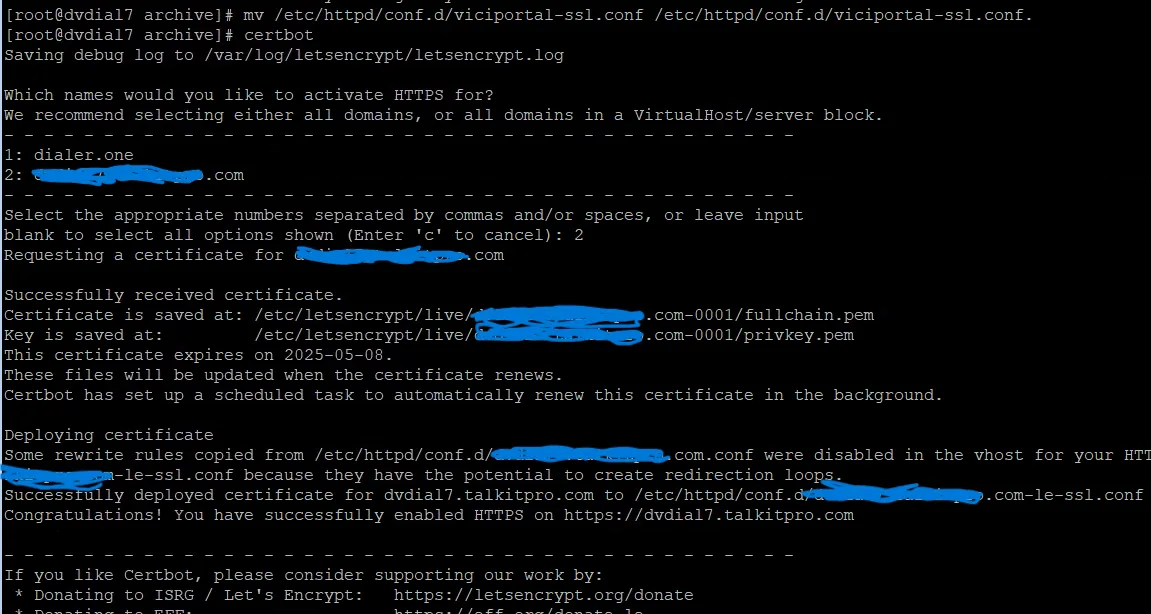
How to – Renew your certbot SSL cert when it fails
enewing a Let’s Encrypt SSL certificate can sometimes result in an “unauthorized” error. This error typically indicates that the certificate authority (CA) couldn’t verify your domain ownership2. Here’s a step-by-step guide to help you troubleshoot and resolve this issue:
Step 1 – Turn the firewall off and remove old files
So for some reason sometimes the certbot certificates renewal process will not go through and you will see an error like this saying “unauthorized”:
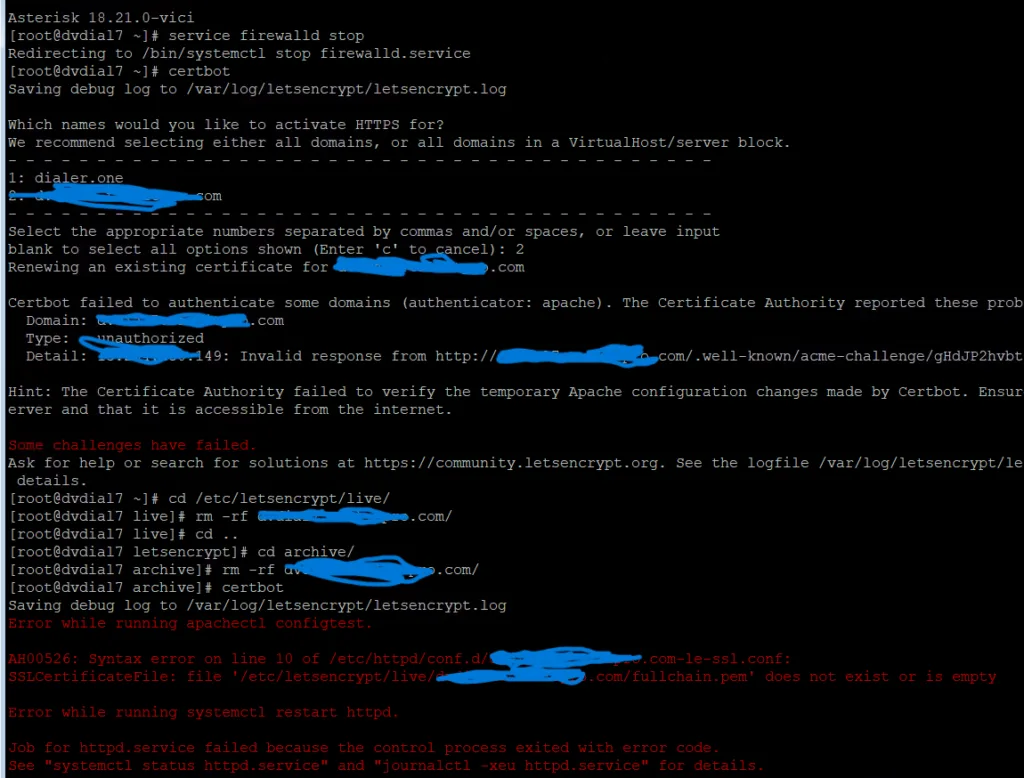
You need to remove the cert folders for archive and live in cd /etc/letsencrypt/ as shown above as well as the .conf file and rename the viciportal.conf file:
cd /etc/letsencrypt/live/
rm -rf dvdial.dialer.com/
cd /etc/letsencrypt/archive/
rm -rf dvdial.dialer.com/
rm -rf /etc/httpd/conf.d/dvdial.dialer.com-le-ssl.conf
mv /etc/httpd/conf.d/viciportal-ssl.conf /etc/httpd/conf.d/viciportal-ssl.conf.off
Replace “dvdial.dialer.one” with your domain
Step 2 – Rerun the certbot command
After step 1 is complete, you can rerun “certbot” which will recreate the .conf file we deleted and recreate the SSL cert, but with -0001 added to the new directories so we need to copy these new folders to the old locations for the viciportal.conf to work without changes.
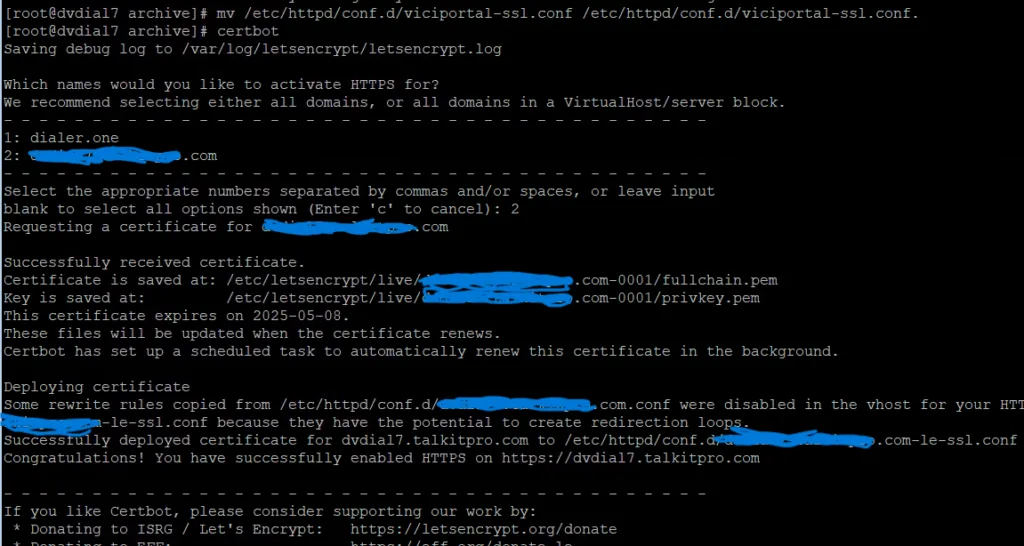
First rename the viciportal conf back to the correct name as shown below then copy the directories:
mv /etc/httpd/conf.d/viciportal-ssl.conf.off /etc/httpd/conf.d/viciportal-ssl.conf
cd /etc/letsencrypt/live/
cp -r dvdial.dialer.com-0001/ dvdial.dialer.com/
Step 3 – Restart Apache and Turn the firewall back on

service httpd restart
service firewalld start
This will work on any certs you have issued from my auto installers, its a bug I haven’t quite worked out yet. If you have any input to fix the renewals please comment here or join the Discord: https://discord.gg/ymGZJvF6hK
Chris aka carpenox
Introducing the New and Improved Full White Label Theme for ViciDial 2025 Edition by CyburDial
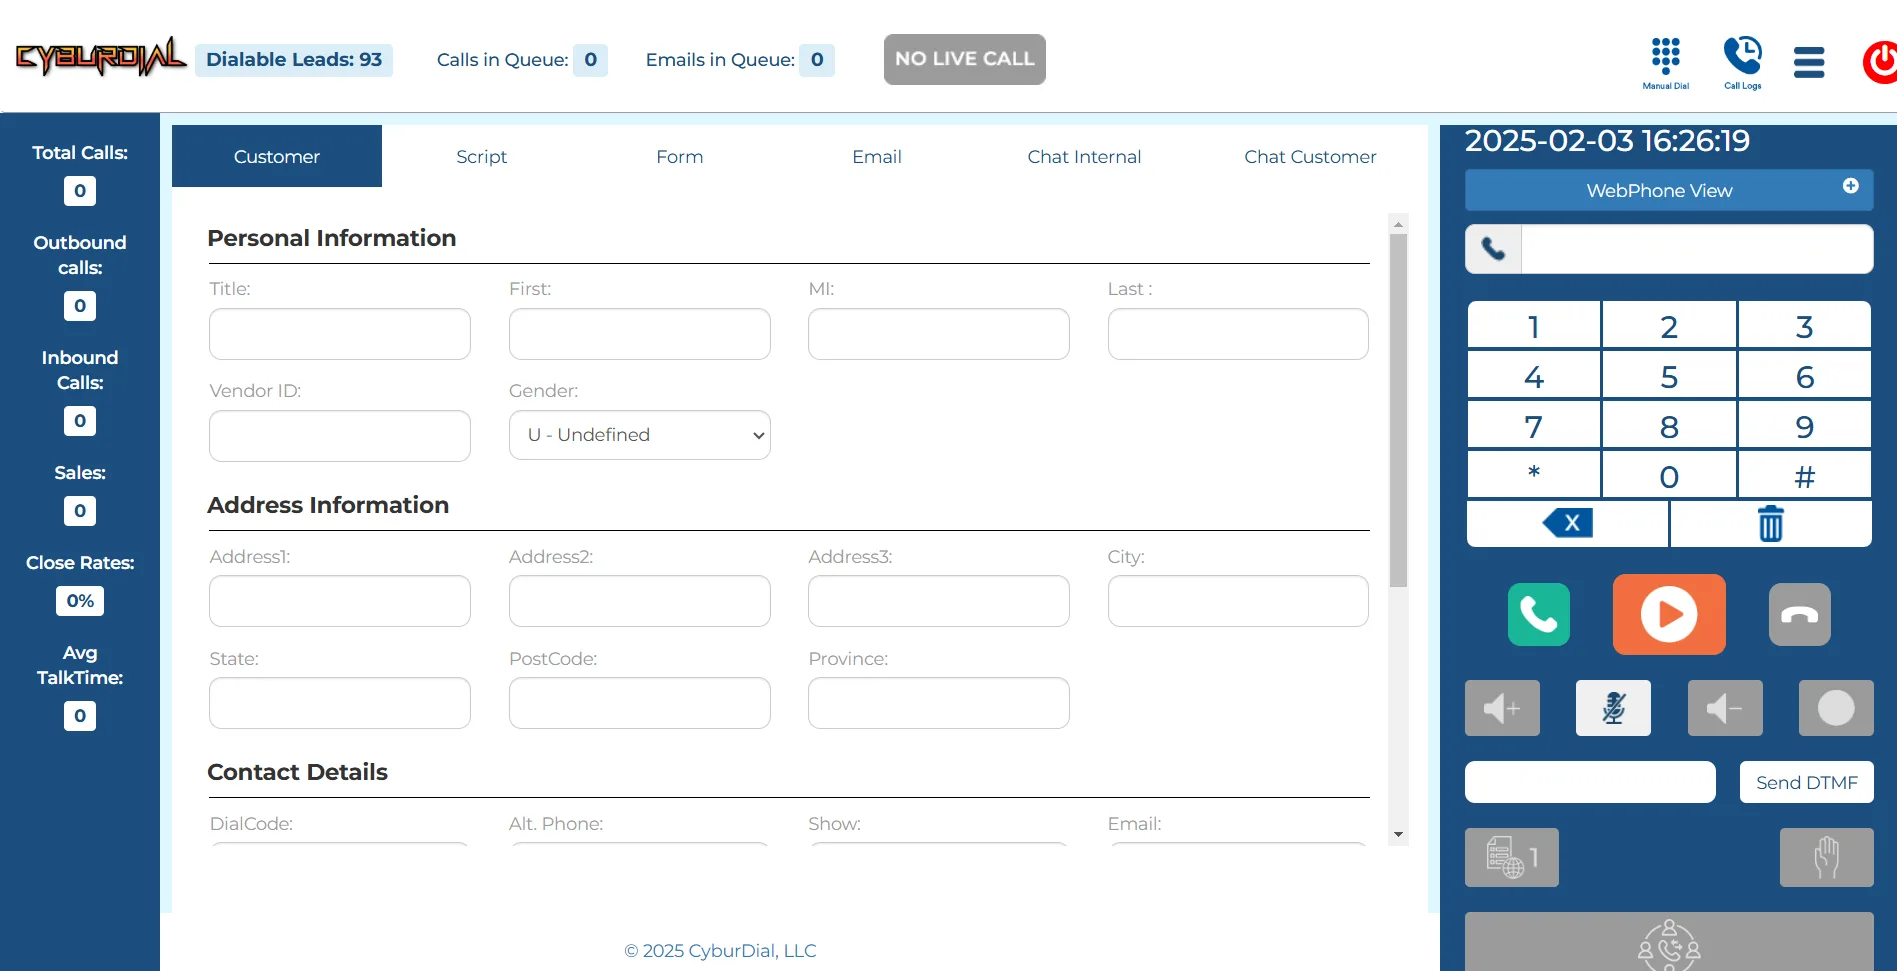
Introducing the New and Improved Full White Label Theme for ViciDial 2025 Edition by CyburDial
CyburDial is excited to announce the release of the 2025 edition of its Full White Label Theme for ViciDial! This latest version brings a host of new features and improvements designed to enhance the user experience for call center agents and administrators alike.
Enhanced Agent Screen Features
The new theme introduces several key features on the agent screen, including:
- Disable Leads: Agents can now disable leads directly from the interface, streamlining the workflow and improving efficiency.
- Manual Dial Buttons: The addition of manual dial buttons allows agents to have more control over their dialing process, ensuring they can handle calls more effectively.
- More Customization Options: Agents can now customize their interface to better suit their individual preferences and working styles.
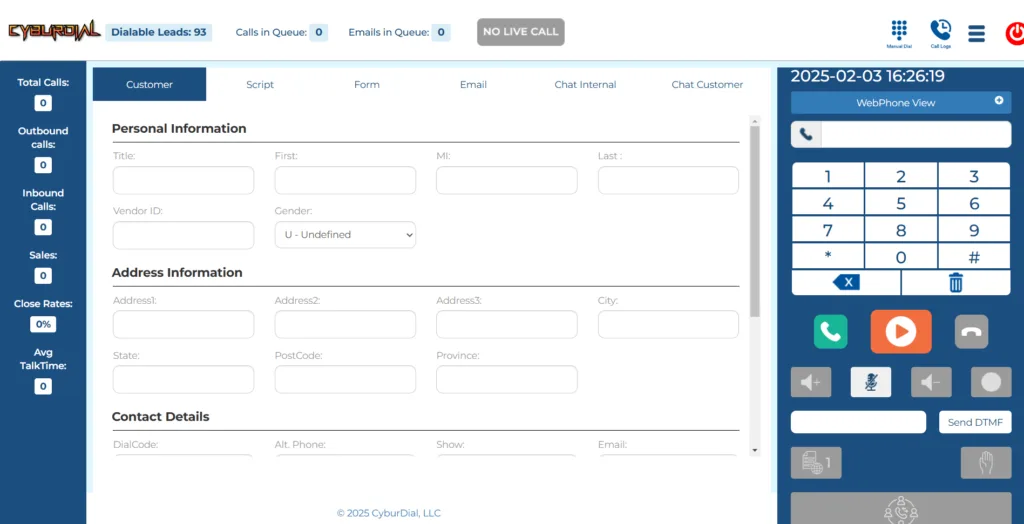
Bug Fixes and Interface Improvements
Over the past year, CyburDial has diligently worked on addressing bugs and improving the overall interface of ViciDial. These enhancements include:
- Resolved Bugs: Numerous bugs reported by users have been fixed, ensuring a smoother and more reliable experience.
- Interface Updates: The interface has been updated to be more intuitive and user-friendly, making it easier for agents to navigate and perform their tasks.
Added Support for Foreign Languages
Recognizing the global reach of ViciDial, the 2025 edition now includes support for additional foreign languages. This makes it easier for call centers around the world to use ViciDial in their native languages, improving communication and efficiency.
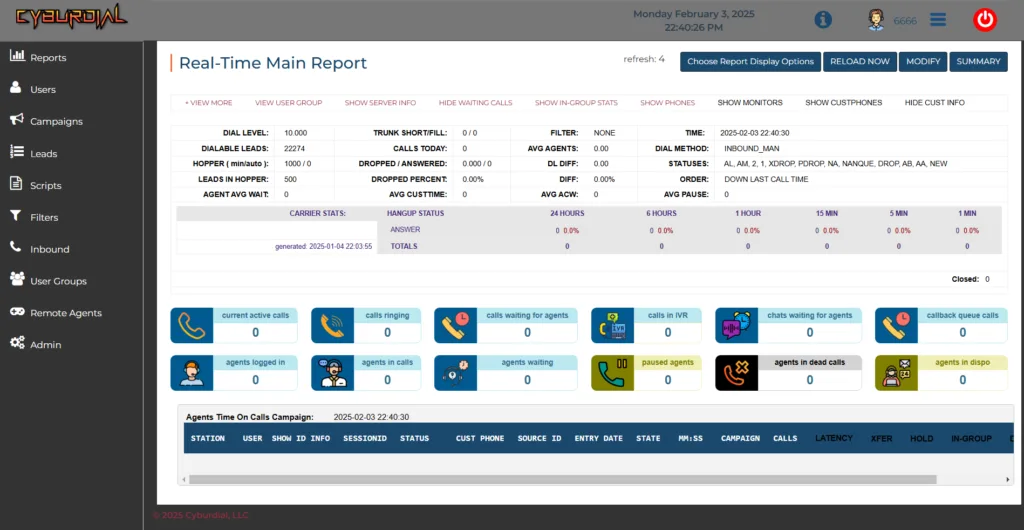
Try It Out Today
To learn more about the new and improved Full White Label Theme for ViciDial 2025 edition, visit our website: https://dialer.one/index.php/product/white-label-cyburdial-theme-2025/.
We look forward to seeing how this new edition helps your call center achieve even greater success!
How to – Fix ViciBox 11 and 12 errors

How to – Fix ViciBox 11 and 12 errors
Step 1 – Fix Apache errors if they exist
cd /etc/apache2/conf.d/
for file in *.conf.old; do mv "$file" "${file%.conf.old}.conf"; done
Answer y to all replace file questions
Step 2 – Recreate missing files
cd /usr/src/astguiclient/trunk
perl install.pl --copy_sample_conf_files --no-prompt
Step 3 – Rebuild missing directories
rm -rf /var/lib/asterisk/sounds
ln -s /usr/share/asterisk/firmware /var/lib/asterisk/firmware
ln -s /usr/share/asterisk/images /var/lib/asterisk/images
ln -s /usr/share/asterisk/moh /var/lib/asterisk/moh
ln -s /usr/share/asterisk/mohmp3 /var/lib/asterisk/moh
ln -s /usr/share/asterisk/sounds /var/lib/asterisk/sounds
ln -s /usr/share/asterisk/static-http /var/lib/asterisk/static-http
ln -s /usr/share/asterisk/phoneprov /var/lib/asterisk/phoneprov
ln -s /var/lib/asterisk/agi-bin /usr/share/asterisk/agi-bin
ln -s /var/lib/asterisk/phoneprov /usr/share/asterisk/phoneprov
Step 4 – Fix yast (ViciBox 12 only)
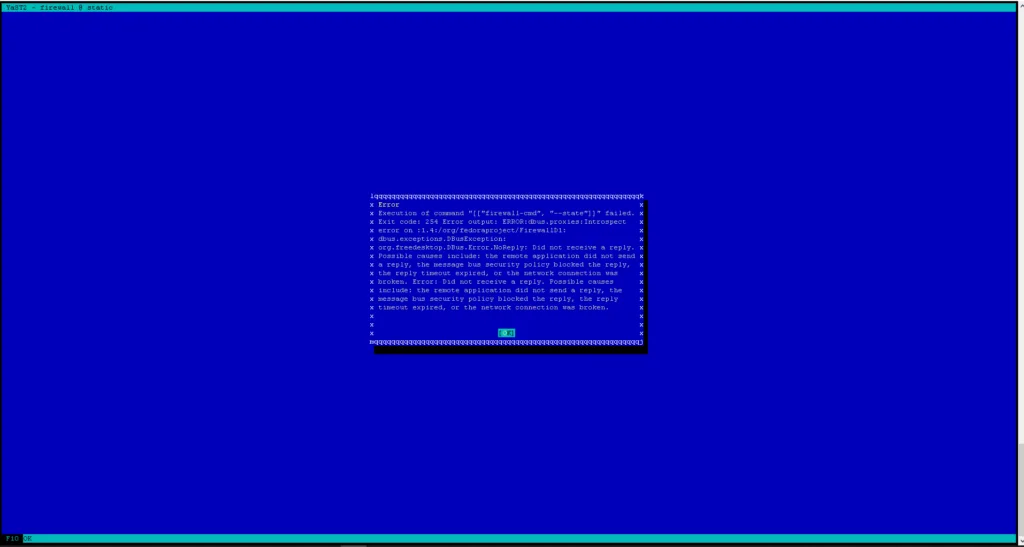
zypper ref && zypper up
cp /etc/firewalld/zones/external.xml.rpmnew /etc/firewalld/zones/external.xml

Also apply this patch:
zypper in -t patch openSUSE-SLE-15.6-2024-4321=1 SUSE-2024-4321=1
Time Sync Has been fixed in SVN 3905 and above
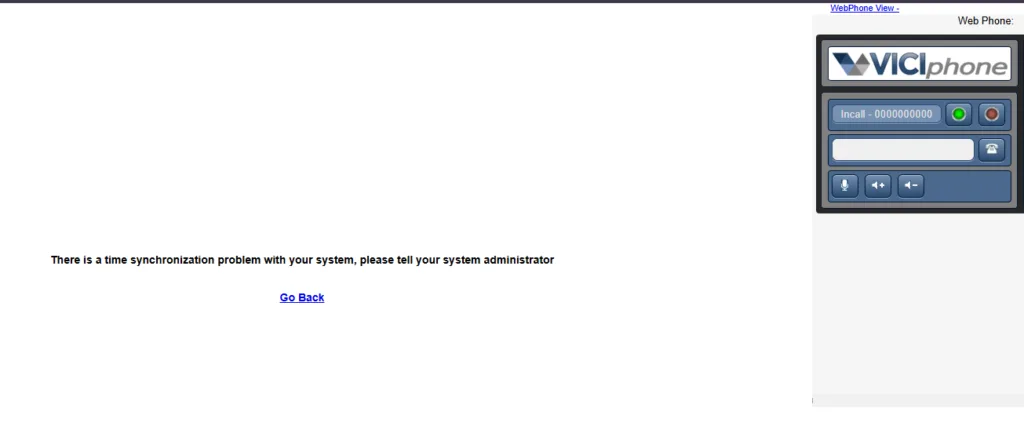
The last issue I have received reports about is a time synchronization issue even when times match everywhere on the system, I am working on debugging this currently, check back here for solution.
The fix is below:
echo "explicit_defaults_for_timestamp = Off" >> /etc/my.cnf.d/general.cnf
systemctl restart mariadb.service
Here is the documentation for it: https://docs.vicibox.com/en/latest/bugfix/bugfix1201-2.html
Here is also a link to the official docs from the ViciBox support website:
https://docs.vicibox.com/en/latest/bugfixerrata.html
Dynportal not working
You need to add port 446 to /etc/apache2/conf/listen.conf as shown below:

If you have any questions feel free to join our discord: https://discord.gg/ymGZJvF6hK
Chris aka carpenox
