In this article, I will demonstrate Install Asterisk 16 on Vicidial aka vicibox 9. In theory it should also work for you CentOS lovers (bleh) too, but just change the zypper commands to yum.
Copy the code below and paste it into your Linux CLI:
cd /usr/src/
wget http://download.vicidial.com/beta-apps/asterisk-16.17.0-vici.tar.gz
tar -xzvf asterisk-16.17.0-vici.tar.gz
cd asterisk-16.17.0-vici
./configure --libdir=/usr/lib64 --with-pjproject-bundled --with-jansson-bundled
rm menuselect.makeopts
make menuselect*
**** Go down one to applications and hit enter, go down until you find the "meetme" app and press space bar, then hit "X" ****
make && make install && make samples && make config && make basic-pbx
/usr/share/astguiclient/start_asterisk_boot.pl
Press Space bar to select [*] app_meetme and then press X
Step 3 – Run the perl install script in /usr/src/astguiclient.trunk
cd /usr/src/astguiclient/trunk perl install.pl
****make sure to change the asterisk version to: 16.17.0-vici & copy sample files
Step 4 – cp all files that have .rmpsave in /etc/asterisk to its original version as shown below
cd /etc/asterisk example: cp sip.conf.rpmsave sip.conf
do the rest too
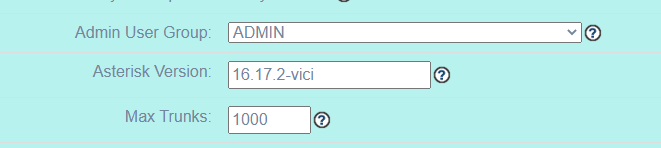
Step 5 – Rebuild server via Vicidial admin
Go to Admin > Servers > Click on the server and change the Asterisk Version
Change Asterisk Version
And then change ‘Rebuild conf files’ to Y and hit submit
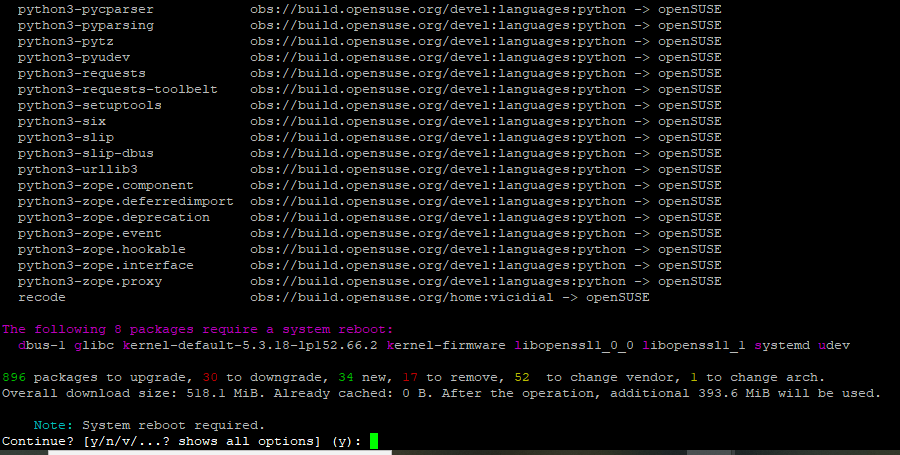
Now you can make sure everything is running correctly by typing the following commands and match the results to the picture below.
Thats all there is to it. If you have any errors or problems, please let me know in the comments below or stop by our live support channel on skype. I hope this helps.
enter Server-IP address into browser(from another Machine/Same Machine) and make sure Apache is showing Testing 123…Webpage. If this webpage is not showing then make sure Apache is properly install, the ports are added into Firewall. You can disable the firewall completely to make sure if it FW problem or something else.
cd /usr/src/
wget http://download.vicidial.com/required-apps/asterisk-perl-0.08.tar.gz
tar -zxf asterisk-perl-0.08.tar.gz
cd asterisk-perl-0.08
perl Makefile.PL
make all
make install
Asterisk 13.29.2 Download & Installation
Download & Unzip Asterisk, Dahdi & Libpri
mkdir /usr/src/asterisk
cd /usr/src/asterisk
wget http://download.vicidial.com/required-apps/asterisk-13.29.2-vici.tar.gz
wget http://download.vicidial.com/beta-apps/dahdi-linux-complete-2.11.1.tar.gz
wget http://downloads.asterisk.org/pub/telephony/libpri/libpri-current.tar.gz

tar xzf asterisk-13.29.2-vici.tar.gz
tar xzf dahdi-linux-complete-2.11.1.tar.gz
tar xzf libpri-current.tar.gz
Install DAHDI
cd dahdi-linux-complete-2.11.1+2.11.1
make all
make install
modprobe dahdi
modprobe dahdi_dummy
make config
Install Libpri
cd /usr/src/asterisk/libpri-1.6.0
make clean
make
make install
cd /usr/src/asterisk/asterisk-13.29.2-vici
./configure --libdir=/usr/lib64 --with-pjproject-bundled
make menuselect #Select Application>MeetMe App
make
make install
make samples
make config
chkconfig asterisk on
Create Database
mysql
CREATE DATABASE `asterisk` DEFAULT CHARACTER SET utf8 COLLATE utf8_unicode_ci;
CREATE USER 'cron'@'localhost' IDENTIFIED BY '1234';
GRANT SELECT,INSERT,UPDATE,DELETE,LOCK TABLES on asterisk.* TO cron@'%' IDENTIFIED BY '1234';
GRANT SELECT,INSERT,UPDATE,DELETE,LOCK TABLES on asterisk.* TO cron@localhost IDENTIFIED BY '1234';
GRANT RELOAD ON *.* TO cron@'%';
GRANT RELOAD ON *.* TO cron@localhost;
flush privileges;
quit
Install Vicidial
mkdir /usr/src/astguiclient
cd /usr/src/astguiclient
svn checkout svn://svn.eflo.net:3690/agc_2-X/trunk
cd trunk
perl install.pl
Enter 13.29.2-vici when it asks for Asterisk Version + Copy Asterisk Settings=Yes + Server webroot path=/var/www/html
Import DB Server Install Settings
mysql
SET GLOBAL connect_timeout=60;
use asterisk;
\. /usr/src/astguiclient/trunk/extras/MySQL_AST_CREATE_tables.sql
\. /usr/src/astguiclient/trunk/extras/first_server_install.sql
\. /usr/src/astguiclient/trunk/extras/sip-iax_phones.sql
quit
Enter Following in the opened file, remove everything from there and copy paste below in it:
#!/bin/sh
#
# This script will be executed *after* all the other init scripts.
# You can put your own initialization stuff in here if you don't
# want to do the full Sys V style init stuff.

touch /var/lock/subsys/local

# OPTIONAL enable ip_relay(for same-machine trunking and blind monitoring)
/usr/share/astguiclient/ip_relay/relay_control start 2>/dev/null 1>&2

# Disable console blanking and powersaving
/usr/bin/setterm -blank
/usr/bin/setterm -powersave off
/usr/bin/setterm -powerdown

### start up the MySQL server
/etc/init.d/mysqld start

### start up the apache web server
/etc/init.d/httpd start

### roll the Asterisk logs upon reboot
/usr/share/astguiclient/ADMIN_restart_roll_logs.pl

### clear the server-related records from the database
/usr/share/astguiclient/AST_reset_mysql_vars.pl

### load dahdi drivers
modprobe dahdi
/usr/sbin/dahdi_cfg -vvvvvvvvvvvvv

### sleep for 20 seconds before launching Asterisk
sleep 20

### start up asterisk
/usr/share/astguiclient/start_asterisk_boot.pl
chmod +x /etc/rc.local
Setting up crontab
crontab -e
Copy the below and paste it into open window and then save it with “:wq”
### keepalive script for astguiclient processes
* * * * * /usr/share/astguiclient/ADMIN_keepalive_ALL.pl

### Compress astguiclient log files and remove old ones
25 2 * * * /usr/bin/find /var/log/astguiclient -maxdepth 1 -type f -mtime +1 -print | grep -v \.xz | xargs xz -9 >/dev/null 2>&1
28 0 * * * /usr/bin/find /var/log/astguiclient -maxdepth 1 -type f -mtime +30 -print | xargs rm -f

### fix the vicidial_agent_log once every hour and the full day run at night
33 * * * * /usr/share/astguiclient/AST_cleanup_agent_log.pl
50 0 * * * /usr/share/astguiclient/AST_cleanup_agent_log.pl --last-24hours
## uncomment below if using QueueMetrics
#*/5 * * * * /usr/share/astguiclient/AST_cleanup_agent_log.pl --only-qm-live-call-check

### updater for VICIDIAL hopper
* * * * * /usr/share/astguiclient/AST_VDhopper.pl -q

### adjust the GMT offset for the leads in the vicidial_list table
1 1,7 * * * /usr/share/astguiclient/ADMIN_adjust_GMTnow_on_leads.pl --debug --list-settings

### optimize the database tables within the asterisk database
3 1 * * * /usr/share/astguiclient/AST_DB_optimize.pl

### VICIDIAL agent time log weekly and daily summary report generation
2 0 * * 0 /usr/share/astguiclient/AST_agent_week.pl
22 0 * * * /usr/share/astguiclient/AST_agent_day.pl

### VICIDIAL campaign export scripts (OPTIONAL)
#32 0 * * * /usr/share/astguiclient/AST_VDsales_export.pl
#42 0 * * * /usr/share/astguiclient/AST_sourceID_summary_export.pl

### inventory report optional
#1 7 * * * /usr/share/astguiclient/AST_dialer_inventory_snapshot.pl -q --override-24hours

### roll logs monthly on high-volume dialing systems
#30 1 1 * * /usr/share/astguiclient/ADMIN_archive_log_tables.pl --months=6

### roll call_log and vicidial_log_extended daily on very high-volume dialing systems
#20 1 * * * /usr/share/astguiclient/ADMIN_archive_log_tables.pl --daily

## uncomment below if using Vtiger
#1 1 * * * /usr/share/astguiclient/Vtiger_optimize_all_tables.pl --quiet

# cleanup of the scheduled callback records
25 0 * * * /usr/share/astguiclient/AST_DB_dead_cb_purge.pl --purge-non-cb --quiet

### inbound email parser should only be active on a single server
* * * * * /usr/share/astguiclient/AST_inbound_email_parser.pl

### flush queue DB table every hour for entries older than 1 hour
11 * * * * /usr/share/astguiclient/AST_flush_DBqueue.pl -q

### remove and rotate old asterisk logs
29 0 * * * /usr/bin/find /var/log/asterisk -maxdepth 3 -type f -mtime +30 -print | xargs rm -f
30 0 * * * /usr/bin/find / -maxdepth 1 -name "screenlog.0*" -mtime +7 -print | xargs rm -f
31 0 * * * /usr/bin/find /tmp -maxdepth 1 -type f -mtime +7 -print | xargs rm -f
32 0 * * * /usr/bin/find /var/log/asterisk -maxdepth 1 -type f -mtime +1 -print | grep -v \.xz | xargs xz >/dev/null 2>&1

### recording mixing/compressing/ftping scripts
0,3,6,9,12,15,18,21,24,27,30,33,36,39,42,45,48,51,54,57 * * * * /usr/share/astguiclient/AST_CRON_audio_1_move_mix.pl
0,3,6,9,12,15,18,21,24,27,30,33,36,39,42,45,48,51,54,57 * * * * /usr/share/astguiclient/AST_CRON_audio_1_move_mix.pl --MIX
#0,3,6,9,12,15,18,21,24,27,30,33,36,39,42,45,48,51,54,57 * * * * /usr/share/astguiclient/AST_CRON_audio_1_move_VDonly.pl
1,4,7,10,13,16,19,22,25,28,31,34,37,40,43,46,49,52,55,58 * * * * /usr/share/astguiclient/AST_CRON_audio_2_compress.pl --MP3
#2,5,8,11,14,17,20,23,26,29,32,35,38,41,44,47,50,53,56,59 * * * * /usr/share/astguiclient/AST_CRON_audio_3_ftp.pl --MP3 --run-check
#0 1 * * * /usr/share/astguiclient/AST_CRON_audio_4_ftp2.pl --ftp-server=server.ip --ftp-login=user --ftp-pass=pass --ftp-directory=/ --ftp-persistent --ftp-validate --transfer-limit=100000 --list-limit=100000

### remove old recordings more than 7 days old, and delete originals after 1 day
#24 0 * * * /usr/bin/find /var/spool/asterisk/monitorDONE -maxdepth 2 -type f -mtime +7 -print | xargs rm -f
24 1 * * * /usr/bin/find /var/spool/asterisk/monitorDONE/ORIG -maxdepth 2 -type f -mtime +1 -print | xargs rm -f

### kill Hangup script for Asterisk updaters
* * * * * /usr/share/astguiclient/AST_manager_kill_hung_congested.pl

### updater for voicemail
* * * * * /usr/share/astguiclient/AST_vm_update.pl

### updater for conference validator
* * * * * /usr/share/astguiclient/AST_conf_update.pl

### reset several temporary-info tables in the database
2 1 * * * /usr/share/astguiclient/AST_reset_mysql_vars.pl

### Reboot nightly to manage asterisk issues and memory leaks - uncomment if issues arise
30 6 * * * /sbin/reboot

### remove text to speech file more than 4 days old
#20 0 * * * /usr/bin/find /var/lib/asterisk/sounds/tts/ -maxdepth 2 -type f -mtime +4 -print | xargs rm -f

### Update agent records with the IP of the phone they are logging in on
#*/5 * * * * /usr/share/astguiclient/AST_phone_update.pl --agent-lookup

### Delete voicemail that is older then 60 days
#0 2 * * * /usr/local/bin/vmspool_manager.pl --active --age=60

### ViciBox integrated firewall, by default just load the VoIP Black list and reload it every 4 hours
### You can lock everyone out of your server if you set this wrong, so understand what you are doing!!!
@reboot /usr/local/bin/VB-firewall.pl --voipbl --noblack --quiet
0 */6 * * * /usr/local/bin/VB-firewall.pl --voipbl --noblack --flush --quiet
Going into mysql and executing the upgrade sql file:
mysql
use asterisk
\. /usr/src/astguiclient/trunk/extras/upgrade_2.14.sql
quit
about:blankREPORT THIS AD
On ALL servers: (Database, web, telephony)
cd /usr/src/astguiclient/trunk
perl ./install.pl
NOTES: If you have customized any scripts in the bin or agi folders,
then make sure you back them up before running the install.pl script.
This script will replace existing files in the astguiclient installation.
A Virtual Office is a new platform designed for the remote world we live in today.
As employees shift to a new work from home lifestyle; companies must adopt new tools and best practices to help their teams effectively communicate, collaborate and stay informed and connected in the absence of a physical office.
A new category of tools called ‘virtual office’ is emerging
Virtual offices (aka: online workspace, digital office, digital workspace) serve as a digital representation of a physical office, providing employees with an online environment to meet and collaborate, while also offering a number of features designed to alleviate common pain points and frustrations shared by remote teams and employees.
Products that fall into the virtual office or workspace category typically offer distributed team members:
• A sense of presence, proximity, and an awareness of team members online availability • Support internal communication via audio, video conferencing, and/or instant messaging • Screen sharing for collaborative work and discussions • Allow teams to create and designate virtual meeting rooms or spaces for ad-hoc and recurring team meetings, discussions, and check-ins
Why does my team need virtual office software?
Problem: Working remote can be lonely compared to in-office
According to Buffer’s State of Remote Work 2020, one of the most common employee-reported limitations of working remote is the feeling of loneliness, disconnect and isolation that stems when teammates are unable to work side-by-side. There are numerous reports and articles pointing to loneliness being a dark side of remote work. In this article, Ben Fanning writes “If you’ve been working with people for a while and had that connectivity and face-to-face meetings and were used to that work environment, and now suddenly working at a distance with little connectivity, it really creates a huge problem. It’s like being on a remote island.”
How can virtual offices help reduce feelings of isolation?
Virtual office solutions offer a wide variety of user experiences and designs, but they all focus on visually helping your distributed team feel more connected and aware of office happenings; commonly referred to as ‘presence’. Virtual presence features can include:
• Profile pictures or avatars that offer ways to express oneself • Availability indicated with text or UI (eg are they ‘away’ in ‘do not disturb mode’, or ‘available’ for conversation?) • Work and/or activity in progress (eg are they ‘coding’, ‘messaging’, or other?) • Meetings and/or discussions underway (ie who’s meeting and should I join if relevant), and more.
These visualizations help to replicate some of the workplace buzz and liveliness you feel when working in a physical office.
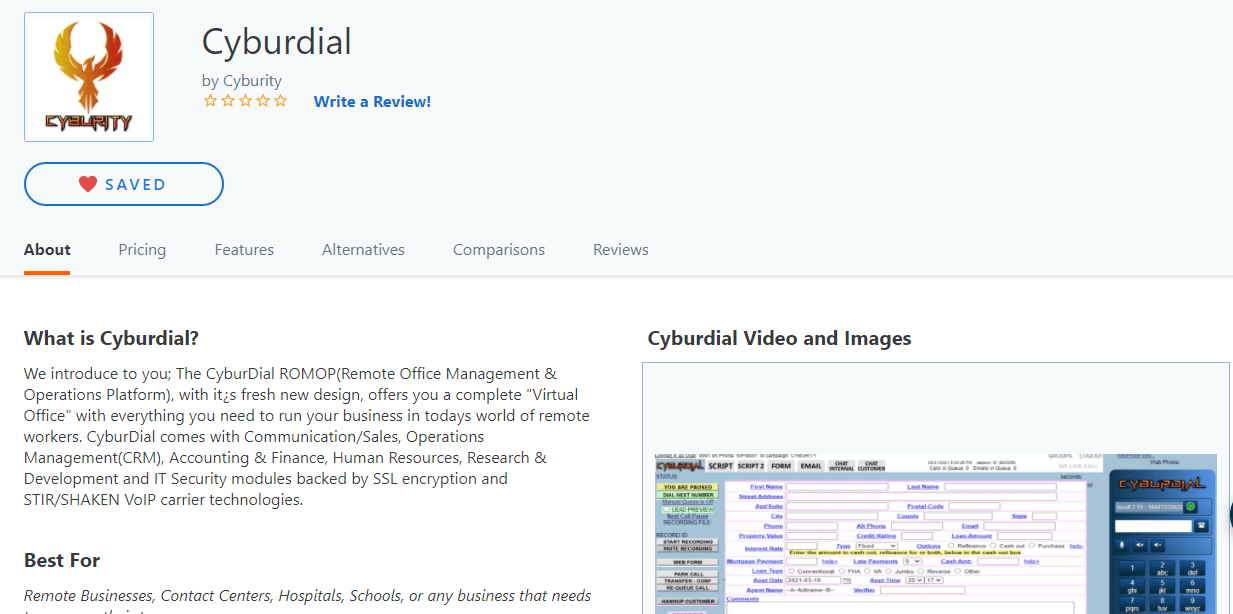
As an example, CyburDial shows users’ ‘activity status,’ which informs teammates about their co-workers’ true availability. Users can opt to set themselves as ‘away’ or ‘available’, and even enable ‘automatic status’ which automatically displays the work activity (eg designing) or whether a user is in ‘focus’ meaning it’s probably not a good time to engage.
Problem: Teams struggle with less communication and collaboration when remote
The other most common struggle employees report when working remote is the significant loss of communication and collaboration. There are many great tools which in-person and remote teams have adopted but few of these tools have been specifically developed for fully distributed teams.
Challenges with communication (too much, or too little)
Most of us that have experienced work from home can relate to either:
1.) Too many formal, structured video calls resulting in the 2020 coined term ‘zoom fatigue’, or 2.) Too few team interactions resulting in a feeling of work disconnect.
It can be challenging for remote organizations to achieve balance and replicate the ad-hoc, informal, and spontaneous nature of conversations held when coworkers work together in a shared office space.
Human Resources Module
The most important work discussions happen outside of formal calendar meetings
A recent internal analysis shared by Microsoft on their shift to remote work put a spotlight on this and showed that a significant increase of shorter duration meetings across the organization was the result of employees missing office interactions — “we could no longer catch up in hallways or by the coffee machine, so we were scheduling more (video) connections” But the time-consuming, formalized nature of scheduling quick, ad-hoc meetings and discussions is itself a main challenge with remote work that even teams like Microsoft struggle with.
How do virtual offices help improve communication?
By providing an online sense of team presence and status, virtual office’s are uniquely positioned to accommodate spontaneous video or audio-based check-ins, desk drop-ins, and casual conversations virtually. Akin to a ‘virtual shoulder tap’, users simply look at their workspace, check the real-time availability of a coworker or group of coworkers, and tap teammates to initiate an immediate call with them; eliminating many of the barriers that typically prevent coworkers from communicating more frequently in their day. Gone is the need to pre-qualify or guess if a teammate is available for a call or if the timing is right to engage — and with no coordination friction required. The majority of internal remote work conversations outside of virtual offices require many time-consuming steps like scheduling, creating, and sharing a meet calendar invite or link — and all of this for a meeting that might warrant just a five minute discussion.
Conversations as fast as real life shoulder-taps
Virtual office tools enable push-to-talk style conversation. In CyburDIal, users just tap a team member and then are immediately connected — If a teammate is free, they simply unmute to accept the call. If they’re unavailable, they do not have to accept and can follow up at a later time.
A General Office setting
Collaboration is key to the success of all companies, and keeping teams aligned and working towards common goals is critical. But when teams are distributed, discussions, background conversations, serendipitous hallway interactions, and paired work moments are limited, if not possible at all due to team structure and time zones. When remote, much internal communication becomes siloed within departments, and teammates often struggle to know what’s happening in other parts of the organization due to limited cross-departmental interactions.
How do virtual offices help teams collaborate?
Time zones
Many distributed teams have employees working across many time zones. A common collaboration challenge for remote workers is the ability to quickly determine where teammates are located and their current time. Layering in calendar events and country specific holidays makes this an even more onerous chore in that scheduling becomes difficult but also you lose a sense of time in general and end-up pinging a colleague at the end of their day when it’s important to be empathetic.
As teams become more globally distributed, and as employees benefit from flexible work schedules within their time zones, organizing teammates by time zone and providing further presence such as using AI to predict when a user will next be online or return is critical.
Know teammates better
The missed water cooler moments as mentioned earlier not only impact collaboration but they also significantly impact opportunity for coworkers to form bonds, build camaraderie, and create a cohesive team culture. According to the Gartner ReimagineHR Employee Survey, 41 percent of those surveyed don’t feel connected to their colleagues when working remotely. Virtual offices provide more opportunities for remote colleagues, particularly cross-department, to get to know each other as they do when in a physical shared office.
Some virtual offices offer casual rooms, or the ability to create ‘watercooler’ rooms, dedicated solely for social interactions like coffee breaks, games, or simply for ‘hangout sessions’ to work with other teammates in an open room environment to feel more together. Avatars, profile images, memes, and emojis are used in varying ways across virtual office tools to let teammates show personality and bring more fun to remote work. CyburDial incorporates games, ice breakers such as local weather, suggests catch-ups and enables other concepts to help teammates get to know one another.
Problem: Lost serendipity and missed hallway discussions
Sales/Marketing Floor
Serendipity lost
“Creativity comes from spontaneous meetings, from random discussions. You run into someone, you ask what they’re doing, you say ‘Wow,’ and soon you’re cooking up all sorts of ideas.” – Steve Jobs
In this recent Fast Company article, Sagi Eliyahu writes about recent shifts to remote work “A lot of the work that gets done — certainly more than we realized — requires direct human collaboration that includes decision-making, delegation, coordination, and strategy. And much of the progress we make in that work, the leaps in innovation, the light-bulb moments, happens without us consciously planning for it.” He adds, “Many of us took for granted just how many ideas were cooked up back when we enjoyed the luxury of working together, in person.”
While lost serendipity is not easy to quantify, it is a commonly reported limitation of remote work.
How can virtual offices enable more spontaneous discussions and ‘Wow’ moments?
By seeing teammates and enabling ad-hoc, on-the-fly conversations, virtual office solutions are helping to address the ‘lost serendipity’ challenge of remote work in a variety of ways. Some virtual offices have introduced skeuomorphic representations of the office, and when your avatar is in a set proximity to another user you can ‘speak out loud’ or interact as you might in an office. Other tools encourage ‘always on’ audio and/or video rooms where teammates can enter a communal workspace environment.
CyburDial lets users optionally broadcast the conversations they deem helpful for their coworkers; offering teams an AI-generated, ‘real-time’ summary of topics to help bring more connection, awareness, and spark innovation. Teammates can also hover over this live conversation summary to listen into the discussion in real-time without having to join — this is the closest thing to background conversation in the office.
Conference Area
After the discussion ends, users can then publish the discussion into a personalized Facebook-like feed with a goal of keeping teams more in the loop and aware of office happenings, especially useful for team members across many time zones missing key meetings.
The ChillZone
Conclusion: Get started today with CyburDial
We really think you will like what our ROMOP(Remote Office: Management & Operations Platform) has to offer, but don’t take our word for it, take our Virtual Office for a test drive today and decide for yourself! https://CyburDial.com The username for all areas is 0000 and the password is demo.
We were just added to Capterra – Please leave us a review
Good day all, we have recently been added to Capterra.com which is a software search site as well as softwareadvice.com and getapp.com. If you wouldn’t mind writing us a review so we can reach our first 10 reviews to unlock some further options for us, we would really appreciate it. Thank you
If you wouldn’t mind writing us a review for our dialer systemClick here to leave your review!
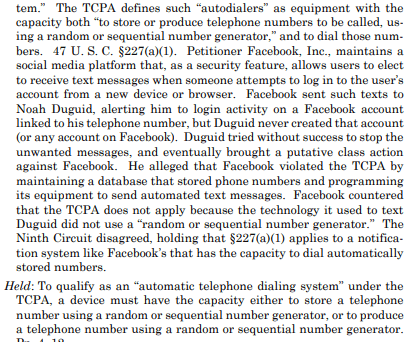
U.S. Supreme Court ruling: ATDS Definition – Sorry for your loss TCPA lits!
The US Supreme court has ruled on the definition of an “ATDS” on a big loss to TCPA litigators.
They answer the question of what exactly an auto-dialer is:
“To qualify as an “automatic telephone dialing system,” a device must have the capacity either to store a telephone number using a random or sequential generator or to produce a telephone number using a random or sequential number generator.”
Since CyburDial does neither of these things, it is technically not an “automatic telephone dialing system” as defined by the TCPA!
Download the ruling here: https://tinyurl.com/tcpawin
How to – Use the built in Dynamic Portal for Vicibox
Ok so I have had a LOT of people ask me how to use the dynamic portal for Vicibox or for their own Vicidial scratch install. I didn’t think I needed to go over this topic, since it’s in the install instructions for vicibox9, but since there has been a very high demand for it. This is the prelude for the live session I will be giving in a couple hours.
So there is an easy way to install this on your server if you are using a scratch install for Leap by adding the repo for Vicibox that matches your Linux distro. You can go to the url below:
Once you find the Leap version you are using, just add the repo such as this: For this example, Leap 15.2
The Steps – Vicibox Dynamic Portal
Step 1 – Add the Vicibox repo
zypper ar https://download.opensuse.org/repositories/home:/vicidial:/vicibox/openSUSE_Leap_15.2/home:vicidial:vicibox.repo
zypper ar https://download.opensuse.org/repositories/home:/vicidial:/vicibox/openSUSE_Leap_15.2/home:vicidial:vicibox.repo
Step 2 – Install the needed files
After you add the repo, you can just type:
zypper install vicibox*
Step 3 – Edit the apache config files for dynamic portal
For this next part I will show you the code for the dynamic portal conf file incase you are trying to install this on another OS. Here is the dynportal.conf file which is in /etc/apache2/vhost.d/ and you can find an example of the ssl version below in the picture
<VirtualHost *:81>
        ServerAdmin admin@company.com
        # This needs to be different from other vhosts otherwise they'll get
        # mod_cband applied to it too since it works by ServerName not VHost
        ServerName dynportal.company.com
        #ServerAlias
        DocumentRoot /srv/www/vhosts/dynportal
        ErrorLog /var/log/apache2/dynportal-error_log
        #CustomLog /var/log/apache2/access_log combined
        CustomLog /dev/null combined
        HostnameLookups Off
        UseCanonicalName Off
        ServerSignature Off
        TraceEnable Off
        Include /etc/apache2/conf.d/php7.conf
        Include /etc/apache2/conf.d/mod_deflate.conf
        Include /etc/apache2/conf.d/mod_cband.portal
        DirectoryIndex index.html index.php index.htm

        # Prevent access to debug and other things
        <Files ~ "^\.ht">
                Require all denied
        </Files>
        <Files ~ "^\debug.txt">
                Require all denied
        </Files>
        <Directory "/srv/www/vhosts/dynportal/inc">
                Require all denied
        </Directory>

        # And allow our directory to be served finally
        <Directory "/srv/www/vhosts/dynportal">
                Options FollowSymLinks
                AllowOverride None
                Require all granted
        </Directory>

        # Take care of CSS and some other web-crap security things
        <IfModule mod_headers.c>
                Header always set X-Frame-Options: DENY
                Header always set X-XSS-Protection "1; mode=block"
                Header always set X-Content-Type-Options: nosniff
                Header always set Content-Security-Policy "script-src 'self'; object-src 'self'"
                Header always set Strict-Transport-Security "max-age=63072000; includeSubdomains;"
        </IfModule>

</VirtualHost>
Make sure you change the domain and email and then restart Apache: service apache restart
dynportal-ssl.conf file example
<VirtualHost *:446>
        ServerAdmin admin@agentwebdialer.com
        # This needs to be different from other vhosts otherwise they'll get
        # mod_cband applied to it too since it work by ServerName not VHost
        ServerName agentwebdialer.com
        #ServerAlias
        DocumentRoot /srv/www/vhosts/dynportal
        ErrorLog /var/log/apache2/dynportal-error_log
        #CustomLog /var/log/apache2/access_log combined
        CustomLog /dev/null combined
        HostnameLookups Off
        UseCanonicalName Off
        ServerSignature Off
        TraceEnable Off
        Include /etc/apache2/conf.d/php7.conf
        Include /etc/apache2/conf.d/mod_deflate.conf
        Include /etc/apache2/conf.d/mod_cband.portal
        DirectoryIndex index.html index.php index.htm

        # Configure SSL cert
        SSLEngine on
        SSLCertificateFile /etc/certbot/live/agentwebdialer.com/cert.pem
        #SSLCACertificateFile /etc/apache2/ssl.crt/CA_chain.crt
        SSLCertificateKeyFile /etc/certbot/live/agentwebdialer.com/privkey.pem

        # SSL Options
        <FilesMatch "\.(php)$">
                SSLOptions +StdEnvVars
        </FilesMatch>
        SetEnvIf User-Agent ".*MSIE.*" nokeepalive ssl-unclean-shutdown downgrade-1.0 force-response-1.0

        # Prevent access to debug and other things
        <Files ~ "^\.ht">
                Require all denied
        </Files>
        <Files ~ "^\debug.txt">
                Require all denied
        </Files>
        <Directory "/srv/www/vhosts/dynportal/inc">
                Require all denied
        </Directory>

        # And allow our directory to be served finally
        <Directory "/srv/www/vhosts/dynportal">
                Options Indexes FollowSymLinks
                AllowOverride None
                Require all granted
        </Directory>

        # Take care of CSS and some other web-crap security things
        <IfModule mod_headers.c>
                Header always set X-Frame-Options: DENY
                Header always set X-XSS-Protection "1; mode=block"
                Header always set X-Content-Type-Options: nosniff
                Header always set Content-Security-Policy "script-src 'self'; object-src 'self'"
                Header always set Strict-Transport-Security "max-age=63072000; includeSubdomains;"
        </IfModule>

</VirtualHost>
Step 4 – Change the default settings for the dynamic portal
Make sure you change the defaults.inc.php file in /srv/www/vhosts/dynportal/inc
defaults,inc.php
Step 5- Open Ports on Firewall
There is a service added to the yast firewall to add the dynamic portal named viciportal, make sure you add this to the “public” zone
Open the port in the firewall to the “trusted” zone
Step 6 – Add Crontab Entry
The last step is to add a crontab entry for the dynamic portal entries as such:
### ViciBox integrated firewall, by default just load the VoIP Black list and reload it every 4 hours
### You can lock everyone out of your server if you set this wrong, so understand what you are doing!!!
@reboot /usr/local/bin/VB-firewall.pl --whitelist=ViciWhite --dynamic --quiet
* * * * * /usr/local/bin/VB-firewall.pl --whitelist=ViciWhite --dynamic
I changed the timing on the crontab entry to every 60 seconds from its original setting
chmod -R 775 /srv/www/vhosts/dynportal service apache restart
Step 7 – You’re Done! Check it out!
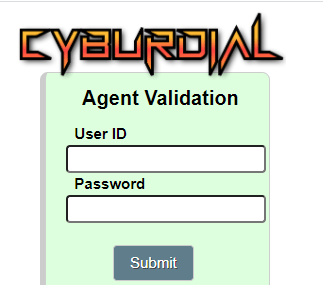
After you restart apache and open the port in the firewall, you should be able to go to http://yourserver:81/valid8.php or https://yourserver:446/valid8.php for SSL and see the following:
Dynamic Portal
Well, that’s it, I did this from memory instead of trying it from scratch so if I missed anything, I’ll update the instructions, just leave a comment below. Thanks. See you guys soon at the Live session: https://fb.me/e/5zj1fJ9Fg
Login to the admin panel and then go to system settings
Admin -> System Settings
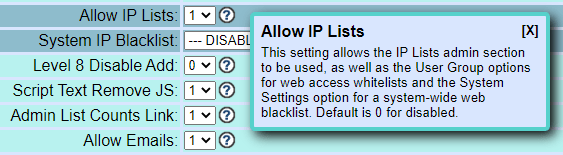
Scroll down to “Allow IP Lists” and enable it by setting it to “1”
Admin > System Settings > Allow IP List -> 1
Step 2 – Go to the Admin user(6666) and enable access
Go down to the bottom of the user setting screen and set “Modify IP Lists” to 1(good idea to ignore ip list for yourself)
Modify IP Lists = 1
Step 3 – Turn on whitelist for the user groups you want to limit access
Go to user groups > scroll down to whitelist settings
Enable for User groups
Step 4 – Go back into admin section and click IP Lists to add IP’s
Click IP lists
Make sure to add your IP’s to the list
Thats it, you have now enabled IP whitelist access only. Make sure to update your crontab entries for VB-firewall.pl from –blacklist to –whitelist=ViciWhite and such like so:
Make sure you tune in for tomorrow’s live session to learn how to start using the built in dynamic portal and keeping your systems secure.
CyburDial -:- A Cloud Based ‘Zero Trust’ Predictive Dialer
In this emerging world of ransomware, malware, and hacks such as SolarWinds becoming our everyday reality, how concerned are you with data security? How important is your privacy and sense of security? WCW I(World Cyber War) is right around the corner and if you think that your business is not a target, then perhaps you should check out my blog post about how hackers are leveraging Linux servers, especially for their personal criminal VoIP needs(ie. for ransomware threats) and other monetary gains. That’s why, all of us here at CyburDial, offer you a “Zero Trust” environment as suggested by the NSA, that we invite you to try for free by filling out the form below.
Our new CyburDial system, with it’s fresh new design, offers you such tools as ‘IP whitelist access’, ‘2 factor authentication’ and acompletely ‘encrypted (SSL/STIR/SHAKEN)’ systemwide connection, combined with the peace of mindthat our network is operatedand maintained by our Cyber Securityprofessionals lead by myself, of which I am a certified ethical hacker that has been in the cyber security industry since the late 90’s. So, on behalf of myself, my fellow security staff members, technical support staff and the rest of us here at CyburDial, are proud to offer you CyburDial.
CyburDial Access Portal
CyburDial Admin Panel – Complete Remote Business Management Tool
Agent communication platform
Quality Control Scorecards – Make sure your employee’s are following the “script”
2FA
2 Factor Authentication – Totally secure your customer data, and other sensitive business info with a call, text or email
IP Whitelist Access
Easy User Management – Add/Delete/Edit Users and Phones with an easy to use web interface
Dynamic Portal
What’s new?
Our quality control module not only lets you create your own score cards to dictate the way a call progresses, you then have access to listen, grade and reassign the call back to its original caller or transfer it to its next stage of the sales funnel. Our programming team alongside CyburDial’s API capabilities can give your business management system, a custom fit, based around your business’ needs. We invite you to sign in and try it out, then get a free trial account on CyburDial by filling out the form below:
Quality Control Scorecards – Make sure your employee’s are following the “script”
Well, it seems there is an issue with the installer now since Leap 15.1 went end of life and no longer supports updates. So what do you do now? A scratch install on Leap 15.2 is one option following a post I wrote up for that a few days ago, or you could upgrade 15.1 to 15.2 following this tutorial.
Vicibox 9 Fix as well
Step 1 – Preparing for upgrade by enabling the proper repository
zypper modifyrepo --enable openSUSE-Leap-15.1-Update
zypper ref
zypper up
Step 2 – Change existing repo’s for the others
This next part will change the repo’s to 15.2 and then we will start the fun part.
files="$(zypper lr -u | awk -F'|' '$4 ~ /Yes/ { gsub (" ", "", $2); r="/etc/zypp/repos.d/"$2".repo"; print r }')"
for f in $files
doecho "Backup of $f saved to /root/ before patching it up ..."
cp -f "$f" /root/sed -i 's+/leap/15.1+/leap/$releasever+' "$f"
sed -i 's+15.1.1+15.2+' "$f"
sed -i 's+15.1+15.2+' "$f"
done
If you have any problems, just comment here and I will help you out the best I can or you can drop by our Skype Group chat: https://join.skype.com/ujkQ7i5lV78O . Hope this helps a lot of you out there.
March 28th Update: Make sure you copy php7.conf to mod_php7.conf or the dynportal and audiostore conf files will cause apache to have errors. You can do so with the following command:
cp /etc/apache2/conf.d/mod_php7.conf /etc/apache2/conf.d/php7.conf or vica versa, i forget
MySQL manages connections to the database server through the use of a socket file, a special kind of file that facilitates communications between different processes. The MySQL server’s socket file is named mysqld.sock and on Ubuntu systems it’s usually stored in the /var/run/mysqld/ directory. This file is created by the MySQL service automatically.
Sometimes, changes to your system or your MySQL configuration can result in MySQL being unable to read the socket file, preventing you from gaining access to your databases. The most common socket error looks like this:
OutputERROR 2002 (HY000): Can't connect to local MySQL server through socket '/var/run/mysqld/mysqld.sock' (2)
There are a few reasons why this error may occur, and a few potential ways to resolve it.
One common cause of this error is that the MySQL service is stopped or did not start to begin with, meaning that it was unable to create the socket file in the first place. To find out if this is the reason you’re seeing this error, try starting the service with systemctl:
sudo systemctl start mysql
Then try accessing the MySQL prompt again. If you still receive the socket error, double check the location where your MySQL installation is looking for the socket file. This information can be found in the mysqld.cnf file:
sudo nano /etc/mysql/mysql.conf.d/mysql.cnf
Look for the socket parameter in the [mysqld] section of this file. It will look like this:/etc/mysql/mysql.conf.d/mysqld.cnf
. . .
[mysqld]
user            = mysql
pid-file        = /var/run/mysqld/mysqld.pid
socket          = /var/run/mysqld/mysqld.sock
port            = 3306
. . .
Close this file, then ensure that the mysqld.sock file exists by running an ls command on the directory where MySQL expects to find it:
ls -a /var/run/mysqld/
If the socket file exists, you will see it in this command’s output:
If the file does not exist, the reason may be that MySQL is trying to create it, but does not have adequate permissions to do so. You can ensure that the correct permissions are in place by changing the directory’s ownership to the mysql user and group:
sudo chown mysql:mysql /var/run/mysqld/
Then ensure that the mysql user has the appropriate permissions over the directory. Setting these to 775 will work in most cases:
sudo chmod -R 755 /var/run/mysqld/
Finally, restart the MySQL service so it can attempt to create the socket file again:
sudo systemctl restart mysql
Then try accessing the MySQL prompt once again. If you still encounter the socket error, there’s likely a deeper issue with your MySQL instance, in which case you should review the error log to see if it can provide any clues.