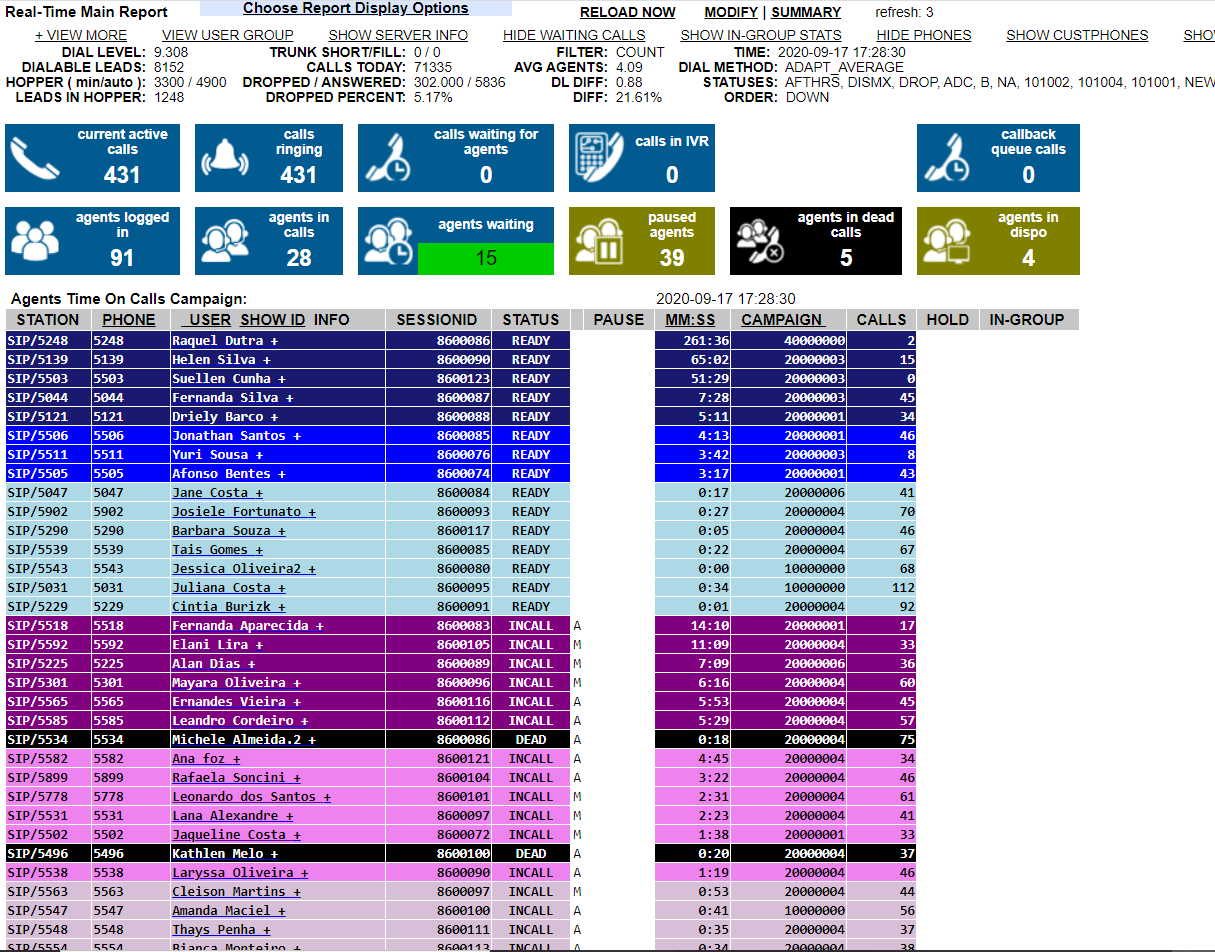
CyburDial – Check out our new admin and agent interfaces
We are pleased to announce the release of our new interface! Check our the admin and agent areas with our fresh new professional look. You can login through CyburDial Demo with the username: 0000 and the password: demo but make sure you login through the firewall access first in order to have your IP added to the firewall.
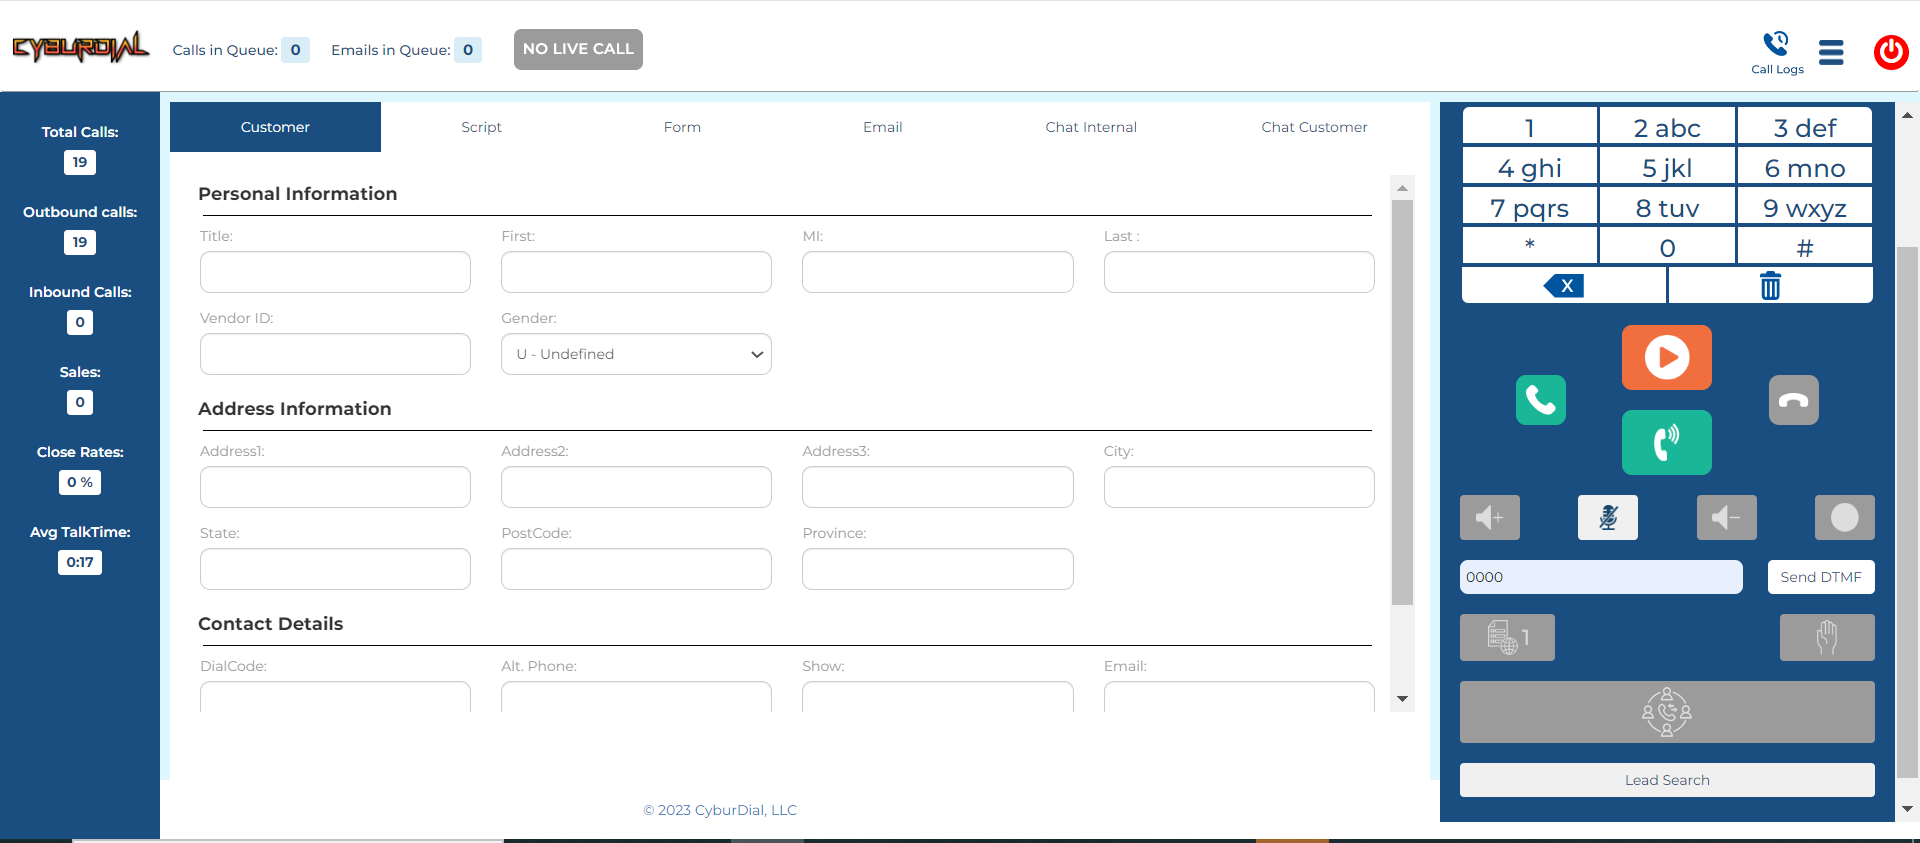
CyburDial Admin Interface
CyburDIal Admin
Our easy to navigate agent interface has all the features you could need and a nice crisp clean look that brings our industry into the year 2022!
How to – use one dynamic portal for whitelisting and have it sync across an entire cluster
This article will go over a method I have recently come up with in order to have your agents sign in through one dynamic portal and have their IP validated across all servers in the cluster.
Step 1 – Generate a SSH key
In your linux cli simply type “ssh-keygen” and just press enter for all default values with no password as shown below
ssh-keygen
Step 2 – copy the ssh key to the other servers you need it synced to
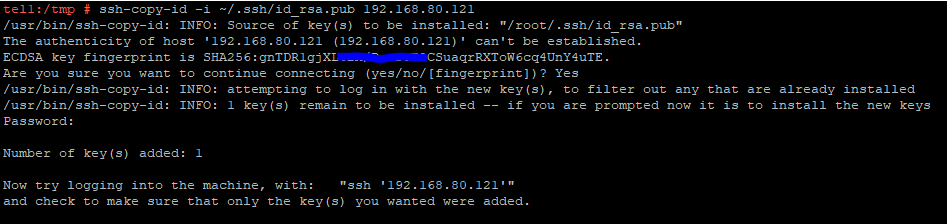
ssh-copy-id -i ~/.ssh/id_rsa.pub 192.168.80.121 (replace IP with the servers Ip’s as you do each one)
Type yes and then enter the servers root password, do these steps for each server in your cluster
ssh-copy-id -i ~/.ssh/id_rsa.pub 192.168.80.121
Step 3 – rsync the Dynamic IP firewall list to the other servers
Replace the IP’s with each one in your cluster and repeat this step for each
Vicibox9 users use this command: /usr/bin/rsync -a -e “ssh” /tmp/VB-DYNAMIC-tmp root@192.168.80.121:/tmp/
Vicibox10 users use this one: /usr/bin/rsync -a -e “ssh” /tmp/dynamiclist-add-tmp root@192.168.80.121:/tmp/
/usr/bin/rsync -a -e “ssh” /tmp/dynamiclist-add-tmp root@192.168.80.121:/tmp/
Step 4 – Now add a cronjob to have this done every minute with one line for each server as shown below
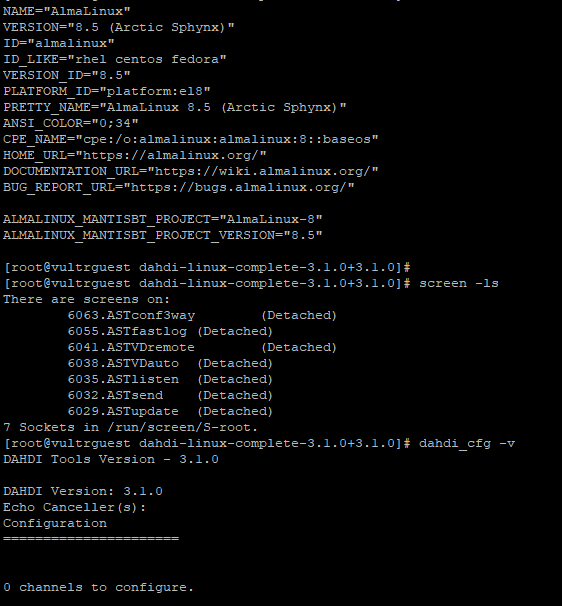
How to migrate from CentOS 8 to AlmaLinux (conversion)
I already wrote about migrating from CentOS 8 to Rocky Linux. Today, this quick post will list steps to convert existing VM or bare metal server from CentOS 8 to AlmaLinux 8.
WARNING! Make a backup before you start upgrading and the conversion procedure. I am an experienced Linux user, developer and sysadmin. However, there is no substitute for backups. Keep verified backups. Do not proceed further without backups. CyburDial is not responsible for data loss.
If you are doing this over an SSH session, I recommend running commands over GNU/screen or Tmux terminal multiplexer.
Migrating from CentOS 8 to AlmaLinux (conversion)
Log in as the root user: sudo -i
Apply pending updates to CentOS 8 by running the dnf command/yum command: dnf update
Apply pending updates before migration starts
Reboot the Linux box when new kernel updates are installed: reboot
After reboot, you need to download the almalinux-deploy.sh script using the wget or curl command, type: wget https://raw.githubusercontent.com/AlmaLinux/almalinux-deploy/master/almalinux-deploy.sh # read the script # vim almalinux-deploy.sh
Next set up executable permission using the chmod command, run:
chmod -v +x almalinux-deploy.sh
Downloading almalinux-deploy.sh script
Finally, migrate CentOS to AlmaLinux by typing the almalinux-deploy.sh: ./almalinux-deploy.sh
AlmaLinux migration tool in action
The upgrade and migration will take their own sweet time. It all depends upon your server hardware specification and the Internet speed. So wait and watch for errors on the screen. In the end, you should see a confirmation message as follows on screen:Complete! Run dnf distro-sync -y OK Restoring of alternatives is done OK Generating grub configuration file … done All Secure Boot related packages which were released by not AlmaLinux are reinstalledOK Migration to AlmaLinux is completed
Reboot the Linux box hosted at AWS or Linode: shutdown -r now Connection to 3.1x.2xx.2xx closed by remote host.
Finally, verify the AlmaLinux version, run: cat /etc/redhat-release ## OR ## cat /etc/os-release
CentOS to Almalinux migration successfully executed
Also, make sure all services such as PGSQL, Apache and others are running using the ps command or ss command: ss -tulpn | more ss -tulpn | grep ":80" # Verify logs using the tail command and dmesg command+egrep command # tail -f /var/log/httpd/app_name_goes_here dmesg | egrep -i 'error|critical|warn'
This will convert your centos8 system over to AlmaLinux
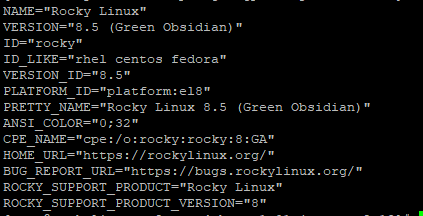
Rocky Linux is an open-source operating system and one of the strongest replacement candidates for CentOS 8. It is a 100% binary-compatible release using the Red Hat Enterprise Linux (RHEL). Let us see how to migrate CentOS 8 Linux live server to Rocky Linux 8 using a shell script provided by the Rocky Linux project.
Step 1 – Backup CentOS 8
I started the migration process with backup. I do have nightly backups, but before upgrading, I made a snapshot to revert back when something goes wrong. In other words, keep verified backups.
Step 2 – Installing all updates on CentOS 8
Then I log in using the ssh command: ssh user@cyburdial-php8-app1
Now, all we have to do is use the dnf command to apply all pending updates: sudo dnf update
Finally, reboot the Linux box using the shutdown command or reboot command: sudo reboot
Let us verify CentOS Linux 8 version using the cat command or more command/less command: more /etc/centos-release
RockyLinux
Step 3 – Installing git client on CentOS 8
We need git to install the migration script. Is git installed on the server? Let us find out. Execute the type command: type -a git
Let us search for the git package, Execute: dnf list git dnf search git dnf info git
Now, install git on your server with the help of the dnf utility, Execute: sudo dnf install git type -a git
Clone the repo to install migration tool called rocky-tool
Finally, we need to clone the rocky-tools repo with the help of the git command: cd /tmp/ git clone https://github.com/rocky-linux/rocky-tools.git Getting ready for Rocky Linux migration
Step 4 – Migrating from CentOS 8 to Rocky Linux
Change the directory using cd command where rocky-tools cloned: cd /tmp/rocky-tools/migrate2rocky
Set up executable permissions using the chmod command: chmod -v +x migrate2rocky.sh
Start the migration from CentOS 8 to Rocky Linux by typing the migrate2rocky.sh command: ./migrate2rocky.sh -r
Follow on-screen instructions and wait for some time to finish the migration job. At the end you should see:Done, please reboot your system. A log of this installation can be found at /var/log/migrate2rocky.log
cd /usr/src
wget http://download.vicidial.com/required-apps/asterisk-perl-0.08.tar.gz
tar xzf asterisk-perl-0.08.tar.gz
cd asterisk-perl-0.08
perl Makefile.PL
make all
make install

dnf --enablerepo=powertools install libsrtp-devel -y
yum install -y elfutils-libelf-devel libedit-devel

cd /usr/src
wget http://downloads.sourceforge.net/project/lame/lame/3.99/lame-3.99.5.tar.gz
tar -zxf lame-3.99.5.tar.gz
cd lame-3.99.5
./configure
make
make install

cd /usr/src/
wget https://digip.org/jansson/releases/jansson-2.13.tar.gz
tar xvzf jansson*
cd jansson-2.13
./configure
make clean
make
make install
ldconfig

UPDATE: 6/22/21 - Ty @Ankit for catching the wrong directiory below

cd /usr/src/
wget https://downloads.asterisk.org/pub/telephony/dahdi-linux-complete/dahdi-linux-complete-current.tar.gz
tar xzf dahdi*
cd /usr/src/dahdi-linux-complete-3.1.0+3.1.0/
nano /usr/src/dahdi-linux-complete-3.1.0+3.1.0/linux/include/dahdi/kernel.h
remove #include: </linux/pci-aspm.h>
make
make install
make install-config
(if you get an error here about 4.18.0-305.7.1.el8_4.x86_64 missing then do "yum install *4.18.0-305.7.1.el8_4.x86_64")

yum install dahdi-tools-libs

cd tools
make clean
make
make install
make install-config

if it gives an error /usr/sbin/dahdi_cfg -vvvvvvvvvvvvv
edit the file "system.conf.sample" in "system.conf"


cd /usr/src/
wget http://downloads.asterisk.org/pub/telephony/libpri/libpri-1.6.0.tar.gz
tar xzf libpri-1.6.0.tar.gz
cd /usr/src/libpri-1.6.0
make clean
make
make install

nano  /etc/php.ini
error_reporting  =  E_ALL & ~E_NOTICE
memory_limit = 128M
short_open_tag = On
max_execution_time = 330
max_input_time = 360
post_max_size = 100M
upload_max_filesize = 42M
default_socket_timeout = 360
date.timezone = Europe/Rome

cd /usr/src/
wget http://download.vicidial.com/required-apps/asterisk-13.29.2-vici.tar.gz
tar xzf asterisk-13.29.2-vici.tar.gz
cd /usr/src/asterisk-13.29.2/
./configure --libdir=/usr/lib64 --with-pjproject-bundled -with-jansson-bundled
make clean
make menuselect    ; ####### select "app_meetme" "res_http_websocket" and "res_srtp"
make
make install
make samples
make config


mkdir /usr/src/astguiclient
cd /usr/src/astguiclient
svn checkout svn://svn.eflo.net:3690/agc_2-X/trunk


mysql
SET GLOBAL connect_timeout=60;
CREATE DATABASE `asterisk` DEFAULT CHARACTER SET utf8 COLLATE utf8_unicode_ci;
CREATE USER 'cron'@'localhost' IDENTIFIED BY '1234';
GRANT SELECT,INSERT,UPDATE,DELETE,LOCK TABLES on asterisk.* TO cron@'%' IDENTIFIED BY '1234';
CREATE USER 'custom'@'localhost' IDENTIFIED BY 'custom1234';
GRANT SELECT,INSERT,UPDATE,DELETE,LOCK TABLES on asterisk.* TO custom@'%' IDENTIFIED BY 'custom1234';
GRANT SELECT,INSERT,UPDATE,DELETE,LOCK TABLES on asterisk.* TO cron@localhost IDENTIFIED BY '1234';
GRANT SELECT,INSERT,UPDATE,DELETE,LOCK TABLES on asterisk.* TO custom@localhost IDENTIFIED BY 'custom1234';
GRANT RELOAD ON *.* TO cron@'%';
GRANT RELOAD ON *.* TO cron@localhost;
GRANT RELOAD ON *.* TO custom@'%';
GRANT RELOAD ON *.* TO custom@localhost;
flush privileges;
use asterisk;
\. /usr/src/astguiclient/trunk/extras/MySQL_AST_CREATE_tables.sql
\. /usr/src/astguiclient/trunk/extras/first_server_install.sql
ALTER TABLE phones ALTER template_id SET DEFAULT '';
quit

cd /usr/src/astguiclient/trunk

perl install.pl


*Within the install.pl script make sure you Copy Asterisk Settings=Yes + Server webroot path=/var/www/html
nano /etc/rc.local

### paste this below:

#!/bin/sh
#
# This script will be executed *after* all the other init scripts.
# You can put your own initialization stuff in here if you don't
# want to do the full Sys V style init stuff.

touch /var/lock/subsys/local

# OPTIONAL enable ip_relay(for same-machine trunking and blind monitoring)
/usr/share/astguiclient/ip_relay/relay_control start 2>/dev/null 1>&2

# Disable console blanking and powersaving
/usr/bin/setterm -blank
/usr/bin/setterm -powersave off
/usr/bin/setterm -powerdown

### start up the MySQL server
systemctl restart mariadb.service

### start up the apache web server
systemctl restart apache2

### roll the Asterisk logs upon reboot
/usr/share/astguiclient/ADMIN_restart_roll_logs.pl

### clear the server-related records from the database
/usr/share/astguiclient/AST_reset_mysql_vars.pl

### load dahdi drivers
modprobe dahdi
/usr/sbin/dahdi_cfg -vvvvvvvvvvvvv

### sleep for 20 seconds before launching Asterisk
sleep 20

### start up asterisk
/usr/share/astguiclient/start_asterisk_boot.pl
type "crontab -e"

### paste below:

### recording mixing/compressing/ftping scripts
#0,3,6,9,12,15,18,21,24,27,30,33,36,39,42,45,48,51,54,57 * * * * /usr/share/astguiclient/AST_CRON_audio_1_move_mix.pl
0,3,6,9,12,15,18,21,24,27,30,33,36,39,42,45,48,51,54,57 * * * * /usr/share/astguiclient/AST_CRON_audio_1_move_mix.pl --MIX
0,3,6,9,12,15,18,21,24,27,30,33,36,39,42,45,48,51,54,57 * * * * /usr/share/astguiclient/AST_CRON_audio_1_move_VDonly.pl
1,4,7,10,13,16,19,22,25,28,31,34,37,40,43,46,49,52,55,58 * * * * /usr/share/astguiclient/AST_CRON_audio_2_compress.pl --GSM
#2,5,8,11,14,17,20,23,26,29,32,35,38,41,44,47,50,53,56,59 * * * * /usr/share/astguiclient/AST_CRON_audio_3_ftp.pl --GSM

### keepalive script for astguiclient processes
* * * * * /usr/share/astguiclient/ADMIN_keepalive_ALL.pl --cu3way

### kill Hangup script for Asterisk updaters
* * * * * /usr/share/astguiclient/AST_manager_kill_hung_congested.pl

### updater for voicemail
* * * * * /usr/share/astguiclient/AST_vm_update.pl

### updater for conference validator
* * * * * /usr/share/astguiclient/AST_conf_update.pl

### flush queue DB table every hour for entries older than 1 hour
11 * * * * /usr/share/astguiclient/AST_flush_DBqueue.pl -q

### fix the vicidial_agent_log once every hour and the full day run at night
33 * * * * /usr/share/astguiclient/AST_cleanup_agent_log.pl
50 0 * * * /usr/share/astguiclient/AST_cleanup_agent_log.pl --last-24hours
## uncomment below if using QueueMetrics
#*/5 * * * * /usr/share/astguiclient/AST_cleanup_agent_log.pl --only-qm-live-call-check

## uncomment below if using Vtiger
#1 1 * * * /usr/share/astguiclient/Vtiger_optimize_all_tables.pl --quiet

### updater for VICIDIAL hopper
* * * * * /usr/share/astguiclient/AST_VDhopper.pl -q

### adjust the GMT offset for the leads in the vicidial_list table
1 1,7 * * * /usr/share/astguiclient/ADMIN_adjust_GMTnow_on_leads.pl --debug

### reset several temporary-info tables in the database
2 1 * * * /usr/share/astguiclient/AST_reset_mysql_vars.pl

### optimize the database tables within the asterisk database
3 1 * * * /usr/share/astguiclient/AST_DB_optimize.pl

## adjust time on the server with ntp
30 * * * * /usr/sbin/ntpdate -u pool.ntp.org 2>/dev/null 1>&2

### VICIDIAL agent time log weekly and daily summary report generation
2 0 * * 0 /usr/share/astguiclient/AST_agent_week.pl
22 0 * * * /usr/share/astguiclient/AST_agent_day.pl

### VICIDIAL campaign export scripts (OPTIONAL)
#32 0 * * * /usr/share/astguiclient/AST_VDsales_export.pl
#42 0 * * * /usr/share/astguiclient/AST_sourceID_summary_export.pl

### remove old recordings more than 7 days old
#24 0 * * * /usr/bin/find /var/spool/asterisk/monitorDONE -maxdepth 2 -type f -mtime +7 -print | xargs rm -f

### roll logs monthly on high-volume dialing systems
#30 1 1 * * /usr/share/astguiclient/ADMIN_archive_log_tables.pl

### remove old vicidial logs and asterisk logs more than 2 days old
28 0 * * * /usr/bin/find /var/log/astguiclient -maxdepth 1 -type f -mtime +2 -print | xargs rm -f
29 0 * * * /usr/bin/find /var/log/asterisk -maxdepth 3 -type f -mtime +2 -print | xargs rm -f
30 0 * * * /usr/bin/find / -maxdepth 1 -name "screenlog.0*" -mtime +4 -print | xargs rm -f

### cleanup of the scheduled callback records
25 0 * * * /usr/share/astguiclient/AST_DB_dead_cb_purge.pl --purge-non-cb -q

### GMT adjust script - uncomment to enable
#45 0 * * * /usr/share/astguiclient/ADMIN_adjust_GMTnow_on_leads.pl --list-settings

### Dialer Inventory Report
1 7 * * * /usr/share/astguiclient/AST_dialer_inventory_snapshot.pl -q --override-24hours

### inbound email parser
* * * * * /usr/share/astguiclient/AST_inbound_email_parser.pl
nano /etc/httpd/conf.d/record.conf

Alias /RECORDINGS/ "/var/spool/asterisk/monitorDONE/"

<Directory "/var/spool/asterisk/monitorDONE">
    Options Indexes MultiViews
    AllowOverride None
    Order allow,deny
    Allow from all
    Require all granted
        <files *.mp3>
            Forcetype application/forcedownload
        </files>
</Directory>
for synchronization problems:
yourserverip/vicidial/admin.php
go to Admin-> Servers-> update Asterisk Version: 13.29.2-vici
This article will go over how to scratch install Vicidial on AlmaLinux 8.6 -:- Special thanks to https://zestvoip.com/ and https://zenithbsolutions.com/ for testing this out. You can also use the Video tutorial at the bottom created by HBtutorials
IMPORTANT UPDATE: Alma changed one of the dependency packages and the normal install doesn’t work anymore, see the fix at the bottom.
cd /usr/src
wget http://download.vicidial.com/required-apps/asterisk-perl-0.08.tar.gz
tar xzf asterisk-perl-0.08.tar.gz
cd asterisk-perl-0.08
perl Makefile.PL
make all
make install

dnf --enablerepo=powertools install libsrtp-devel -y
yum install -y elfutils-libelf-devel libedit-devel

cd /usr/src
wget http://downloads.sourceforge.net/project/lame/lame/3.99/lame-3.99.5.tar.gz
tar -zxf lame-3.99.5.tar.gz
cd lame-3.99.5
./configure
make
make install

cd /usr/src/
wget https://digip.org/jansson/releases/jansson-2.13.tar.gz
tar xvzf jansson*
cd jansson-2.13
./configure
make clean
make
make install
ldconfig

UPDATE: 6/22/21 - Ty @Ankit for catching the wrong directory below

UPDATE: 8/2/23 - TY to Nik and Frank for fixing the install with the added lines I've put below for the dahdi install.

REBOOT!!

cd /usr/src/
wget https://downloads.asterisk.org/pub/telephony/dahdi-linux-complete/dahdi-linux-complete-current.tar.gz
tar xzf dahdi*
cd /usr/src/dahdi-linux-complete-3.2.0+3.2.0/
cd /usr/src
git clone -b next
git://git.asterisk.org/dahdi/linux


yum -y install kernel-devel-$(uname -r)

sudo sed -i 's|, 64);|);|g' /usr/src/dahdi-linux-complete-3.2.0+3.2.0/linux/drivers/dahdi/wctc4xxp/base.c

make
make install
make install-config

yum -y install dahdi-tools-libs

cd tools
make clean
make
make install
make install-config

cd /etc/dahdi
mv system.conf.sample system.conf


cd /usr/src/
wget http://downloads.asterisk.org/pub/telephony/libpri/libpri-1.6.0.tar.gz
tar xzf libpri-1.6.1.tar.gz
cd /usr/src/libpri-1.6.0
make clean
make
make install

nano  /etc/php.ini
error_reporting  =  E_ALL & ~E_NOTICE
memory_limit = 128M
short_open_tag = On
max_execution_time = 330
max_input_time = 360
post_max_size = 100M
upload_max_filesize = 42M
default_socket_timeout = 360
date.timezone = America/New_York

cd /usr/src/
wget http://download.vicidial.com/required-apps/asterisk-13.29.2-vici.tar.gz
tar xzf asterisk-13.29.2-vici.tar.gz
cd /usr/src/asterisk-13.29.2/
./configure --libdir=/usr/lib64 --with-pjproject-bundled -with-jansson-bundled
make clean
make menuselect    ; ####### select chan_meetme
make
make install
make samples
make config


mkdir /usr/src/astguiclient
cd /usr/src/astguiclient
svn checkout svn://svn.eflo.net:3690/agc_2-X/trunk


mysql
SET GLOBAL connect_timeout=60;
CREATE DATABASE `asterisk` DEFAULT CHARACTER SET utf8 COLLATE utf8_unicode_ci;
CREATE USER 'cron'@'localhost' IDENTIFIED BY '1234';
GRANT SELECT,INSERT,UPDATE,DELETE,LOCK TABLES on asterisk.* TO cron@'%' IDENTIFIED BY '1234';
CREATE USER 'custom'@'localhost' IDENTIFIED BY 'custom1234';
GRANT SELECT,INSERT,UPDATE,DELETE,LOCK TABLES on asterisk.* TO custom@'%' IDENTIFIED BY 'custom1234';
GRANT SELECT,INSERT,UPDATE,DELETE,LOCK TABLES on asterisk.* TO cron@localhost IDENTIFIED BY '1234';
GRANT SELECT,INSERT,UPDATE,DELETE,LOCK TABLES on asterisk.* TO custom@localhost IDENTIFIED BY 'custom1234';
GRANT RELOAD ON *.* TO cron@'%';
GRANT RELOAD ON *.* TO cron@localhost;
GRANT RELOAD ON *.* TO custom@'%';
GRANT RELOAD ON *.* TO custom@localhost;
flush privileges;
use asterisk;
\. /usr/src/astguiclient/trunk/extras/MySQL_AST_CREATE_tables.sql
\. /usr/src/astguiclient/trunk/extras/first_server_install.sql
ALTER TABLE phones ALTER template_id SET DEFAULT '';
quit

cd /usr/src/astguiclient/trunk

perl install.pl


*Within the install.pl script make sure you Copy Asterisk Settings=Yes + Server webroot path=/var/www/html
nano /etc/rc.d/rc.local

### paste this below:

#!/bin/sh
#
# This script will be executed *after* all the other init scripts.
# You can put your own initialization stuff in here if you don't
# want to do the full Sys V style init stuff.

touch /var/lock/subsys/local

# OPTIONAL enable ip_relay(for same-machine trunking and blind monitoring)
/usr/share/astguiclient/ip_relay/relay_control start 2>/dev/null 1>&2

# Disable console blanking and powersaving
/usr/bin/setterm -blank
/usr/bin/setterm -powersave off
/usr/bin/setterm -powerdown

### start up the MySQL server
systemctl restart mariadb.service

### start up the apache web server
systemctl restart apache2

### roll the Asterisk logs upon reboot
/usr/share/astguiclient/ADMIN_restart_roll_logs.pl

### clear the server-related records from the database
/usr/share/astguiclient/AST_reset_mysql_vars.pl

### load dahdi drivers
modprobe dahdi
/usr/sbin/dahdi_cfg -vvvvvvvvvvvvv

### sleep for 20 seconds before launching Asterisk
sleep 20

### start up asterisk
/usr/share/astguiclient/start_asterisk_boot.pl
type "crontab -e"

### paste below:

### recording mixing/compressing/ftping scripts
#0,3,6,9,12,15,18,21,24,27,30,33,36,39,42,45,48,51,54,57 * * * * /usr/share/astguiclient/AST_CRON_audio_1_move_mix.pl
0,3,6,9,12,15,18,21,24,27,30,33,36,39,42,45,48,51,54,57 * * * * /usr/share/astguiclient/AST_CRON_audio_1_move_mix.pl --MIX
0,3,6,9,12,15,18,21,24,27,30,33,36,39,42,45,48,51,54,57 * * * * /usr/share/astguiclient/AST_CRON_audio_1_move_VDonly.pl
1,4,7,10,13,16,19,22,25,28,31,34,37,40,43,46,49,52,55,58 * * * * /usr/share/astguiclient/AST_CRON_audio_2_compress.pl --GSM
#2,5,8,11,14,17,20,23,26,29,32,35,38,41,44,47,50,53,56,59 * * * * /usr/share/astguiclient/AST_CRON_audio_3_ftp.pl --GSM

### keepalive script for astguiclient processes
* * * * * /usr/share/astguiclient/ADMIN_keepalive_ALL.pl --cu3way

### kill Hangup script for Asterisk updaters
* * * * * /usr/share/astguiclient/AST_manager_kill_hung_congested.pl

### updater for voicemail
* * * * * /usr/share/astguiclient/AST_vm_update.pl

### updater for conference validator
* * * * * /usr/share/astguiclient/AST_conf_update.pl

### flush queue DB table every hour for entries older than 1 hour
11 * * * * /usr/share/astguiclient/AST_flush_DBqueue.pl -q

### fix the vicidial_agent_log once every hour and the full day run at night
33 * * * * /usr/share/astguiclient/AST_cleanup_agent_log.pl
50 0 * * * /usr/share/astguiclient/AST_cleanup_agent_log.pl --last-24hours
## uncomment below if using QueueMetrics
#*/5 * * * * /usr/share/astguiclient/AST_cleanup_agent_log.pl --only-qm-live-call-check

## uncomment below if using Vtiger
#1 1 * * * /usr/share/astguiclient/Vtiger_optimize_all_tables.pl --quiet

### updater for VICIDIAL hopper
* * * * * /usr/share/astguiclient/AST_VDhopper.pl -q

### adjust the GMT offset for the leads in the vicidial_list table
1 1,7 * * * /usr/share/astguiclient/ADMIN_adjust_GMTnow_on_leads.pl --debug

### reset several temporary-info tables in the database
2 1 * * * /usr/share/astguiclient/AST_reset_mysql_vars.pl

### optimize the database tables within the asterisk database
3 1 * * * /usr/share/astguiclient/AST_DB_optimize.pl

## adjust time on the server with ntp
30 * * * * /usr/sbin/ntpdate -u pool.ntp.org 2>/dev/null 1>&2

### VICIDIAL agent time log weekly and daily summary report generation
2 0 * * 0 /usr/share/astguiclient/AST_agent_week.pl
22 0 * * * /usr/share/astguiclient/AST_agent_day.pl

### VICIDIAL campaign export scripts (OPTIONAL)
#32 0 * * * /usr/share/astguiclient/AST_VDsales_export.pl
#42 0 * * * /usr/share/astguiclient/AST_sourceID_summary_export.pl

### remove old recordings more than 7 days old
#24 0 * * * /usr/bin/find /var/spool/asterisk/monitorDONE -maxdepth 2 -type f -mtime +7 -print | xargs rm -f

### roll logs monthly on high-volume dialing systems
#30 1 1 * * /usr/share/astguiclient/ADMIN_archive_log_tables.pl

### remove old vicidial logs and asterisk logs more than 2 days old
28 0 * * * /usr/bin/find /var/log/astguiclient -maxdepth 1 -type f -mtime +2 -print | xargs rm -f
29 0 * * * /usr/bin/find /var/log/asterisk -maxdepth 3 -type f -mtime +2 -print | xargs rm -f
30 0 * * * /usr/bin/find / -maxdepth 1 -name "screenlog.0*" -mtime +4 -print | xargs rm -f

### cleanup of the scheduled callback records
25 0 * * * /usr/share/astguiclient/AST_DB_dead_cb_purge.pl --purge-non-cb -q

### GMT adjust script - uncomment to enable
#45 0 * * * /usr/share/astguiclient/ADMIN_adjust_GMTnow_on_leads.pl --list-settings

### Dialer Inventory Report
1 7 * * * /usr/share/astguiclient/AST_dialer_inventory_snapshot.pl -q --override-24hours

### inbound email parser
* * * * * /usr/share/astguiclient/AST_inbound_email_parser.pl
systemctl enable httpd
##Install Sounds

cd /usr/src
wget http://downloads.digium.com/pub/telephony/sounds/asterisk-core-sounds-en-ulaw-current.tar.gz
wget http://downloads.digium.com/pub/telephony/sounds/asterisk-core-sounds-en-wav-current.tar.gz
wget http://downloads.digium.com/pub/telephony/sounds/asterisk-core-sounds-en-gsm-current.tar.gz
wget http://downloads.digium.com/pub/telephony/sounds/asterisk-extra-sounds-en-ulaw-current.tar.gz
wget http://downloads.digium.com/pub/telephony/sounds/asterisk-extra-sounds-en-wav-current.tar.gz
wget http://downloads.digium.com/pub/telephony/sounds/asterisk-extra-sounds-en-gsm-current.tar.gz
wget http://downloads.asterisk.org/pub/telephony/sounds/asterisk-moh-opsound-gsm-current.tar.gz
wget http://downloads.asterisk.org/pub/telephony/sounds/asterisk-moh-opsound-ulaw-current.tar.gz
wget http://downloads.asterisk.org/pub/telephony/sounds/asterisk-moh-opsound-wav-current.tar.gz
#Place the audio files in their proper places:
cd /var/lib/asterisk/sounds
tar -zxf /usr/src/asterisk-core-sounds-en-gsm-current.tar.gz
tar -zxf /usr/src/asterisk-core-sounds-en-ulaw-current.tar.gz
tar -zxf /usr/src/asterisk-core-sounds-en-wav-current.tar.gz
tar -zxf /usr/src/asterisk-extra-sounds-en-gsm-current.tar.gz
tar -zxf /usr/src/asterisk-extra-sounds-en-ulaw-current.tar.gz
tar -zxf /usr/src/asterisk-extra-sounds-en-wav-current.tar.gz
mkdir /var/lib/asterisk/mohmp3
mkdir /var/lib/asterisk/quiet-mp3
ln -s /var/lib/asterisk/mohmp3 /var/lib/asterisk/default
cd /var/lib/asterisk/mohmp3
tar -zxf /usr/src/asterisk-moh-opsound-gsm-current.tar.gz
tar -zxf /usr/src/asterisk-moh-opsound-ulaw-current.tar.gz
tar -zxf /usr/src/asterisk-moh-opsound-wav-current.tar.gz
rm -f CHANGES*
rm -f LICENSE*
rm -f CREDITS*
cd /var/lib/asterisk/moh
rm -f CHANGES*
rm -f LICENSE*
rm -f CREDITS*
cd /var/lib/asterisk/sounds
rm -f CHANGES*
rm -f LICENSE*
rm -f CREDITS*
cd /var/lib/asterisk/quiet-mp3
sox ../mohmp3/macroform-cold_day.wav macroform-cold_day.wav vol 0.25
sox ../mohmp3/macroform-cold_day.gsm macroform-cold_day.gsm vol 0.25
sox -t ul -r 8000 -c 1 ../mohmp3/macroform-cold_day.ulaw -t ul macroform-cold_day.ulaw vol 0.25
sox ../mohmp3/macroform-robot_dity.wav macroform-robot_dity.wav vol 0.25
sox ../mohmp3/macroform-robot_dity.gsm macroform-robot_dity.gsm vol 0.25
sox -t ul -r 8000 -c 1 ../mohmp3/macroform-robot_dity.ulaw -t ul macroform-robot_dity.ulaw vol 0.25
sox ../mohmp3/macroform-the_simplicity.wav macroform-the_simplicity.wav vol 0.25
sox ../mohmp3/macroform-the_simplicity.gsm macroform-the_simplicity.gsm vol 0.25
sox -t ul -r 8000 -c 1 ../mohmp3/macroform-the_simplicity.ulaw -t ul macroform-the_simplicity.ulaw vol 0.25
sox ../mohmp3/reno_project-system.wav reno_project-system.wav vol 0.25
sox ../mohmp3/reno_project-system.gsm reno_project-system.gsm vol 0.25
sox -t ul -r 8000 -c 1 ../mohmp3/reno_project-system.ulaw -t ul reno_project-system.ulaw vol 0.25
sox ../mohmp3/manolo_camp-morning_coffee.wav manolo_camp-morning_coffee.wav vol 0.25
sox ../mohmp3/manolo_camp-morning_coffee.gsm manolo_camp-morning_coffee.gsm vol 0.25
sox -t ul -r 8000 -c 1 ../mohmp3/manolo_camp-morning_coffee.ulaw -t ul manolo_camp-morning_coffee.ulaw vol 0.25
nano /etc/httpd/conf.d/record.conf

Alias /RECORDINGS/ "/var/spool/asterisk/monitorDONE/"

<Directory "/var/spool/asterisk/monitorDONE">
    Options Indexes MultiViews
    AllowOverride None
    Order allow,deny
    Allow from all
    Require all granted
        <files *.mp3>
            Forcetype application/forcedownload
        </files>
</Directory>
This article will go over how to complete a vTiger integration into Vicidial, I have done it and its working on version 7.3. I would like to go a little deeper on this than the original coder wrote up but I will do that over time with pictures and such. I did NOT write this up, this was all done by mstopkey from the vicidial forums.
Features Working: 1. Inbound dialer call screen pop existing Lead/Contact/Prospect/Organization in Vtiger. If “Entity” does not exist in Vtiger it will insert new Lead. 2. Inbound dialer call logging in Vtiger. 3. Outbound dialer call functions the same as feature # 1. 4. Outbound dialer call logging in Vtiger. 5. Agent login to Vicidial also launches Vtiger and logs in. 6. Vtiger mobile App sync. 7. Vtiger mobile App click to call from cell phone and logging call in Vtiger.
Features not working: 1. Sync Vicidial users to Vtiger. (Currently, manually setup same username/password in Vtiger and Vicidial. Set Vicidial phone extension in Vtiger user) 2. Click to dial from Vtiger through Vicidial.
Future features: 1. Ability for one instance Vicidial to integrate with mutliple Vtiger instances at dialer Inbound Group and Campaign 2. Call recordings from Vicidial available in Vtiger
Vtiger Integration & Configuration:
1. Install Vtiger Open Source 7.3. Follow the on-screen instructions. (If need click to dial from Vtiger, install on same web server as Vicidial web server) “Feature not working yet” 2. COPY file /vtigercrm/includes/http/Request.php to /vtigercrm/includes/http/Request.php.ORIGINAL, this way you have a backup file to restore incase of any problems editing Request.php 3. Edit file /vtigercrm/includes/http/Request.php . On line 213 comment out “throw new Exception(‘illegal request’);” by placing //in front of it. If you don’t, the login request from Vicidial will fail. 4. Create Vtiger users with same usernames and passwords as in Vicidial. Also enter Vicidial phone extension in user field “CRM Phone extension”.
Vicidial Configuration: 1. Update/Upgrade to the Vicidial version and build listed above. BACK IT UP FIRST! 2. Make sure SVN trunk is up to date. 3. On your vicidial web server, COPY file /srv/www/htdocs/vicidial/vtiger_search.php to /srv/www/htdocs/vicidial/vtiger_search.php.ORIGINAL 4. Edit file /srv/www/htdocs/vicidial/vtiger_search.php (NOTE: Leads are no longer in Sales, they are in Marketing. And, Vtiger no longer uses ‘tabs’, it uses ‘app’ for Module lookups) (a) Comment out line 339 with # in front of it. $account_URL = “$vtiger_url/index.php?module=Calendar&action=EditView&return_module=Accounts&return_action=DetailView&record=$activityid&activity_mode=Events&return_id=$vendor_id&parenttab=SALES”; (b) On line 340, comment out } with # in front of it. (c) On line 344 change from $account_URL = “$vtiger_url/index.php?module=Accounts&action=DetailView&record=$vendor_id&parenttab=Sales”; TO $account_URL = “$vtiger_url/index.php?module=Accounts&view=Detail&record=$vendor_id&app=SALES”; (d) Comment out lines 523 through 526 with # in front of them. (FIRST ACTION OF ELSE WILL NOT WORK. ONLY NEED THE ACTION AFTER ELSE. THIS WILL BE REFINED IN FUTURE) (e) On line 528 change from $account_URL = “$vtiger_url/index.php?module=Accounts&action=DetailView&record=$accountid&parenttab=Sales”; TO $account_URL = “$vtiger_url/index.php?module=Accounts&view=Detail&record=$accountid&app=SALES”; (f) On line 577 change from $account_URL = “$vtiger_url/index.php?module=Vendors&action=DetailView&record=$vendorid&parenttab=Inventory”; TO $account_URL = “$vtiger_url/index.php?module=Vendors&view=Detail&record=$vendorid&app=INVENTORY”; (g) Comment out lines 735 through 738 with # in front of them. (FIRST ACTION OF ELSE WILL NOT WORK. ONLY NEED THE ACTION AFTER ELSE. THIS WILL BE REFINED IN FUTURE) (h) On line 740 change from $account_URL = “$vtiger_url/index.php?module=Leads&action=EditView&record=$leadid&parenttab=Sales”; TO $account_URL = “$vtiger_url/index.php?module=Leads&view=Detail&record=$leadid&app=MARKETING”; (YES, THIS IS CURRENTLY REDUNDANT LEADS LOOKUP AS LEADS ARE ONLY IN SALES MODULE. WILL FIX IN FUTURE. MAY CUT THIS ONE OUT) (i) Comment out lines 843 through 846 with # in front of them. (FIRST ACTION OF ELSE WILL NOT WORK. ONLY NEED THE ACTION AFTER ELSE. THIS WILL BE REFINED IN FUTURE) (j) On line 848 change from $account_URL = “$vtiger_url/index.php?module=Leads&action=DetailView&record=$leadid&parenttab=Sales”; TO $account_URL = “$vtiger_url/index.php?module=Leads&view=Detail&record=$leadid&app=MARKETING”; 5. Go to Vicidial Admin/System Settings (a) Set Enable Vtiger Integration: to 1. (Do NOT click on “Click here to Synchronize users with Vtiger”) (b) In field Vtiger DB Server IP: enter your Vtiger Database server IP address. (c) In field Vtiger DB Nmae: enter the name of your Vtiger database. (d) In field Vtiger DB Login: enter the Vtiger database username. (e) In field Vtiger DB Password: enter the password for Vtiger DB user. (f) In field Vtiger URL: enter the URL of your Vtiger instance. Example, http://mycrm.com 6. Go to detail view of your campaign. (NOTE 1: These settings are how we are using it. Upon agent login to Vicidial, Vtiger opens in new window and agent is automatically logged in.) (NOTE 2: Do NOT try to run the old vicidial-vtiger patch files.) (NOTE 3: Do NOT try to synchronize Vicidial users with Vtiger. We are setting up same usernames and passwords in both systems.) (a) In field Web Form: enter the URL of your Vicidial web server/vtiger_search.php. Example, http://192.168.1.1/vicidial/vtiger_search.php (b) In field Web Form Target: enter vdcwebform (c) In field Get Call Launch: Select WEBFORM (d) Leave field CRM Popup Login: = N (e) Leave field CRM Popup Address: empty 7. Go to Inbound/Show DIDs. (a) Setup a DID and point it to an Inbound Group that is allowed in your campaign. 8. Edit the Inbound Group you pointed your DID to. (a) In the inbound group, set field Web Form: to URL of your Vicidial web server/vtiger_search.php. Example, http://192.168.1.1/vicidial/vtiger_search.php (b) Set field Get Call Launch: to WEBFORM 9. Edit file /srv/www/htdocs/agc/vicidial.php (BACK IT UP) When done editing, back up this file to off-server location as any SVN updates to it you will lose your modifications. (a) On line 17803 change: document.getElementById(“ScriptContents”).innerHTML = “<iframe src=\”” + VtigeRurl + “/index.php?module=Users&action=Authenticate&return_module=Users&return_action=Login&user_name=” + user + “&user_password=” + orig_pass + “&login_theme=softed&login_language=en_us\” style=\”background-color:transparent;z-index:17;\” scrolling=\”auto\” frameborder=\”0\” allowtransparency=\”true\” id=\”popupFrame\” name=\”popupFrame\” width=\”” + script_width + “px\” height=\”” + script_height + “px\”> </iframe> “; TO document.getElementById(“ScriptContents”).innerHTML = “<iframe src=\”” + VtigeRurl + “/index.php?module=Users&action=Login&return_module=Users&return_action=Login&username=” + user + “&password=” + orig_pass + “&login_theme=softed&login_language=en_us\” style=\”background-color:transparent;z-index:17;\” scrolling=\”auto\” frameborder=\”0\” allowtransparency=\”true\” id=\”popupFrame\” name=\”popupFrame\” width=\”” + script_width + “px\” height=\”” + script_height + “px\”> </iframe> “; (b) On line 17807 change: var VtigeRall = VtigeRurl + “/index.php?module=Users&action=Authenticate&return_module=Users&return_action=Login&user_name=” + user + “&user_password=” + orig_pass + “&login_theme=softed&login_language=en_us”; TO var VtigeRall = VtigeRurl + “/index.php?module=Users&action=Login&return_module=Users&return_action=Login&username=” + user + “&password=” + orig_pass + “&login_theme=softed&login_language=en_us”;
I know this is a little complicated so if you have any problems, just join our live support channel on skype: https://join.skype.com/ujkQ7i5lV78O
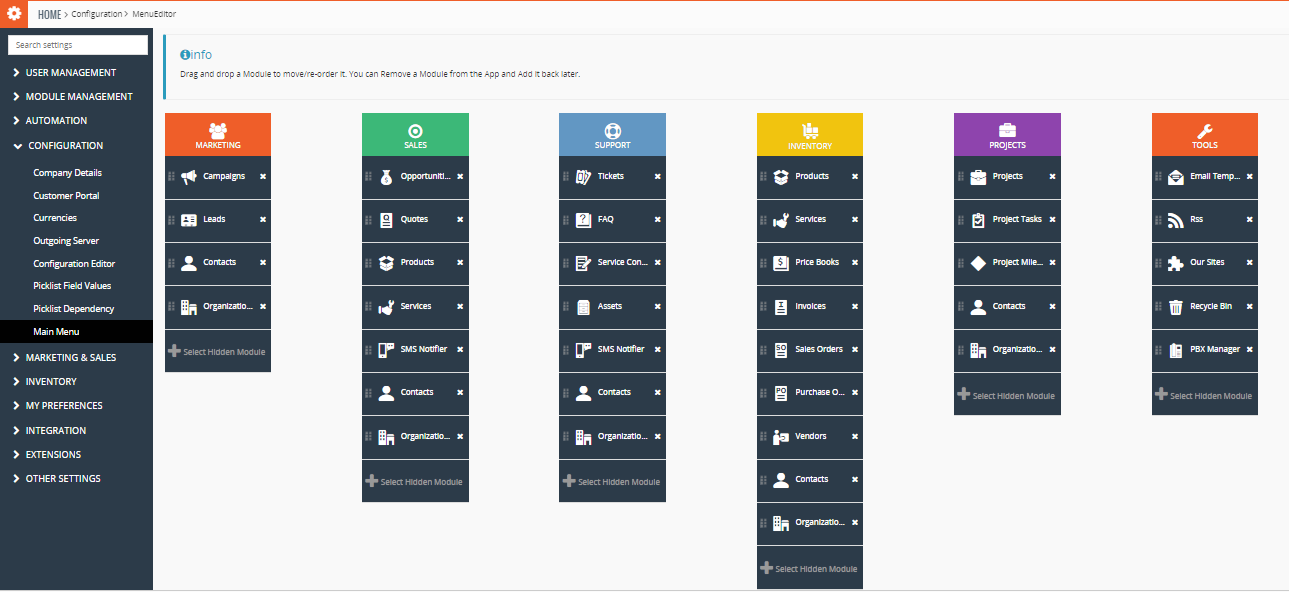
How to – Create a call menu/IVR in ViciDial that you can dial an agents extension on
In this article, I will go over the steps you need to take to create an IVR(call menu) where people can call in and dial the agents extension number and reach them or get forwarded to their voicemail. This is going to assume you know how to create and upload the audio files needed for the recording for the Call menu / IVR and that you have a DID pointed to the Call Menu once its created.
Step 1 – Create the call menu
Click on Inbound and then add a new call menu
Create new Call Menu (IVR)
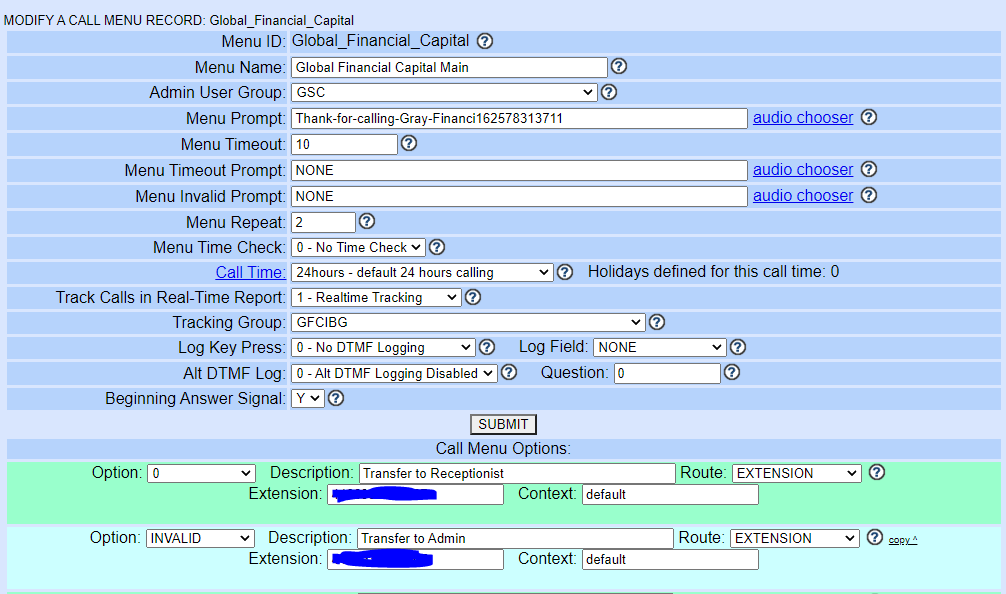
Step 2 – Fill out the call menu with the options you need
At the bare minimum you need the “Menu Prompt” where you select the audio file you want to be played to callers, the “Menu Timeout”, and the various options in the drop down menus.
Call Menu / IVR
Step 3 – Add the custom Dialplan
Here is the code you need to add to the custom dialplan box: (assuming the agent extensions are 4 digits, alter it accordingly)
Step 4 – Change AGENTDIRECT ingroup to work with sending to voicemail if there’s no agents logged in
This step will send calls to the agents voicemail if there is no one logged into the system. Change the No Agents No Queue options to match your needs or as I have it below but the most important thing to change is the Voicemail box settings to “AGENTVMAIL” for this Call Menu / IVR to go to the agents voicemail box that they press during the call menu.
AGENTDIRECT Changes
That’s it for this article, if you have any questions feel free to reach out to us in our group chat which has grown rather large from members of the ViciDial forum: https://join.skype.com/ujkQ7i5lV78O
So there is a major problem with Vicibox10 where the VB-firewall when used, will totally lock you out the system and I finally figured out how to fix the problem. Its rather simple actually and I hope this helps all of you out there that have been wanting to try Asterisk 16 on Vicibox10.
Step 1 – Edit the VB-firewall file
We need to edit the VB-firewall file at /usr/bin/VB-firewall
nano /usr/bin/VB-firewall
scroll down until you see $IPBLACK=’blacknets’; # IPSet blacklist IP and change it to $IPBLACK=’dynamiclist’; # IPSet blacklist IP
Change to $IPBLACK=’dynamiclist’;
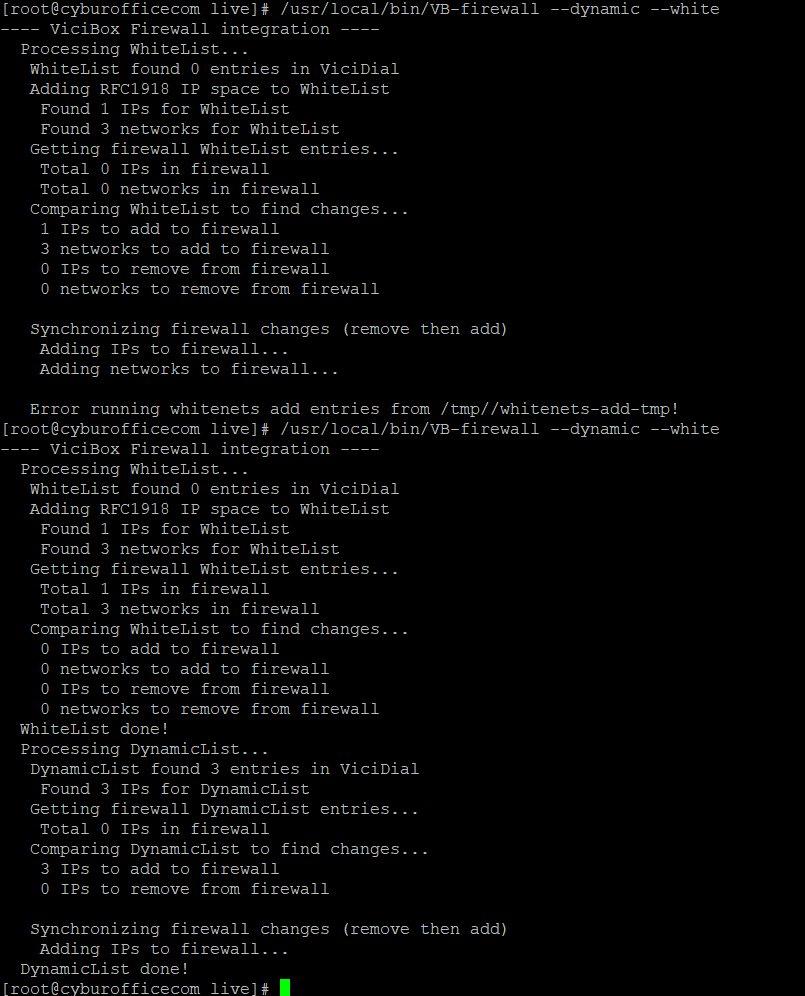
Step 2 – Run the Vb-firewall with the whitelist and dynamic list
/usr/bin/VB-firewall –dynamic –white
The first time you run this command you may get an error, make sure to run it again as you see below:
Fixing VB-firewall on Vicibox10
Step 3 – Change the crontab entry to dynamic list and whitelist
### ViciBox integrated firewall, by default just load the VoIP Black list and reload it every 4 hours
### You can lock everyone out of your server if you set this wrong, so understand what you are doing!!!
@reboot /usr/bin/VB-firewall --dynamic --whitelist=ViciWhite
* * * * * /usr/bin/VB-firewall --dynamic --whitelist-ViciWhite
That’s all there is to it. Fell free to join our live chat support on Skype if you have any questions or comments: https://join.skype.com/ujkQ7i5lV78O